
With Mother’s Day right around the corner, I decided to show you a really simple, yet fabulous home decor project I created using Stampin’ Up! products. I wanted elegant, but bold stamps, so I chose the following sets for my project today: Summer Silhouettes, Fabulous Florets (retiring stamp set), Serene Silhouettes, Blooming with Kindness, and for my background En Francais (retiring stamp).

These coasters are so easy to make, and they are the perfect gift! I made a set for mother’s day, and I also made a set for my son’s daycare provider for teacher appreciation week. Not only are these coasters beautiful, but they are also extremely affordable (i.e. “dirt cheap”)! I would love to hear what you think of my project today. Please leave me a comment. Also, if you like my work, why not have my posts delivered to your inbox automatically? Just click on the “follow” button in the sidebar to subscribe now.
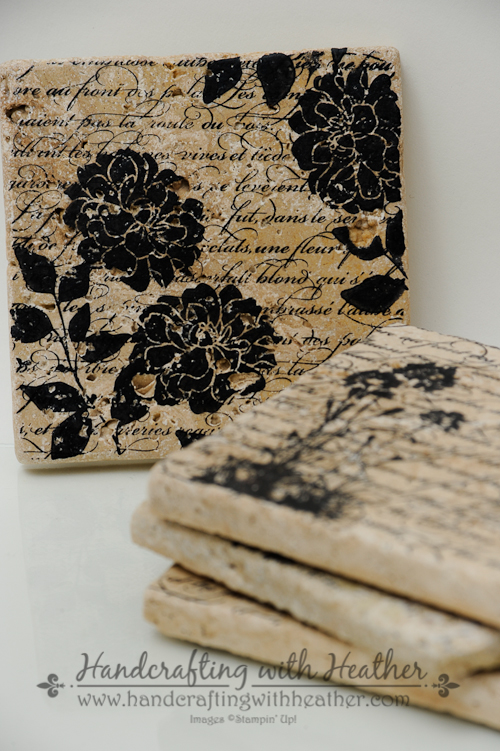
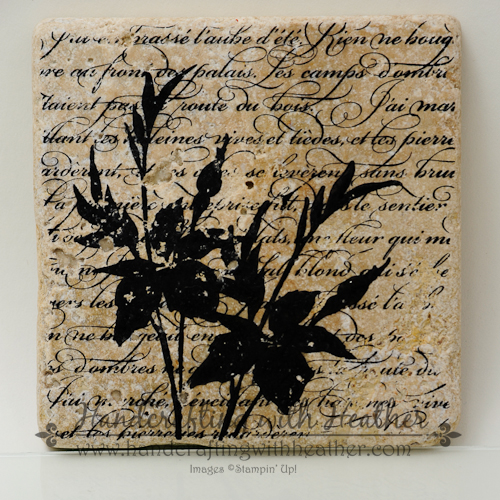
I used Stazon Black Ink for my project today because it is permanent. I began by stamping each coaster with the En Francais background stamp. (This stamp is retiring, but as of the time I am writing this, it is still available in clear mount.) Then I stamped the four different coaster designs using a combination of stamp sets. I found that stamps with a lot of solid surface area worked well for this project. I just love the black silhouettes against the scripted font of the background.
Coaster #1: Serene Silhouettes

Coaster #2: Blooming with Kindness & Summer Silhouettes
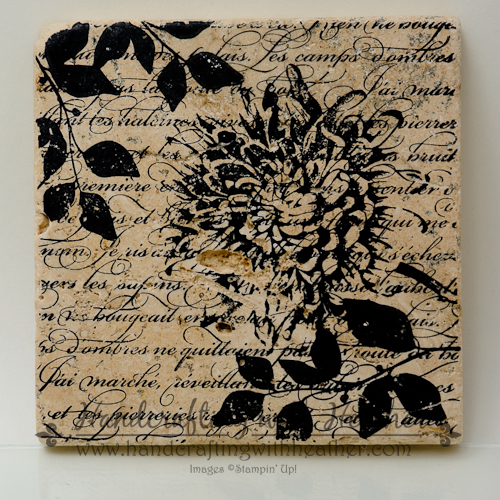
Coaster #3: Fabulous Florets
Coaster #4: Fabulous Florets & Summer Silhouettes

Once the coasters were stamped, I put them on a cookie sheet in a cold oven and brought the temperature up to 375 degrees. Then I baked them for 30 minutes and let them cool in the oven. Once everything was completely cooled, I used Minwax Paste Finishing Wax to seal in my designs. Finally, I added felt pads to the corners on the bottom of the coaster to protect the table from scratching.

My mom is just finishing up a big renovation at her house and she is sprucing everything up. I know she is going to love these coasters! If you love them too, you should pin them to Pinterest! At the bottom of this post you will find a complete list of supplies used in this project. Just below the supply list is a “pin it” button.

If you need any stamping supplies, including any of the fabulous stamp sets used in this project, I would love to help you out. Click here to shop online now! If you find inspiration from my blog, one way you can show your support is by selecting me as your personal Stampin’ Up! Demonstrator. Feel free to email me if you have any questions. I’m here to help!
Happy Stamping!
Heather
Weekly Deals from Stampin’ Up! – May 6-12

Click here to see the Weekly Deals from Stampin’ Up! in my online store. The Weekly Deals are only while supplies last and only available at these great prices through May 12.
Retiring Stampin’ Up! Products – Available while supplies last until June 4, 2014
Many of the retiring products from Stampin’ Up! have already sold out! Be sure to check out the links below to check to see which items are still available. Stampin’ Up! is updating these lists daily to tell us which items are gone. The last column has a little “x” next to the products that are no longer available. If you want any of the products on the retiring list, be sure to order soon, so you don’t miss out!
- Retiring Stamps (Available April 21-June 4, 2014, or while supplies last)
- Retiring Accessories (Available April 21-June 4, 2014, or while supplies last)
If you need any stamping supplies, I’d be very happy to be your Demonstrator. Just click on Order Stampin’ Up! Online Now in the main menu or in the sidebar to go directly to my online store or drop me an email if you have any questions.
Stampin’ Up! items used to create today’s project:
If you would like to order any of the products featured in today’s project, click the images below to order from my online store.


Other Products Used in Today’s Project:
click the images to be directed to the product information on the Home Depot website.


Those are fabulous Heather! Can’t wait to give that a try. 🙂
LikeLike
The stamps you used really work well together. I love the big and bold look. Well done.
LikeLike
You did a wonderful job, Heather. I love the stamp sets you chose. I have tried stamping on the tumbled tiles before with very poor results. I will have to give it another try. Thank you.
LikeLike
Those are truly awesome!! I want to try them. Thanks for sharing a wonderful idea!
LikeLike
LOVE, LOVE, LOVE this project. I can see trying this very soon. I just placed my stampin up order, wish I had ordered the background stamp to make these. I think that stamp set is what really made these pop. GREAT JOB
LikeLike
Heather these are just beautiful!! Great choice of stamps. Thanks for sharing!
LikeLike
I just love these…ran right out to get the supplies to make them! My project for when the kiddos go to bed. Thanks for sharing!
LikeLike
Kris, that makes me happy! I would love to see what you create! Take some pictures and send them to me!
LikeLike
These are adorable. Question – What kind of tiles are they (non-porous etc) if I want to get them from some other store? We don’t have a home depot near us. Also, mod podge ( I have heard) is a great sealant for projects like this. Thanks for sharing your project.
LikeLike
I don’t really know about what type of tile they are. I just went to Home Depot and chose one that was the right size for what I wanted. If you look at the bottom of the post, you can click on the image of the tiles and it will take you to the link for them on the Home Depot website. You should be able to get all the details there, or even order them online!
LikeLike
They turned out beautiful. I made a several different designs a few years ago around the holidays and boy they were a big hit for everyone. Good Job! Keep them coming.
LikeLike
i absolutely love this idea……christmas gifts here i come! thank you
LikeLike
Heather, Have been looking at your lovely creations since AmyK introduced you… you create lovely art! These coasters are fabulous and can be used as gifts for so many occasions. Do you think they could be made as trivets using larger tiles? Just wondering about withstanding hot dishes. I will be stopping by Home Depot this evening on my way home from work so I can get started on a couple of coaster sets. Thanks for sharing.
LikeLike
You could absolutely use this technique on a larger tile for trivets! I baked the tiles in the oven to set the ink and there wasn’t any issue with them being able to withstand the heat. I’ve heard of people using leftover tiles from kitchen remodels for trivets, and this would be the same.
LikeLike
Just found this on line. I love the idea and am excited to try this. Does the Minwax help preserve the art work or is it just for adding some shine?
LikeLike
I think it protects the artwork. The tiles get darker in color, but they don’t have any real shine.
LikeLike
Just found your site today. I love the artwork on the tiles, and the instructions. Thanks for sharing
LikeLike
I absolutely love everything about these coasters, I’ve been looking for a home decor project to do in a one day retreat I’m running in autumn and think coasters like these would be perfect.
LikeLike
I love the idea but when I tried a did a couple using the Timber Brown Stazon and when they came out of the oven they were purple. the ones I tried using the Black Stazon worked out nicely. The tiles are a bit hard to find here, our home Depot doesn’t carry them.. Love the finished product though when the colour stayed true.
LikeLike