
Today’s card features the See Ya Later stamp set from Stampin’ Up! (Sale-a-bration item). This week’s color scheme was inspired by the Florida Gators. My boss’ birthday was this week and practically every stamp set I own is floral or something else “girly.” My self imposed “card challenge” was to create a card that my boss would love, so I pulled my inspiration from his favorite college team. I just got home from team trivia with some people from work, where we presented him with his card. His first comment was, “Thanks guys, I love the color scheme you’ve got going on there!” Exactly what I was going for! I think this card turned out great, and I love that the color scheme could be adjusted for any sports team. I will definitely keep that one in mind in the future.
I would love to hear what you think of today’s card and to hear your ideas for masculine cards too. I can use all the help I can get in that arena. Also, as an added benefit, on March 31st I will do a drawing and one lucky person who left me a comment will receive a handcrafted card in the mail! If you enjoy reading my posts, why not have them delivered to your inbox automatically? Just click on the “follow” button in the sidebar. I love seeing my blog audience grow. It makes me very excited. (I know, I’m a total craft nerd, but what can I say? LOL.)

I began my card with a Pacific Point card base. Then I added a panels of Tangerine Tango card stock and Garden Green Designer Series Paper using SNAIL adhesive.
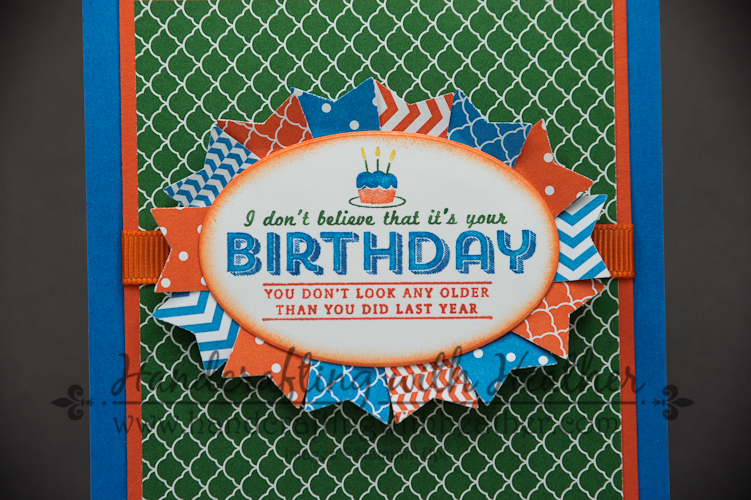
Next, I colored the birthday stamp from the See Ya Later stamp set using Stampin’ Write Markers in Tangerine Tango, Garden Green, Pacific Point, and Daffodil Delight (Brights Collection and Regals Collection Markers). I stamped my image onto Whisper White card stock and cut it out using the Ovals Collection Framelits Die (2nd one counting from the inside out). I used a sponge dauber and my Tangerine Tango Classic Stampin’ Pad to add some color to the edges of my sentiment, then I used my Banner Punch (Sale-a-bration item) to punch a variety of banners in Pacific Point and Tangerine Tango Designer Series Paper (Brights Collection Designer Series Paper Stack). I adhered my banners to the back of my birthday greeting using mini glue dots. Then I used Stampin’ Dimensionals to add the whole thing to the front of my card. I felt the card needed a finishing detail, so I added three brads from the Vintage Trinkets Accents & Elements set to the bottom right corner of the panels.
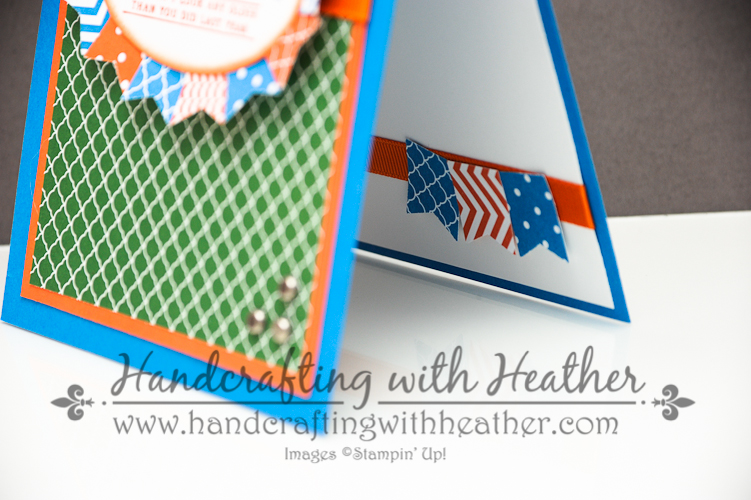
To finish off the inside of my card, I wrapped some orange grosgrain ribbon around a panel of whisper white card stock. I added three banners at the bottom to mirror the design on the front.
I loved seeing the reaction of my boss when he opened his card. It was very gratifying to know that my card hit its mark. If you liked my post today, please pin it to Pinterest for me. I need your help to get the word out, so that people will come read my blog! If you scroll to the bottom of the post, you will find a “pin it” button just below my supply list for the project… and, don’t forget to leave me a comment for your chance to win a handcrafted card!
Remember you can get the See Ya Later stamp set or the Banner Punch for FREE with a $50 purchase until March 31st. Both of these items are great ones to have in your stamping tool kit. You can shop in my online store by clicking here.
You can find a complete list of supplies used for this project at the very bottom of this post.
____________________________________________________________
Weekly Deals from Stampin’ Up! March 11 – 17
Here are the new Weekly Deals from Stampin’ Up!:Click here to see the Weekly Deals from Stampin’ Up! in my online store. The Weekly Deals are only while supplies last and only available at these great prices through February 17.

Click here to see the Weekly Deals from Stampin’ Up! in my online store. The Weekly Deals are only while supplies last and only available at these great prices through March 17.
________________________________________________________________________________________
If you need any stamping supplies, I’d be very happy to be your Demonstrator. Just click on Order Stampin’ Up! Online Now in the main menu or in the sidebar to go directly to my online store or drop me an email if you have any questions.
Happy Stamping!
Heather
- It’s Sale-a-bration time!! You’ll get a free item from Stampin’ Up! for every $50 that you purchase between now and March 31! Click on my Stampin’ Up! Promotions page for more information!
- Visit my online store here.
- Shop the Clearance Rack here.
____________________________________________________________
Stampin’ Up! items used to create this project:
Stamp Sets: See Ya Later (Sale-a-bration item)
Dies, Punches, & Embossing Folders: Ovals Collection Framelits (129381); Banner Punch (Sale-a-bration item)
Card Stock & DSP: Pacific Point (111350) – 4-1/4″ x 11″ card base; Tangerine Tango (111349) – 3-3/4″ x 5″ panel; Garden Green DSP (130139) – 3-1/2″ x 4-3/4″ panel; Whisper White (100730) – one oval framelits die cut, 4″ x 5-1/4″ panel (inside of card); Brights Designer Series Paper in Pacific Point & Tangerine Tango (130134) – 17 banners total
Markers & Ink: Tangerine Tango Classic Stampin’ Pad (126946); Brights Collection Stampin’ Write Markers (131259) – Pacific Point, Tangerine Tango, Daffodil Delight; Regals Collection Stampin’ Write Markers (131262) – Garden Green.
Embellishments: Vintage Trinkets Accents and Elements (118764) – 3 brads
Tools: Big Shot (113439); Sponge Dauber (102892)
Adhesive: SNAIL (104332); Stampin’ Dimensionals (104430); Mini Glue Dots (103683)
Non-Stampin’ Up: Orange grosgrain ribbon

