Hey, Valentine You’re a Treasure! – Stampin’ Up!

The first time I flipped through the Stampin’ Up! 2015 Occasions catalog, I was with my son.  As soon as I got to the page with the Hey, Valentine stamp set on it, he said, “I want the pirate one!”  I knew then that I would use that stamp for my sweet little Valentine boy!

Hey, Valentine Pirate (1 of 4)

The design of this card was CASED from Angie Britt.  I just loved how she colored the image and combined it with the DSP from the Stacked with Love Paper Stack.  The Blendabilities markers worked perfectly for this little guy!  Did you know that you can earn FREE Stampin’ Blendabilities with every $50 purchase during Sale-A-Bration through March 31, 2015.  You can choose from 12 different color options!

Hey, Valentine Pirate (3 of 4)

Although I stayed pretty faithful to the original card design, I did add a few little extra details to make it my own.  I wanted to add a little extra pizzaz, so I mounted my image on Red Glimmer Paper, and a pirate’s booty wouldn’t be complete without diamonds… the perfect opportunity for some rhinestones, I’d say!

Hey, Valentine Pirate (4 of 4)

Finally, I added some Real Red 1/4″ Cotton Ribbon to the front and a few little hearts and a strip of DSP to the inside to finish it off.

Hey, Valentine Pirate (2 of 4)

I know Carter is going to love getting this card on Valentine’s day…. now, I just have to decide what I’m going to give him to go with it!  If you are a fan of this project, I hope you will pin it to Pinterest for me.  You will find a “pin it” button at the very bottom of this post following the supply list.

I hope you will consider selecting me as your demonstrator for your stamping needs.  If you need any supplies you can shop now in my online store!  Feel free to drop me an email if you have any questions or if you would like a catalog.  I’m here to help!

Happy Stamping!

Heather

  • Visit my online store here.
  • Shop the Clearance Rack here.

Handcrafting with Heather Creativity Clubhouse

Creativity Credit copy

Don’t forget about my customer loyalty program when you place your orders.  I’m offering double Creativity Credits during Sale-A-Bration!  Click here to read more about the Creativity Credits program, my buyer reward program where you earn free Stampin’ Up! merchandise.

Let me know if you have any questions, have fun shopping!

January 29 – February 16 Hostess Code:  XN46DEBT

Use this hostess code when you order and receive a set of rhinestones from me!  If your order is over $150, please do not use this code, but you’ll still get the free gift.


New Weekly Deals From Stampin’ Up! February 10-16

Click the images below to order the weekly deal products from my online store.  The Weekly Deals are only while supplies last and only available at these great prices through February 16th.

133736

Sale: $18.71

Price: $24.95

127012

Sale: $20.21

Price: $26.95

133728

Sale: $28.46

Price: $37.95

134583

Sale: $3.71

Price: $4.95

134581

Sale: $5.21

Price: $6.95

Supply List

Built for Free Using:  My Stampin Blog


Stampin’ Up! Supplies Used for Today’s Project

If you would like to order any of the products featured in today’s project, click the images below to order from my online store.

Supply List

Built for Free Using:  My Stampin Blog

Create a Cupcake & Birthday Basics Birthday Card Set – Stampin’ Up!

Today I created a set of birthday cards using the Birthday Basics DSP, the Stripes Embossing Folder and the Create a Cupcake stamp set form Stampin’ Up!  All of these products are available only while supplies last until June 4th.  If you would like to order any of these items, please place your order today and enjoy FREE Shipping from Stampin’ Up!  Today is the last day for the free shipping promotion.  As an added benefit, I will send a free gift in the mail to anyone who places a $50 order today.

Create a Cupcake Birthday (1 of 13)

During the month of April, I will be doing a drawing each Sunday.  One lucky winner who left me a comment will receive one of the featured products from Sale-a-bration.  So, if you missed out on the free items during the sale, now is your chance to win one!  I would love to hear from you!  Also, if you enjoy reading my posts, why not have them delivered to your inbox automatically.  Just click on the “follow” button in the sidebar.

Create a Cupcake Birthday (4 of 13)

I love the Birthday Basics Designer Series Paper Pack.  It has so many cute patterns that make creating cheerful birthday cards a breeze.  And, Stampin’ Up! makes coordinating colors so easy because they include the colors that were used in the design right on the package!

Create a Cupcake Birthday (8 of 13)

The Create a Cupcake stamp set goes just perfectly with the Birthday Basics DSP too!  I love the cute sentiments and the flexibility of this set.  I selected a Very Vanilla background for my card, to make my punched focal point pop, but I wanted to add some interest to the background, so I used the Stripes Textured Impressions Embossing Folder to dry emboss the panel.  I like the fact that the striped design adds a simple detail that really finishes off the whole card without drawing attention away from the punch art.

Create a Cupcake Birthday (5 of 13)

I decided to use the cute quotes from the Create a Cupcake stamp set to finish off the inside of my cards.

Create a Cupcake Birthday (10 of 13)

Create a Cupcake Birthday (3 of 13)

I love that these cards can be used for people of all ages.  They will be perfect for all the birthday parties we get invited to for Carter’s friends!  At the same time, I would gladly give them to my friends at work.  I hope you are inspired by them too.  If so, I hope you will pin this project to Pinterest for me.  If you scroll to the bottom of this post, you will find a complete list of supplies used to make today’s project, including the dimensions for the card stock cuts.  Below the supply list, you will find a “pin it” button.  I would appreciate your help in spreading the word about my work.  Also, don’t forget to leave me a comment for your chance to win a free stamp set from Sale-a-bration!

If you find inspiration from this blog, one way you can show your support is by selecting me as your personal Stampin’ Up! Demonstrator.  If you are interested in purchasing the Birthday Basics DSP, Stripes Embossing Folder, or the Create a Cupcake stamp set from Stampin’ Up! now is the perfect time.  Remember, these items are on the retiring list, so they are only available while supplies last through June 4th.  Also, don’t forget, today is the last day you can enjoy FREE SHIPPING.  Don’t miss out… shop now in my online store! Every $50 order will qualify for a free gift from me.

If you need any stamping supplies or have any questions, I would love to help you out.  Just click on Order Stampin’ Up! Online Now in the main menu or in the sidebar to go directly to my online store.  Feel free to drop me an email if you have any questions.  I’m here to help!

Happy Stamping!

Heather

  • Visit my online store here.
  • Shop the Clearance Rack here.

WEEKLY DEALS for April 22-28

 Screen Shot 2014-04-22 at 6.20.14 AM

Click here to see the Weekly Deals from Stampin’ Up! in my online store.  The Weekly Deals are only while supplies last and only available at these great prices through April 28.

And, don’t forget… Today is the last day for FREE SHIPPING on all orders!  There is no minimum order to qualify.

Screen Shot 2014-04-18 at 11.04.07 AM


Stampin’ Up! items used to create today’s project:

If you would like to order any of the products featured in today’s project, click the images below to order from my online store.

Card Stock Cuts

Card Base:  Rich Razzleberry – 5-1/2″ x 8-1/2″; Bermuda Bay – 4-1/4″ x 11″; Crisp Canteloupe – 4-1/4″ x 11″

Panels:  Very Vanilla – 4″ x 5-1/4″ two panels (front and inside of card)

Sentiment/Die Cuts: Scalloped Tag Topper – 2″ x 3-1/2″ panel punched on both ends (various designs from the Birthday Basics DSP); one 1-3/4″ scalloped circle punch – Rich Razzleberry, Bermuda Bay, or Crisp Canteloupe; one Cupcake stamped on Very Vanilla; one Modern Label Punch – Rich Razzleberry or Bermuda Bay; one Word Window Punch – Very Vanilla


Birthday Basics Makes Gifting Easy! – Stampin’ Up!

Today I wanted to show you how a little Stampin’ Up! magic with the Birthday Basics DSP  and the Scalloped Tag Topper Punch can turn gift giving into a breeze.

If you like my post today, please leave me a comment.  I love hearing from you and sharing ideas.  Plus, as an added benefit,  you will be entered into my monthly drawing for a chance to win a free card.  Also, If you aren’t already a subscriber, please consider following me via email.   Just click on the “follow” button in the sidebar.

Cupcake Punch (11 of 11)

My son will be three in a couple of weeks.  The year I was pregnant with him, we had 7 other babies born at school.  In addition to that, there are 10 kids who live on our street.  I tell you all this just to demonstrate that we get invited to a lot of birthday parties!  Between the gifts, the cards, and the gift wrap it gets pretty expensive.  Now, you know I’ve got the cards covered, but it wasn’t until recently that I realized I could make some super cute gifts with plain brown craft paper and a couple of minutes with some punches.  I’ve seen tons of really cute stamped packages out there, but I don’t always have time to color a bunch of stamps and make a paper bow, etc.  So, today’s share is my 5 minute solution to kids birthday wrap!

Cupcake Punch (1 of 11)

I started by cutting a 2″ x 3-1/2″ strip of the candles paper from the Birthday Basics designer series paper pack.  Then I cut a circle of Coastal Cabana card stock using my Circles Framelits Dies (I would have used the 1-3/4″ circle punch if I had it… that is going on an order soon!).  I added the circle to my birthday candle tag using Stampin’ Dimensionals.  Next, I quickly punched a cupcake using the Cupcake Builder Punch and three different papers from the Birthday Basics DSP pack.  Those were glued together using Multipurpose Liquid Glue and added to the label with Stampin’ Dimensionals.

Cupcake Punch (2 of 11)

Finally, I stamped the “Happy Birthday” sentiment from the Teeny Tiny Wishes stamp set (wood mount and clear mount) on Whisper White card stock using my Bermuda Bay Classic Stampin’ Pad.  I punched it out using the Word Window Punch.  Then I used the Modern Label Punch to create a base for my greeting in Bermuda Bay card stock.  I layered everything together using Stampin’ Dimensionals and threaded some white ribbon through to finish it all off with a cute little bow.

Cupcake Punch (10 of 11)

This gift tag was quick and easy to make.  In fact, I think I might go ahead and make several more to have on hand next time we are invited to a birthday party!  If you liked this project, please don’t forget to leave me a comment so you will be entered into my drawing.  Also, please pin it to Pinterest for me.  I am new to blogging and I would love your help in developing a blog following.  If you scroll to the bottom of the post, you will find a “pin it” button just below my supply list for the project.

If you would like to purchase the Birthday Basics DSP, Cupcake Punch, or any of the other great products featured in this project, shop in my online store by clicking here.  Remember you can earn a FREE item with every $50 purchase through March 31st.  The final days of Sale-a-bration are here.  Don’t miss your chance to get these great products before they are gone!

You can find a complete list of supplies used for this project at the very bottom of this post.

____________________________________________________________

Weekly Deals from Stampin’ Up! March 25-31

Here are the new Weekly Deals from Stampin’ Up!:

Screen Shot 2014-03-25 at 6.22.01 AM

Click here to see the Weekly Deals from Stampin’ Up! in my online store.  The Weekly Deals are only while supplies last and only available at these great prices through March 31.

____________________________________________________________

If you need any stamping supplies, I’d be very happy to be your Demonstrator.  Just click on Order Stampin’ Up! Online Now in the main menu or in the sidebar to go directly to my online store or drop me an email if you have any questions.

Happy Stamping!

Heather

  • It’s Sale-a-bration time!!  You’ll get a free item from Stampin’ Up! for every $50 that you purchase between now and March 31!  Click on my Stampin’ Up! Promotions page for more information!
  • Visit my online store here.
  • Shop the Clearance Rack here.

____________________________________________________________

Stampin’ Up! items used to create this project:

Stamp Sets: Teeny Tiny Wishes (127802)

Dies, Punches, & Embossing Folders: Cupcake Punch (121807); Scalloped Tag Topper Punch (133324); Circles Framelits Dies (130911); Word Window Punch (119857); Modern Label Punch (119849)

Card Stock & DSP:  Bermuda Bay (131197) – modern label punch; Whisper White (100730) – word window punch; Coastal Cabana (131297) – Circles framelit die cut; Birthday Basics DSP – Birthday candles: 2″ x 3-1/2″ tag, polka dots: cupcake wrapper, coastal cabana floral – cupcake icing, raspberry ripple – cherry.

Markers & Ink:  Bermuda Bay Classic Stampin’ Pad (131171)

Embellishments: Ribbon (the one I used is not a Stampin’ Up! item) –  Use 5/8″ Organza Ribbon (114319) from Stampin’ Up!

Tools:  N/A

Adhesive: Stampin’ Dimensionals (104430); Multipurpose Liquid Glue (110755)

Birthday Basics Card in a Box – Stampin’ Up!

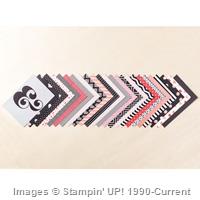
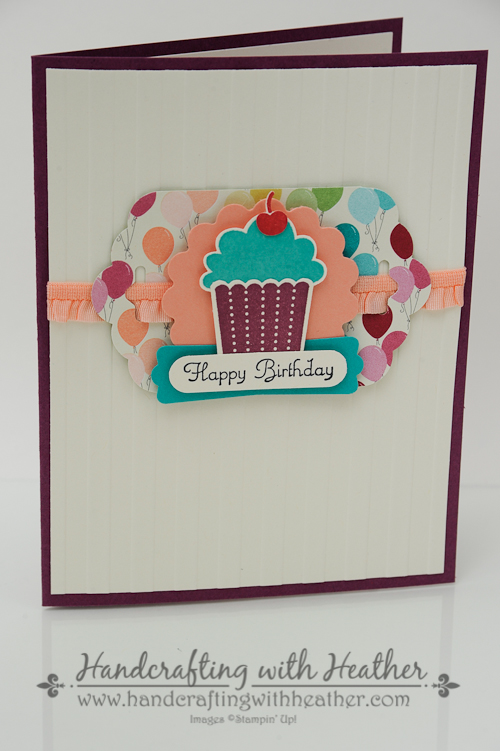
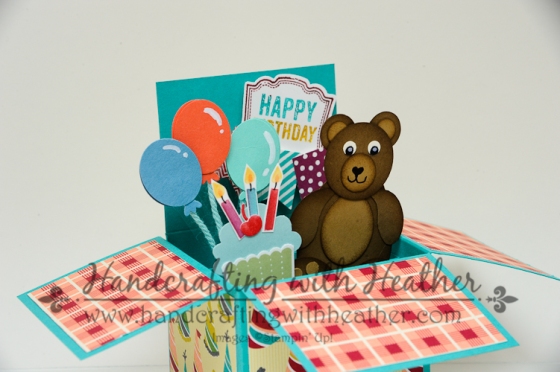
I have been seeing these cute “card in a box” projects all over Pinterest lately, and I just couldn’t resist doing one for my son Carter’s third birthday!  We are going to have a small party at Build-a-Bear Workshop followed by  a teddy bear picnic.  It just seemed like the perfect opportunity to try a card in a box.  I love, love, love how this one turned out!  The Birthday Basics DSP was the perfect pair for my birthday picnic theme.  Another thing I love about these cards is that you get a huge “WOW” factor right out of the envelope… but they are really easy to make!

If you like my post today, please leave me a comment.  I love hearing from you and sharing ideas.  Plus, as an added benefit,  you will be entered into my monthly drawing for a chance to win a free card.  Also, If you aren’t already a subscriber, please consider following me via email.   Just click on the “follow” button in the sidebar.

Carter's Birthday Invite (4 of 18)

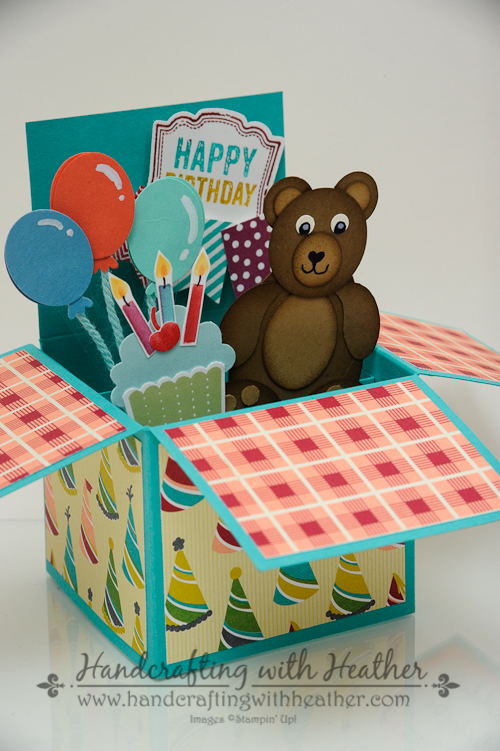
Now, when I decided I wanted to do a card in a box, I had no idea how to do it, so I did a search to find a video tutorial.  I have to thank Stamp and Scrap with Frenchie for her great video tutorial.  You can find a link to her instructions at the bottom of this post below the supply list.  I modified some of the dimensions for my card, but the basic premise for the box is the same.  The other great thing about these cards is they fold up and fit into a regular A2 invitation style envelope!  I made my own envelope using the envelope punch board so that the colors would coordinate.  I love that tool, it makes creating custom envelopes so easy!

Carter's Birthday Invite (16 of 18)

I chose Bermuda Bay card stock for my card base, and adhered panels of the birthday hat and plaid designer series papers from the Birthday Basics DSP pack to the sides of my box.  I used sticky strip to hold the box together.  I wanted the plaid paper to resemble a table cloth at a picnic.  Then, I printed the invitation details and the words from the teddy bear picnic song onto Whisper White card stock using my computer’s printer.  Then, I cut out my printed panels and used my Real Red ink and a sponge dauber to ink around the edges of the panels.  I adhered the party details to the back and the song lyrics to the underside of the box flaps using SNAIL adhesive.

Carter's Birthday Invite (13 of 18)

Carter's Birthday Invite (15 of 18)

Once the foundation of my box was finished, it was time to create my embellishments.  I wish I had taken pictures of the process along the way, but I didn’t. I will do my best to describe the steps I took, but please feel free to contact me with questions if you have them.  I used the following punches to create the teddy bear, cupcake, balloons, and banners:

Teddy Bear:

  • x1 – extra large oval punch – Soft Suede (body)
  • x1 – 1″ circle punch – Soft Suede (head)
  • x3 – small oval – Soft Suede (arms/feet)
  • x1 – small oval – Baked Brown Sugar (belly)
  • x2 – 1/2″ circle – Soft Suede (ears)
  • x3 – 1/2″ circle – Baked Brown Sugar (mouth/paws)
  • x2 – circle from owl builder punch – Baked Brown Sugar (inside of ears)
  • x6 – circle from cupcake builder punch – Baked Brown Sugar (toes)
  • x2 – circle from cupcake builder punch – Whisper White (eyes)

Once I had punched all my pieces, I cut one of the Soft Suede small ovals “yin yang” style to create the two arms.  Then I used my sponge dauber to ink the edges of EVERYTHING (except the eyes and toes) with Soft Suede ink.  I used Multipurpose Liquid Glue to put everything together.  then I colored on the nose and the pupils with a sharpie.  I used my Stampin’ Chalk Marker to add a little gleam to the eyes.

Carter's Birthday Invite (3 of 18)

Balloons – I chose a variety of bright colors for the balloons.  Each one was made from the following list of materials:

  • x2- small oval punch
  • x1 – foot of the owl from the owl builder punch.
  • strip of clear plastic – window sheets
  • twine from the Sweet Sorbet Accessory Pack (Sale-a-bration item)
  • Stampin’ Chalk Marker

To make the balloons I punched two ovals and sandwiched the owl foot, twine, and plastic strip between them to create the balloon.  Then I added a reflection with the Stampin’ Chalk Marker.

Carter's Birthday Invite (1 of 18)

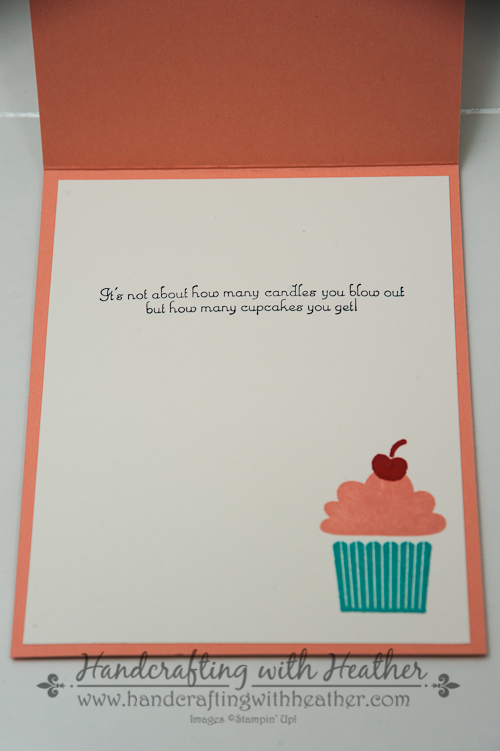
Cupcake:  The cupcake was created with the Cupcake Builder Punch and the Create a Cupcake stamp set (wood mount and clear mount).  I stamped the cupcake wrapper in Pear Pizzazz ink and then punched it out with the cupcake builder punch.  The frosting was punched from Pool Party card stock.  I colored the candles and the cherry using my Stampin’ Write Markers in Real Red, Rich Razzleberry, Bermuda Bay, Daffodil Delight, and Pumpkin Pie (Brights Collection and Regals Collection).   Then I cut out the candles with paper snips and added a wick with a black pen.  I punched the cherry out using my cupcake builder punch.  Then, I glued everything together using multipurpose liquid glue.

Once my balloons, cupcake, and teddy bear were finished and ready to be added to the box, I added two strips of bermuda bay along the inside of the box (see the video tutorial for instructions) to support the embellishments.  Then I stuck everything on with mini glue dots, making sure my embellishments weren’t taller than the back of the box.  This ensures that it will all fit nicely into the envelope.

Carter's Birthday Invite (9 of 18)

Banners & Greeting:  I colored my birthday greeting from the Label Love stamp set (wood mount and clear mount) with my Bermuda Bay, Rich Razzleberry, and Daffodil Delight Stampin’ Write Markers. Then I stamped it on Whisper White and punched it out using the Artisan Label Punch (The Label Love stamp set and Artisan Punch are available as a bundle for 15% discount; wood mount and clear mount). I stamped my banners using the Banner Blast stamp set (Sale-a-bration item) and punched them out using the Banner Punch (Sale-a-bration item).  Finally, I adhered the greeting and the banners to the background of the box using Stampin’ Dimensionals.

Carter's Birthday Invite (6 of 18)

These cards are a lot of steps and they take some time, but they are not difficult to do.  Everyone will be very impressed with your work, which is something I always enjoy.  There’s nothing like hearing someone say, “You made that!?!”  If you liked this card, please don’t forget to leave me a comment so you will be entered into my drawing.  Also, please pin it to Pinterest for me.  I am new to blogging and I would love your help in developing a blog following.  If you scroll to the bottom of the post, you will find a “pin it” button just below my supply list for the project.  Remember, I’ve also linked the video tutorial for making a card in a box below the supply list.

If you would like to purchase the Birthday Basics DSP, Create a Cupcake stamp set, or any of the other great products featured in this project, shop in my online store by clicking here.  Remember you can earn a FREE item with every $50 purchase through March 31st (including the Banner Blast stamp set and Banner Punch).  The final days of Sale-a-bration are fast approaching.  Don’t miss your chance to get these great products before they are gone!

You can find a complete list of supplies used for this project at the very bottom of this post.

____________________________________________________________

Weekly Deals from Stampin’ Up! March 25-31

Here are the new Weekly Deals from Stampin’ Up!:

Screen Shot 2014-03-25 at 6.22.01 AM

Click here to see the Weekly Deals from Stampin’ Up! in my online store.  The Weekly Deals are only while supplies last and only available at these great prices through March 31.

________________________________________________________________________________________

If you need any stamping supplies, I’d be very happy to be your Demonstrator.  Just click on Order Stampin’ Up! Online Now in the main menu or in the sidebar to go directly to my online store or drop me an email if you have any questions.

Happy Stamping!

Heather

  • It’s Sale-a-bration time!!  You’ll get a free item from Stampin’ Up! for every $50 that you purchase between now and March 31!  Click on my Stampin’ Up! Promotions page for more information!
  • Visit my online store here.
  • Shop the Clearance Rack here.

____________________________________________________________

Stampin’ Up! items used to create this project:

Stamp Sets: Create a Cupcake (121982); Banner Blast (Sale-a-bration); Label Love (130622)

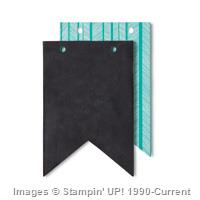
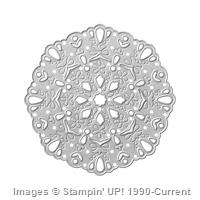
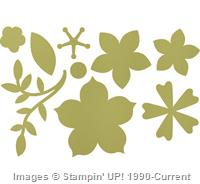
Dies, Punches, & Embossing Folders: Banner Punch (Sale-a-bration); Artisan Label Punch (130920); Cupcake Punch (121807); Owl Builder Punch (118074); extra large oval (119859); 1″ circle (119868); small oval (120908); 1/2″ circle (119869).

Card Stock & DSP:  Bermuda Bay (131197) – card base 4-1/4″ x 11″ (score at 1/2″, 3-1/8″, 5-3/4″, 8-3/8″ and along the length of the card at 2″), 2 strips for supporting embellishments – 4-1/8″ x 1″; Baked Brown Sugar (131296) – punches for teddy bear listed in post; Soft Suede (115318) – teddy bear punches listed in the post; Whisper White (100730) – 2-1/8″ x 3-3/4″ panel (back of card), 3 panels 2-3/8″ x 1-3/4″ (teddy bear picnic lyrics); cupcake wrapper, candles, label love greeting, teddy bear eyes; Pool Party (122924) – cupcake punch; Birthday Basics DSP (130145) – Plaid: 3 panels 2-3/8″ x 1-3/4″, Birthday Hat: 3 panels 2-3/8″ x 2″, 1 panel 2-3/8″ x 4″ (back of card).

Markers & Ink:  Soft Suede Classic Stampin’ Pad (126978); Regals Collection Stampin’ Write Markers (131262); Brights Collection Stampin’ Write Markers (131259); Stampin’ Chalk Marker (132133); Pear Pizzazz Classic Stampin’ Pad (131180)

Embellishments: Twine from Sweet Sorbet Accessory Pack (Sale-a-bration)

Tools:  sponge daubers (102892); envelope punch board (133774)

Adhesive: SNAIL (104332); Stampin’ Dimensionals (104430); Glue Dots (103683); Sticky Strip (104294); Multipurpose Liquid Glue (110755)

Card Tutorial:  Stamp and Scrap with Frenchie