Giggle Greetings… Age Only Counts if You’re a Cheese! – Stampin’ Up!

Today’s project is a silly birthday card featuring the Giggle Greetings stamp set from Stampin’ Up!  I just love the goofy sentiments in this set.  They are perfect for putting a smile on anyone’s face.

Giggle Greetings - Cheese (5 of 4)

I decided to use my Labels Collection Framelits Dies to create a window in the front of my card.  I like how this technique allows the stamped image to be the focal point of the front of the card as well as the inside.

Giggle Greetings - Cheese (6 of 4)

Giggle Greetings - Cheese (3 of 4)

I colored this image using my Stampin’ Blendabilities markers.  The coloring only took a couple of minutes, but it really makes the card pop!

Giggle Greetings - Cheese (4 of 4)

I hope you are a fan of this project and will pin it to Pinterest for me.  You will find a “pin it” button at the bottom of this post below the supply list and card stock cuts.  Also, please subscribe to my blog via email by clicking on the “follow” button if you enjoy reading my posts.

I hope you will consider selecting me as your demonstrator for your stamping needs.  I also offer free catalogs to all of my customers.  If you are my customer or want to be my customer, please email me your name and mailing address.  I’ll be more than happy to send you a copy of our catalogs.  You can email me at handcraftingheather@icloud.com.

If you need any supplies you can shop now in my online store!  Feel free to drop me an email if you have any questions or if you would like a catalog.  I’m here to help!

Happy Stamping!

Heather

  • Visit my online store here.
  • Shop the Clearance Rack here.

WEEKLY DEALS for August 26 – September 1

Screen Shot 2014-08-26 at 7.19.28 AM

Click here to see the Weekly Deals from Stampin’ Up! in my online store.  The Weekly Deals are only while supplies last and only available at these great prices through September 1.


Stampin’ Up! items used to create today’s project:

If you would like to order any of the products featured in today’s project, click the images below to order from my online store.


Card Stock Cuts

Card Base – Night of Navy – 4-1/4″ x 11″ scored at 5-1/2″

Panels – Crushed Curry – 4″ x 5-1/4″ panel with corners rounded using envelope punch board; Whisper White – 4″ x 5-1/4″ panel inside of card.

Lovely as a Tree Birthday Wishes – Stampin’ Up!

Today’s card is masculine birthday card featuring the Lovely as a Tree and Four You stamp sets from Stampin’ Up!  I love how well this set lends itself to water coloring.  The tree image can be a beautiful springtime card, or a fall beauty depending on the colors you choose.

Lovely as a Tree (1 of 8) The Lovely as a Tree stamp set has withstood the test of time, and it is easy to see why.  I would love to hear how you have used this stamp set in you creations.  Also, if you are a fan of my work, why not have my posts delivered to your inbox automatically.  Just click on the “follow” button in the sidebar.

Lovely as a Tree (2 of 8)

I started my card today with an Old Olive card base, which I heat embossed using the leaf stamp from Lovely as a Tree.  I used Versamark ink and clear Stampin’ Emboss Powder to create the lovely tone-on-tone leaf pattern for my background.

Lovely as a Tree (8 of 8)

Next, I stamped the tree image on water color paper using Stazon Black ink.  I used my Classic Stampin’ Pads in Soft Suede, Old Olive, and Tempting Turquoise and my aqua painter to color the stamped image.  I’ll let you in on a little secret, I accidentally got a smudge of tempting turquoise ink on the edge of my panel… so I used my Tempting Turquoise Stampin’ Write Marker to color around the edge of the panel to cover it up!  Remember, there are no mistakes in stamping, only happy accidents. LOL.

Lovely as a Tree (3 of 8)

Once my art piece was finished, I layered it on panels of Pistachio Pudding and Soft Suede card stock and adhered it to the front of the card using multipurpose liquid glue.  Then I punched two ovals in Soft Suede using the word window punch.  I punched them a second time to shorten them, then I added candy dots from the neutrals collection.  I used a Stampin’ Dimensional on the left side of the punch and liquid glue on the right side because my layered panels were quite thick.

Lovely as a Tree (4 of 8)

For my sentiment, I chose the “Birthday Wishes” greeting from the Four You stamp set.  I stamped it on a scrap of Very Vanilla card stock using Soft Suede ink and then used my hexagon punch to create a banner.  I inked around the edges of the sentiment using my sponge dauber and Soft Suede ink.  Next, I adhered the greeting to the card using Stampin’ Dimensionals and multipurpose liquid glue on the portion that overlapped the stamped panel.

Lovely as a Tree (6 of 8)

Lovely as a Tree (7 of 8)

To finish off the inside of my card, I stamped the tree image from Lovely as a Tree on a panel of Very Vanilla card stock using Soft Suede ink.

Lovely as a Tree (5 of 8)

This card is going to be perfect for my dad’s birthday in a couple of weeks.  He loves the outdoors and admires all the old trees around the lake near his house when we go for walks together.  I hope you have enjoyed today’s project.  If so, please pin it to Pinterest.  If you scroll to the bottom of this post, you will find a complete list of supplies used to make today’s project, including the dimensions for the card stock cuts. Below the supply list, you will find a “pin it” button.  I would appreciate your help in spreading the word about my work.

If you find inspiration from this blog, one way you can show your support is by selecting me as your personal Stampin’ Up! Demonstrator.  If you are interested in purchasing the Lovely as a Tree or Four You stamp sets from Stampin’ Up! you can shop now in my online store!

If you need any stamping supplies or have any questions, I would love to help you out.  Just click on Order Stampin’ Up! Online Now in the main menu or in the sidebar to go directly to my online store.  Feel free to drop me an email if you have any questions.  I’m here to help!

Happy Stamping!

Heather

  • Visit my online store here.
  • Shop the Clearance Rack here.

WEEKLY DEALS for April 29 – May 5

 Weekly Deals

Click here to see the Weekly Deals from Stampin’ Up! in my online store.  The Weekly Deals are only while supplies last and only available at these great prices through May 5.


Stampin’ Up! items used to create today’s project:

If you would like to order any of the products featured in today’s project, click the images below to order from my online store.

Card Base:  Old Olive – 5-1/2″ x 8-1/2″

Panels:  Soft Suede – 3-3/8″ x 3-3/8″ panel; Pistachio Pudding – 3-1/8″ x 3-1/8″ panel; Water Color Paper – 3″ x 3″ panel; Very Vanilla – 4″ x 5-1/4″ panel (inside of card)

Sentiment/Die Cuts: Very Vanilla – banner for greeting


Serene Silhouettes Mountain Scene for My Dad – Stampin’ Up!

I just can’t seem to stay away from the Serene Silhouettes stamp set from Stampin’ Up!  It is one of my new favorites!  Today’s card was inspired by a very similar one created by Michelle Zindorf.  As soon as I saw her card, I was blown away by the artistry.  It opened up a whole new world of artistic possibilities that can be achieved with a little sponging!  I made a few modifications to her design to make it my own, but the creative credit for this one definitely goes to Michelle.   Although I’m a little early, this peaceful mountain sunset scene reminded me of my dad, so I decided to make it a Father’s Day card.  I hope you enjoy it as much as I do.

Serene Silhouettes Sunset (5 of 7)

Isn’t the scenery on the front of this card just gorgeous!  Well, you won’t believe how easy it is to achieve!  If you are in love with this card as much as I am, please leave me a comment. During the month of April, I will be doing a drawing each Sunday.  One lucky winner will receive one of the featured products from Sale-a-bration.  So, if you missed out on the free items during the sale, now is your chance to win one!  Also, if you enjoy reading my posts, why not have them delivered to your inbox automatically.  Just click on the “follow” button in the sidebar.

Serene Silhouettes Sunset (2 of 7)

Now let’s get to how you can create a card like this one on your own.  I used a lot of cool new techniques on this one, and I can’t wait to share them with you.

Serene Silhouettes Sunset Tutorial (13 of 13)

I began by rolling Old Olive ink onto my Square Lattice Textured Impression Embossing Folder using a brayer.  You will get a different impression depending on which side of the folder you apply your ink to.  I rolled the ink on the back side of the folder, then I carefully placed a panel of Old Olive card stock inside and ran it through my Big Shot.  Then I adhered my embossed panel to a Pool Party card base using Tombow Multipurpose Liquid Glue.  I just love how that technique makes the embossed design pop!

Serene Silhouettes Sunset Tutorial (1 of 13)

Next, I swiped my So Saffron and Pool Party Classic Stampin’ Pads directly across a panel of Whisper White card stock.  Don’t worry if your ink is streaky, it will actually add to the design in the end.

Serene Silhouettes Sunset Tutorial (2 of 13)

To create my mountain range, I placed a post-it note just below my horizon line.  Then I tore a piece of paper and stuck it to my work surface with two other post-its.

Serene Silhouettes Sunset Tutorial (3 of 13)

Next, I started layering in my ink.  I started with Tempting Turquoise ink, applying it with a stamping sponge.  Then I moved my torn paper and layered in some more.

Serene Silhouettes Sunset Tutorial (4 of 13)

I continued moving my paper and adding more layers of ink until I was satisfied with my mountain range.  At the end, I went back in and added some Marina Mist and Night of Navy ink toward the bottom of the mountains.

Serene Silhouettes Sunset Tutorial (6 of 13)

Once I was happy with my misty island, I used a sponge to add some So Saffron and Cherry Cobbler ink to the sky to give it a sunset effect.

Serene Silhouettes Sunset Tutorial (8 of 13)

Then, I added some greenery to the foreground, by sponging on some Old Olive ink near the bottom of my art piece.

Serene Silhouettes Sunset Tutorial (10 of 13)

For the final step, I inked up the tree from Serene Silhouettes using Stazon Black ink and stamped it on the left hand side of my panel.  I added some of the Stazon ink across the bottom of the panel using a sponge give some more depth to the foreground.

Serene Silhouettes Sunset Tutorial (11 of 13)

I mounted my finished art piece onto a panel of Always Artichoke card stock and added it to the front of the card using Stampin’ Dimensionals.  Then I stamped the “Happy Father’s Day” greeting from the Teeny Tiny Wishes stamp set onto a scrap of Whisper White card stock.  I punched it out using the Word Window Punch.  Then I punched some Always Artichoke card stock using the Modern Label Punch.  I inked around the edges with Old Olive ink and layered everything together with Stampin’ Dimensionals.

Serene Silhouettes Sunset (4 of 7)

I finished off the inside of my card by sponging along the bottom of a Whisper White panel with Old Olive and Stazon Black ink.  Then I stamped the tree image from Serene Silhouettes in the bottom right corner.

Serene Silhouettes Sunset (6 of 7)

I absolutely love how this card turned out.  I think it may be my favorite creation to date!  I hope you have enjoyed it too!  If so, I hope you will pin it to Pinterest for me.  If you scroll to the bottom of this post, you will find a complete list of supplies used to make today’s project, including the dimensions for the card stock cuts.  Below the supply list, you will find a “pin it” button.  I would appreciate your help in spreading the word about my work.  Also, don’t forget to leave me a comment for your chance to win a free stamp set from Sale-a-bration!

If you are interested in purchasing the Serene Silhouettes stamp set from Stampin’ Up! you can shop now in my online store!  If you need any stamping supplies, I would love to be your personal Demonstrator.  Just click on Order Stampin’ Up! Online Now in the main menu or in the sidebar to go directly to my online store.  Feel free to drop me an email if you have any questions.  I’m here to help!

Happy Stamping!

Heather

  • Visit my online store here.
  • Shop the Clearance Rack here.

WEEKLY DEALS for April 15-21

 Weekly Deals

Click here to see the Weekly Deals from Stampin’ Up! in my online store.  The Weekly Deals are only while supplies last and only available at these great prices through April 21.


Stampin’ Up! items used to create today’s project:

If you would like to order any of the products featured in today’s project, click the images below to order from my online store.


Card Stock Cuts

Card Base:  Pool Party – 5-1/2″ x 8-1/2″

Panels:  Old Olive – 5-1/2″ x 3″; Always Artichoke – 3-3/8″ x 3-1/2″; Whisper White – 3-1/8″ x 3-1/4″, 4″ x 5-1/4″ (inside of card)

Sentiment/Die Cuts:  Always Artichoke – Modern Label Punch; Whisper White – Word Window Punch

From My Heart Friendship Card – Stampin’ Up!

Before I get to today’s card, I have to say “thank you” to my Stampin’ Up! upline, Amy Koenders (Stamp with Amy K).  Amy introduced many of you to my blog Friday, and I am so grateful for her support.  Amy, you are fabulous and your cards are too!

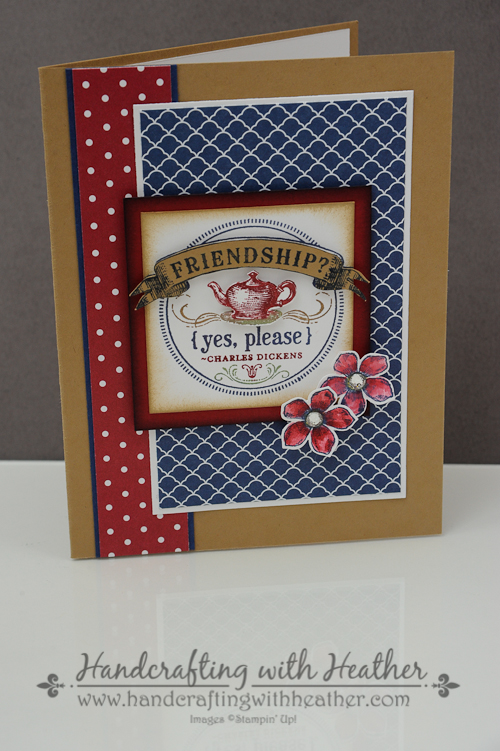
Now, onto today’s card, which was created using the From my Heart stamp set from Stampin’ Up! (wood mount and clear mount).  I just love the teapot image in this set.  It is so cute and different from my normal floral/nature themed cards.  It seemed the perfect choice to go with SCS color challenge 470 this week.

Friday was such an exciting blogging day for me.  I loved seeing so much blog traffic and so many new subscribers!  You have no idea how excited I get seeing the reach of my posts.  That’s where the nerdy math teacher in me comes through! LOL.  Anyway, if you like my post today, I would appreciate hearing from you.  At the end of the month, I will do a drawing and one lucky person who left me a comment will receive a free card in the mail!  If you aren’t already a subscriber, please consider following me via email.   Just click on the “follow” button in the sidebar.

From My Heart (1 of 7)

Today’s card was inspired by The Mojo Monday 337 sketch challenge & Splitcoast Stampers Color Challenge #470:

I began my card with a  Baked Brown Sugar card base.  Then I added panels of Night of Navy (my substitution for the color challenge), Cherry Cobbler DSP, Whisper White, and Night of Navy DSP (Regals DSP Stack) using SNAIL adhesive.

From My Heart (3 of 7)

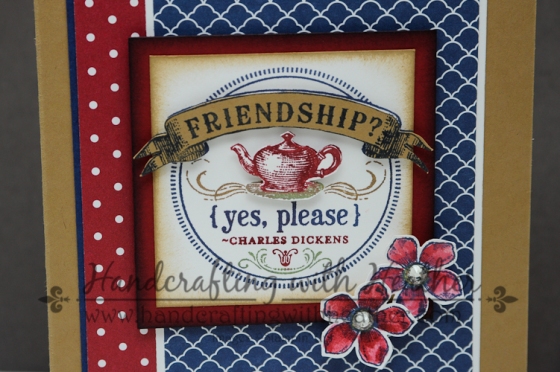
Next, I colored my friendship stamp from the From my Heart stamp set using my Stampin’ Write Markers in Night of Navy, Cherry Cobbler, Wild Wasabi, & Baked Brown Sugar (In Color Markers, Subtles Collection Markers, and Regals Collection Markers).  I stamped the image on Whisper White and used my Baked Brown Sugar ink pad and a sponge dauber to ink around the edges of the panel.  Then I colored the teapot and tray again and stamped them on a scrap of Whisper White,  I cut that out using paper snips and added it to my greeting with Stampin’ Dimensionals for some added depth. I followed the same procedure, stamping the friendship banner in Night of Navy on Baked Brown Sugar card stock.  The finished greeting was layered onto a square of Cherry Cobbler card stock, which I inked with my Night of Navy Classic Stampin’ Pad.

From My Heart (2 of 7)

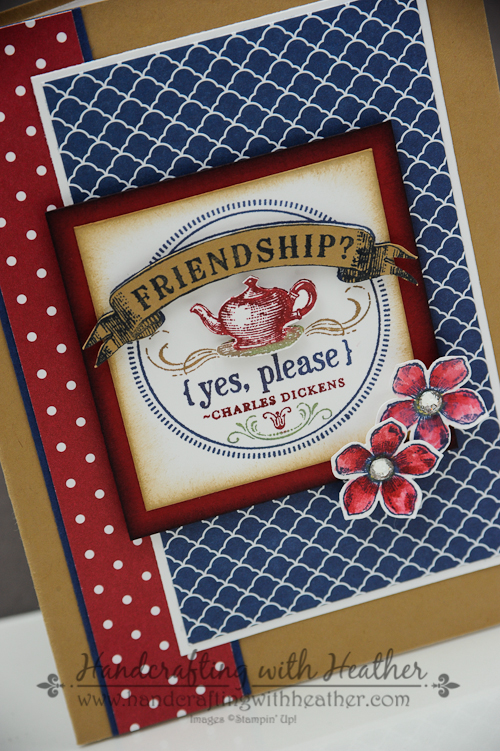
Finally, I stamped two flowers from the Petite Petals stamp set (wood mount and clear mount) using Night of Navy ink.  I colored my flowers using my Cherry Cobbler Classic Stampin’ Pad and my Blender Pens I punched out the flowers using the Petite Petals Punch and added Basic Rhinestones Jewel Accents to the center.  Then I added them to the front of the card using Stampin’ Dimensionals.  (Remember, the Petite Petals stamp set and punch are available as a bundle for a 15% discount, wood mount and clear mount.)

From My Heart (7 of 7)

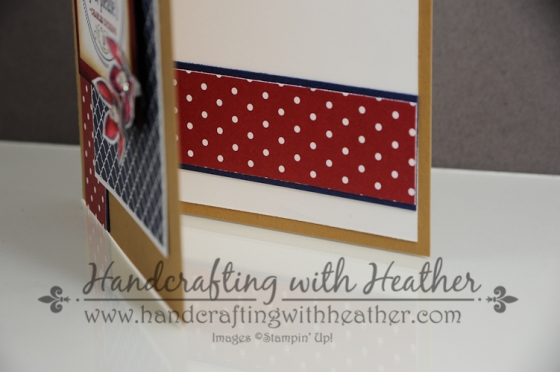
For the finishing touches on the inside of my card I layered strips of Cherry Cobbler DSP and Night of Navy card stock and added them to the bottom of the card.

This card is not my normal kind of color scheme, but I really like the finished product.  That’s the great thing about challenges, they put you outside your comfort zone.  If you liked this card, please don’t forget to leave me a comment so you will be entered into my drawing.  Also, if you liked my post today, please pin it to Pinterest for me.  I am new to blogging and I would love your help in developing a blog following.  If you scroll to the bottom of the post, you will find a “pin it” button just below my supply list for the project.

If you would like to purchase the From my Heart  stamp set, or any of the other great products featured in this project, shop in my online store by clicking here.  Remember you can earn a FREE item with every $50 purchase through March 31st.  The final days of Sale-a-bration are fast approaching.  Don’t miss your chance to get these great products before they are gone!

You can find a complete list of supplies used for this project at the very bottom of this post.

____________________________________________________________

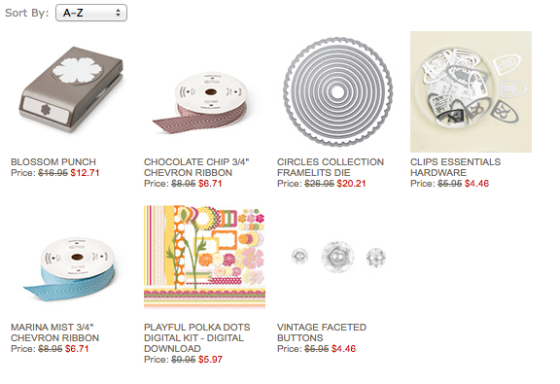
Weekly Deals from Stampin’ Up! March 18-24

Here are the new Weekly Deals from Stampin’ Up!:

Screen Shot 2014-03-19 at 9.55.26 PM

Click here to see the Weekly Deals from Stampin’ Up! in my online store.  The Weekly Deals are only while supplies last and only available at these great prices through March 24.

________________________________________________________________________________________

If you need any stamping supplies, I’d be very happy to be your Demonstrator.  Just click on Order Stampin’ Up! Online Now in the main menu or in the sidebar to go directly to my online store or drop me an email if you have any questions.

Happy Stamping!

Heather

  • It’s Sale-a-bration time!!  You’ll get a free item from Stampin’ Up! for every $50 that you purchase between now and March 31!  Click on my Stampin’ Up! Promotions page for more information!
  • Visit my online store here.
  • Shop the Clearance Rack here.

____________________________________________________________

Stampin’ Up! items used to create this project:

Stamp Sets: Simply Sketched (Hostess Reward – 129672)

Dies, Punches, & Embossing Folders: N/A

Card Stock & DSP:  Baked Brown Sugar (131296) – 5-1/2″ x 8-1/2″ card base, one stamped banner; Night of Navy (100867) – 5-1/2″ x 1-1/8″ strip, 4-” x 1-1/8″ strip (inside card); Cherry Cobbler DSP (130139) – 5-1/2″ x 1″ strip, 4″ x 1″ strip for inside of card; Whisper White (100730) – 2-7/8″ x 4-5/8″ panel, 2-1/2″ x 2-1/2″ square,  5-1/4″ x 4″ panel (inside of card); Night of Navy DSP (130139) – 2-3/4″ x 4-1/2″ panel.

Markers & Ink:  Baked Brown Sugar Classic Stampin’ Pad (131174); Night of Navy Classic Stampin’ Pad (126970); Cherry Cobbler Classic Stampin’ Pad (126966); Blender Pens (102845); In Color 2013-2015 Stampin’ Write Markers (131260); Regals Collection Stampin’ Write Markers (131262); Subtles Collection Stampin’ Write Markers (131263)

Embellishments: Basic Rhinestone Jewel Accents (119246)

Tools:  sponge daubers (102892)

Adhesive: SNAIL (104332); Stampin’ Dimensionals (104430)

See Ya Later Birthday Card Inspired by Florida Gators – Stampin’ Up!

Today’s card features the See Ya Later stamp set from Stampin’ Up! (Sale-a-bration item).  This week’s color scheme was inspired by the Florida Gators.  My boss’ birthday was this week and practically every stamp set I own is floral or something else “girly.”  My self imposed “card challenge” was to create a card that my boss would love, so I pulled my inspiration from his favorite college team.  I just got home from team trivia with some people from work, where we presented him with his card.  His first comment was, “Thanks guys, I love the color scheme you’ve got going on there!”  Exactly what I was going for!  I think this card turned out great, and I love that the color scheme could be adjusted for any sports team.  I will definitely keep that one in mind in the future.

I would love to hear what you think of today’s card and to hear your ideas for masculine cards too.  I can use all the help I can get in that arena.  Also, as an added benefit, on March 31st I will do a drawing and one lucky person who left me a comment will receive a handcrafted card in the mail!  If you enjoy reading my posts, why not have them delivered to your inbox automatically?  Just click on the “follow” button in the sidebar.  I love seeing my blog audience grow.  It makes me very excited.  (I know, I’m a total craft nerd, but what can I say? LOL.)

See Ya Later Birthday UF (2 of 11)

I began my card with a  Pacific Point card base.  Then I added a panels of Tangerine Tango card stock and Garden Green Designer Series Paper using SNAIL adhesive.

See Ya Later Birthday UF (6 of 11)

Next, I colored the birthday stamp from the See Ya Later stamp set using Stampin’ Write Markers in Tangerine Tango, Garden Green, Pacific Point, and Daffodil Delight (Brights Collection and Regals Collection Markers).  I stamped my image onto Whisper White card stock and cut it out using the Ovals Collection Framelits Die (2nd one counting from the inside out).  I used a sponge dauber and my Tangerine Tango Classic Stampin’ Pad to add some color to the edges of my sentiment, then I used my Banner Punch (Sale-a-bration item) to punch a variety of banners in Pacific Point  and Tangerine Tango Designer Series Paper (Brights Collection Designer Series Paper Stack).  I adhered my banners to the back of my birthday greeting using mini glue dots.  Then I used Stampin’ Dimensionals to add the whole thing to the front of my card.  I felt the card needed a finishing detail, so I added three brads from the Vintage Trinkets Accents & Elements set to the bottom right corner of the panels.

See Ya Later Birthday UF (7 of 11)

To finish off the inside of my card, I wrapped some orange grosgrain ribbon around a panel of whisper white card stock.  I added three banners at the bottom to mirror the design on the front.  

I loved seeing the reaction of my boss when he opened his card.  It was very gratifying to know that my card hit its mark.  If you liked my post today, please pin it to Pinterest for me.  I need your help to get the word out, so that people will come read my blog!  If you scroll to the bottom of the post, you will find a “pin it” button just below my supply list for the project… and, don’t forget to leave me a comment for your chance to win a handcrafted card!

Remember you can get the See Ya Later stamp set or the Banner Punch for FREE with a $50 purchase until March 31st.  Both of these items are great ones to have in your stamping tool kit.  You can shop in my online store by clicking here.  

You can find a complete list of supplies used for this project at the very bottom of this post.

____________________________________________________________

Weekly Deals from Stampin’ Up! March 11 – 17

Here are the new Weekly Deals from Stampin’ Up!:Click here to see the Weekly Deals from Stampin’ Up! in my online store.  The Weekly Deals are only while supplies last and only available at these great prices through February 17.

Screen Shot 2014-03-12 at 8.34.27 PM

Click here to see the Weekly Deals from Stampin’ Up! in my online store.  The Weekly Deals are only while supplies last and only available at these great prices through March 17.

________________________________________________________________________________________

If you need any stamping supplies, I’d be very happy to be your Demonstrator.  Just click on Order Stampin’ Up! Online Now in the main menu or in the sidebar to go directly to my online store or drop me an email if you have any questions.

Happy Stamping!

Heather

  • It’s Sale-a-bration time!!  You’ll get a free item from Stampin’ Up! for every $50 that you purchase between now and March 31!  Click on my Stampin’ Up! Promotions page for more information!
  • Visit my online store here.
  • Shop the Clearance Rack here.

____________________________________________________________

Stampin’ Up! items used to create this project:

Stamp Sets: See Ya Later (Sale-a-bration item)

Dies, Punches, & Embossing Folders: Ovals Collection Framelits (129381); Banner Punch (Sale-a-bration item)

Card Stock & DSP:  Pacific Point (111350) – 4-1/4″ x 11″ card base; Tangerine Tango (111349) – 3-3/4″ x 5″ panel; Garden Green DSP (130139) – 3-1/2″ x 4-3/4″ panel; Whisper White (100730) – one oval framelits die cut, 4″ x 5-1/4″ panel (inside of card); Brights Designer Series Paper in Pacific Point & Tangerine Tango (130134) – 17 banners total

Markers & Ink:  Tangerine Tango Classic Stampin’ Pad (126946); Brights Collection Stampin’ Write Markers (131259) – Pacific Point, Tangerine Tango, Daffodil Delight; Regals Collection Stampin’ Write Markers (131262) – Garden Green.

Embellishments: Vintage Trinkets Accents and Elements (118764) – 3 brads

Tools:  Big Shot (113439); Sponge Dauber (102892)

Adhesive: SNAIL (104332); Stampin’ Dimensionals (104430); Mini Glue Dots (103683)

Non-Stampin’ Up: Orange grosgrain ribbon