Giggle Greetings… Sometimes Life is the Pits! – Stampin’ Up!

Lately life has handed me more than my fair share of bad news, so it seemed like the perfect time to have a laugh.  Giggle Greetings is the perfect stamp set to put a little bit of joy into life when life is the pits!

Giggle Greetings (5 of 6)

I don’t mean to sound negative.  My life is full of wonderful blessings too (my new job, a loving family, and most importantly my precious son).  This card is my way of focusing on the positive and bringing some humor to the situation.  I created two different versions of this card because I just couldn’t make my mind up on the design.  Which is your favorite?

Giggle Greetings (3 of 6)

For the green and yellow version, I wanted to add a bow, but I didn’t have any Cherry Cobbler ribbon.  So, I used my Cherry Cobbler Stampin’ Write Marker to die a scrap of white satin ribbon.  It was super easy and did the trick perfectly!

Giggle Greetings (7 of 6)

I stamped the cherry bowl image on the inside of the card in Memento black ink.  I used a post it note to mask the greeting above and below the image.  I liked the simple sketched appearance of the stamped image, so I decided not to color it in on the inside of the card.

Giggle Greetings (8 of 6)

I like how these cards turned out.  I had fun coloring them with my Stampin’ Blendabilities markers, and as always, creating something fun took my mind off of other things.  I just love Stamping!

Please pin this project to Pinterest if you are a fan of this card.  You will find a “pin it” button at the bottom of this post below the supply list and card stock cuts.  Also, please subscribe to my blog via email by clicking on the “follow” button if you enjoy reading my posts.

I hope you will consider selecting me as your demonstrator for your stamping needs.  I also offer free catalogs to all of my customers.  If you are my customer or want to be my customer, please email me your name and mailing address.  I’ll be more than happy to send you a copy of our catalogs.  You can email me at handcraftingheather@icloud.com.

If you need any supplies you can shop now in my online store!  Feel free to drop me an email if you have any questions or if you would like a catalog.  I’m here to help!

Happy Stamping!

Heather

  • Visit my online store here.
  • Shop the Clearance Rack here.

Don’t Miss Out! Get $150 worth of products for only $99!… Time is Running out!

join_1

Whether you are a hobbyist or someone interested in building your own business, this week will be a great time to join Stampin’ Up!  For one week only from August 21-28  for only $99 you will get your choice of $150 worth of product.  In addition, during the month of August you can order from the new Holiday catalog before it is available to the public (on August 28).  If you have at least $99 worth of product on your wish list, you really should consider this opportunity.  Being a demonstrator has SO MANY awesome benefits and the opportunity has zero risk!  If you are interested in learning more please contact me at handcraftingheather@icloud.com or click here fore more information.


WEEKLY DEALS for August 19-25

 Screen Shot 2014-08-19 at 6.18.15 AM

Click here to see the Weekly Deals from Stampin’ Up! in my online store.  The Weekly Deals are only while supplies last and only available at these great prices through August 25.


Stampin’ Up! items used to create today’s project:

If you would like to order any of the products featured in today’s project, click the images below to order from my online store.

Swallowtail Sympathy Card – Stampin’ Up!

Today’s project is a clean and simple sympathy card featuring the Swallowtail stamp from Stampin’ Up!  This card was created in honor of my dear friend who passed away last week.  My thoughts and prayers go out to her husband and the rest of her family.  I hope that this card will bring a small moment of comfort to them as they deal with their loss.

Swallowtail Sympathy Card (5 of 5)I started this card by adhering a panel of Blackberry Bliss to a Rich Razzleberry card base.  You can’t see that very well in the picture, but in person the blackberry bliss mat for the butterfly panel adds a little extra contrast.  next I stamped the Swallowtail image on a panel of Whisper White card stock using Versamark ink and heat embossed it with white embossing powder.

Swallowtail Sympathy Card (4 of 5)I used the resist technique to sponge over my embossed design with Rich Razzleberry ink.  Then I wiped the embossed image with a paper towel to remove the ink that had stuck to the embossing.  Next, I stamped the “With Sympathy” sentiment from the Bloom with Hope stamp set (hostess reward) in Blackberry Bliss ink.

Swallowtail Sympathy Card (3 of 5)

Finally, I tied a bow with Rich Razzleberry 1/4″ cotton ribbon around my white panel and adhered it to the front of the card using Stampin’ Dimensionals.

Swallowtail Sympathy Card (6 of 5)

For the inside of my card, I stamped the sentiment from Bloom with Hope in Blackbery Bliss ink.  Then I added some butterflies from the Papillon Potpourri stamp set in Rich Razzleberry and Blackberry Bliss ink.  I used the same stamps to add some butterflies to the envelope too.

Swallowtail Sympathy Card (7 of 5)

I think the image of a butterfly is perfect for a sympathy card.  Butterflies are a symbol of transformation.  This card brings me a little peace as I think about the passage from this life into the next.  I know my friend is in a place of love and serenity now.

Please pin this project to Pinterest if you are a fan of this card.  You will find a “pin it” button at the bottom of this post below the supply list and card stock cuts.  Also, please subscribe to my blog via email by clicking on the “follow” button if you enjoy reading my posts.

I hope you will consider selecting me as your demonstrator for your stamping needs.  I also offer free catalogs to all of my customers.  If you are my customer or want to be my customer, please email me your name and mailing address.  I’ll be more than happy to send you a copy of our catalogs.  You can email me at handcraftingheather@icloud.com.

If you need any supplies you can shop now in my online store!  Feel free to drop me an email if you have any questions or if you would like a catalog.  I’m here to help!

Happy Stamping!

Heather

  • Visit my online store here.
  • Shop the Clearance Rack here.

WEEKLY DEALS for August 5-11

 Screen Shot 2014-08-05 at 5.30.32 AM

Click here to see the Weekly Deals from Stampin’ Up! in my online store.  The Weekly Deals are only while supplies last and only available at these great prices through August 11.


Stampin’ Up! items used to create today’s project:

If you would like to order any of the products featured in today’s project, click the images below to order from my online store.


Card Stock Cuts

Card Base: Rich Razzleberry – 5-1/2″ x 8-1/2″ scored at 4-1/4″

Panels:  Blackberry Bliss – 4″ x 5-1/4″; Whisper White – 3-7/8″ x 5-1/8″ (front of card), 4″ x 5-1/4″ (inside of card)

Watercolor Wonder Good Thoughts – Stampin’ Up!

I recently learned that a former co-worker of mine has been diagnosed with breast cancer.  I made this get well card featuring a sentiment from Perfect Pennants and the beautiful flowers from the Watercolor Wonder Designer Series Paper pack for her in an attempt to lift her spirits.  It is never fun to have the occasion to make this type of card, but I hope that it will brighten her day a little to know that she is not alone and that I am sending good thoughts her way!

Watercolor Wonder & Perfect Pennants (1 of 9)

This card was pretty quick and very simple to create.  I started with a Whisper White card base and layered on two different panels from Watercolor Wonder.  I inked around the edges of the panels with Tangerine Tango ink to add a little definition to the layers.

Watercolor Wonder & Perfect Pennants (3 of 9)

Next, I stamped the leaf image from Summer Silhouettes three times in Old Olive on the yellow and orange watercolor wash design from the DSP pack.  I cut out three flowers from a sheet of the rose design paper in the Watercolor Wonder pack and added them to the front of my card using Stampin’ Dimensionals.

Watercolor Wonder & Perfect Pennants (6 of 9)

Finally, I stamped the “Sending Good Thoughts Your Way” greeting on to a piece of polka-dot DSP and cut it out using my banner framelits dies.  I inked around the edges of the banner with Tangerine Tango ink.

Watercolor Wonder & Perfect Pennants (4 of 9)

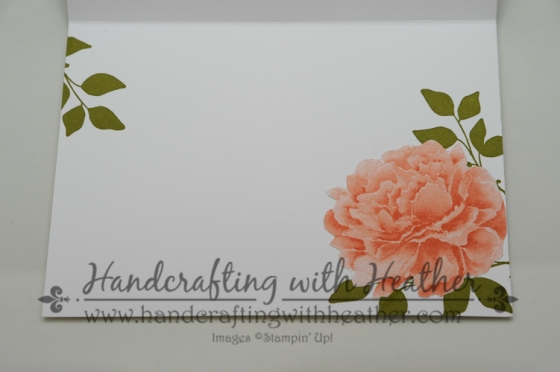
I finished the inside of my card with the leaf motif and another rose from the Watercolor Wonder DSP.

Watercolor Wonder & Perfect Pennants (8 of 9)

Watercolor Wonder & Perfect Pennants (7 of 9)

I hope that this card is able to lift my friend’s spirits.  If you are a fan of this card, please pin this project to Pinterest and leave me a comment.  You will find a “pin it” button at the very bottom of this post below the supply list and cards stock cuts.  Also, if you like my work, why not subscribe to my blog via email.  All you have to do is click on “follow” in the sidebar.

Although, I’m sad to see this beautiful paper being retired, I’m excited about all the new designs that will be available with the new catalog on June 2nd.  If you haven’t gotten your very own copy of the new catalog yet, now is a great time.  I’ve got a stack of them hot off the presses waiting for you. I offer free catalogs to all of my customers.  If you are my customer or want to be my customer, please email me your name and mailing address.  I’ll be more than happy to send you the gorgeous book.  You can email me at handcraftingheather@icloud.com.

I hope you will consider selecting me as your demonstrator for your stamping needs.  If you need any supplies or want to grab some retiring products before they are gone, you can shop now in my online store!  Remember, the Stampin’ Up! Retiring Products are 20%-50% off while supplies last!  Feel free to drop me an email if you have any questions or if you would like a catalog.  I’m here to help!

Happy Stamping!

Heather

  • Visit my online store here.
  • Shop the Clearance Rack here.

WEEKLY DEALS for May 20-26

Screen Shot 2014-05-20 at 6.06.42 AM

Click here to see the Weekly Deals from Stampin’ Up! in my online store.  The Weekly Deals are only while supplies last and only available at these great prices through May 26.


Stampin’ Up! items used to create today’s project:

If you would like to order any of the products featured in today’s project, click the images below to order from my online store.

Card Stock Cuts

Card Base: Whisper White – 5-1/2″ x 8-1/2″

Panels: Watercolor Wonder – (front of card) two panels 5-3/8″ x 4-1/8″ and 5″ x 3-3/4″

Sentiment & Die Cuts: Watercolor Wonder DSP – 1 banner


Expressing Sympathy with Flower Shop – Stampin’ Up!

Today  I have a project to share with you created using the Flower Shop stamp set (wood mount and clear mount) from Stampin’ Up!  I’m very excited about this project because I used several techniques I had never tried before.  It is always exciting when a new venture works out the way you hoped it would!

There are also a lot of updates from Stampin’ Up! today… new Clearance Rack items, new Weekly Deals, new MDS downloads and an announcement about My Paper Pumpkin refills so be sure to look past my card information to see all of the latest updates.

Flower Shop 1For this project, I began by cutting panels of Crumb Cake and Very Vanilla Card Stock (from the Neutrals card stock pack) for the front of the card.  Next, I used an embossing folder to partially emboss the Crumb Cake panel.

Flower Shop 3

In order to emboss part of the panel, I first created a shim to cover the portion of the embossing folder that I wanted to use for my project.
Partial Embossing Shim

To create the shim, I embossed a piece of white computer paper using my embossing folder and my Big Shot.  Then, I cut out the part of the image that I wanted to use.  I used that as a template to cut the same outline on 4 sheets of card stock, which I taped together to give my shim some thickness.

Once my shim was created, I placed my Crumb Cake panel into the embossing folder, closed the folder and lined up the shim on top before running my sandwich through the Big Shot.

Flower Shop 3

Next, I used a sponge dauber and my crumb cake classic stampin’ pad to accentuate the embossing on the panel.  I also used a circular motion to add light touches of ink around the edges of the panel.  I followed this same procedure on the edges of the very vanilla panel.  Then I used a craft knife to cut a slit in the crumb cake card stock panel along the line where my embossing ended.

Flower Shop 4

After creating my “pocket” I used my Stamp-a-ma-jig to place the stem stamp from the Secret Garden Stamp Set (wood mount and clear mount) on the vanilla panel. I used a Crumb Cake Stampin Write Marker to shade in the stems of the flowers.  Then, I inserted the vanilla panel into the slit in the crumb cake panel and adhered it with SNAIL. I used SNAIL to glue the crumb cake panel to a very vanilla card base, then I stamped two flowers using the Flower Shop stamp set on very vanilla card stock using the Soft Suede Classic Stampin’ Pad.  I punched out the flowers using the Pansy Punch and adhered them to the card front using stampin’ dimensionals.

I used the Secret Garden Framelits set to cut out two leaf die cuts for my flowers using soft suede card stock from the Neutrals collection. I cut the leaves apart into smaller sections and placed them decoratively around the flowers.  I attached them using SNAIL adhesive.  Finally, I gave my flowers a finishing touch by adding a Basic Pearl Jewel Accent to the center of each bloom.

Flower Shop 5

My card was looking beautiful at this point, but I still needed to add my message.  I stamped a sentiment from the Love and Sympathy stamp set (wood mount and clear mount) on very vanilla card stock and punched it out using the decorative label punch.  I added two little banners using the Banner Punch (available FREE with a $50 purchase until March 31 as part of the Sale-a-bration Promotion) and decorated them with a small pearl. I used a glue dot to adhere each banner to the card front, and then used stampin’ dimensionals to adhere the sentiment over them.

Flower Shop 1

Now all that was left to finish the front was to add a chiffon bow and pearl accents in the upper right corner of the card.  I used a glue dot to adhere the bow.
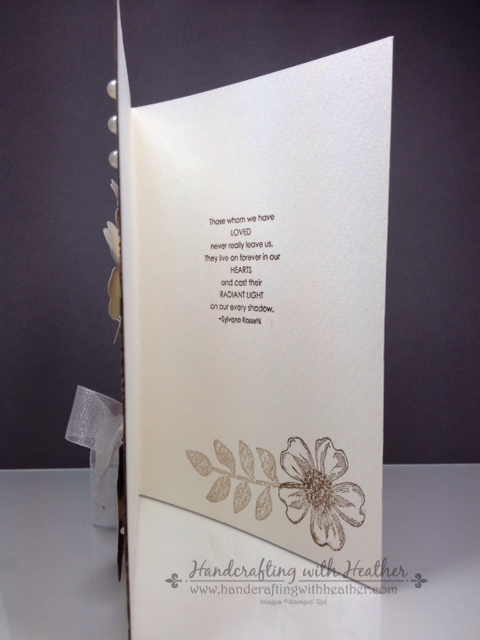
Flower Shop 2I finished the inside of my card by stamping a sentiment from the Love and Sympathy stamp set in the center of the card.  In the bottom corner, I placed one of the blooms from the Flower Shop stamp set that I used on the front of the card, and added a leaf from the secret garden stamp set.

I hope you have enjoyed my share today.   If you would like to order the Flower Shop stamp set, or any of the other wonderful supplies used in this project, please click here to shop in my online store.

You can find a complete list of supplies, including card stock cuts, and the very bottom of this post.

____________________________________________________________

Weekly Deals from Stampin’ Up! February 18-24

Here are the Weekly Deals from Stampin’ Up!:

Click here to see the Weekly Deals from Stampin’ Up! in my online store.  The Weekly Deals are only while supplies last and only available at these great prices through February 17.

____________________________________________________________

Clearance Rack Updated!
Screen Shot 2014-02-18 at 6.30.12 AM

Stampin’ Up! has updated the Clearance Rack in the online store!  I saw some punches, dies, card stock, DSP and embellishments at great deals.  And Clearance Rack items count toward your merchandise total for Sale-a-bration items!!  So click here to head over and start shopping now!  Clearance Rack deals are only available while supplies last. ____________________________________________________________

My Paper Pumpkin Refills and Past Kits Now Available

Screen Shot 2014-02-18 at 6.36.02 AM

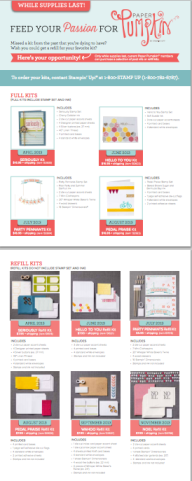
Only while supplies last, active Paper Pumpkin subscribers can purchase a selection of past Paper Pumpkin Kits and Paper Pumpkin Refill Kits.

The Fine Print

  • This special offer is available to any active Paper Pumpkin subscribers. Former Paper Pumpkin subscribers are not eligible unless they re-subscribe.
    • An active or current subscriber is someone who is receiving one or more Paper Pumpkin Kits on a monthly basis.
    • If a subscriber decides to skip a month, they are still considered an active subscriber.
  • Kits and refill kits will count toward Sale-A-Bration rewards (through March 31) and hostess benefits for all subscribers.
  • Active subscribers can order as many kits and refill kits as they’d like; however, this offer is good only while supplies last. Once Stampin’ Up!’s current inventory of a kit is depleted, the kit will not be available for ordering.
  • There is no guarantee that Stampin’ Up! will sell additional past kits or kit refills again. Stampin’ Up! will be monitoring the effectiveness of selling past kits and refill kits prior to offering additional kits or refill kits in the future.
  • Kit prices do not include shipping; standard shipping rates apply.
  • To order these kits, Paper Pumpkin subscribers must call Demonstrator Support during normal business hours (M-F, 7 AM [MT] – 7 PM [MT]) at 1-800-STAMP UP (1-800-782-6787).
    • Kits cannot be ordered in the Online Store.
    • Kits can be added to a customer, or workshop order.
    • Kits cannot be used on incentive orders or as a Starter Kit item.
    • Kits can be purchased with hostess dollars or as hostess 50%-off items.
  • Paper Pumpkin Refill Kits do NOT include the stamp set or ink from the original kit and are $7.95 + shipping.
  • Full Paper Pumpkin Kits are $16.95 + shipping.

Click the flyer below to see the kits and refills that are currently available and let me know if you have any questions.
Screen Shot 2014-02-18 at 7.58.17 AM

____________________________________________________________

New My Digital Studio Downloads Now Available

Screen Shot 2014-02-18 at 6.28.16 AM

Click here to see the new My Digital Studio downloads available now from Stampin’ Up! in my online store.  Click here to see all of the latest My Digital Studio Downloads available.

____________________________________________________________

If you need any stamping supplies, I’d be very happy to be your Demonstrator.  Just click on Order Stampin’ Up! Online Now in the main menu or in the sidebar to go directly to my online store or drop me an email if you have any questions.

Happy Stamping!

Heather

  • It’s Sale-a-bration time!!  You’ll get a free item from Stampin’ Up! for every $50 that you purchase between now and March 31!  Click on my Stampin’ Up! Promotions page for more information!
  • Visit my online store here.
  • Shop the Clearance Rack here.

____________________________________________________________

Stampin’ Up! items used to create this project:

stamps: Flower Shop (130939 wood, 130942 clear); Love & Sympathy (128652 wood, 122797 clear); Secret Garden (131940 wood, 129144 clear)

Dies, Punches, & Embossing Folders: Secret Garden Framelits Dies (129372); Pansy Punch (130698); Decorative Label Punch (120907); Banner Punch (Sale-A-Bration Free item with $50 purchase)

Embellishments: Pearl Basic Jewels (119247)

Card Stock:  Very Vanilla (101650) – 7″ x 10″ card base; 4-1/4″ x 5″ panel (front of card), two flowers (pansy punch), two banners (banner punch), one sentiment label (decorative label punch); Crumb Cake (120953) – 4-3/4″ x 6-3/4″ panel; Soft Suede (115318) – two Secret Garden Framelits die cuts.

Markers & Ink:  Crumb Cake Classic Stampin’ Pad (126975); Soft Suede Classic Stampin’ Pad (126978); Crumb Cake Stampin Write Marker (120967)

Tools:  Big Shot Die-Cutting Machine (113439); Sponge Daubers (102892); Stamp-a-ma-jig (101049)

Adhesive: SNAIL (104332); Glue Dots (103683); Stampin’ Dimensionals (104430)

Non-Stampin’ Up!: Embossing folder & Ribbon