This week, I have been drawing much inspiration from my friend Amy Koenders. Last week, Amy posted a project where she stamped on ceramic ornaments purchased from the local craft store. I was spurred on to see what other media would be good to stamp on. I started by creating this wooden ornament featuring the Beauty of the Season stamp set from Stampin’ Up!
I stamped the image using black Memento Ink, which bled a little on the wood surface, but I found that I wasn’t bothered by the effect. Next, I colored the image with my Blendabilities markers and added some snow with my Stampin’ Chalk Marker. I finished things off with a little red bow. I’m pretty pleased with how it turned out, even if the stamping isn’t as crisp as it would be on paper.
This was my next foray into the unknown… What happens when you try to heat emboss a porcelain ornament? Well, it turns out just beautifully. For this ornament, I used the flourish stamp from Everything Eleanor from Stampin’ Up! I stamped the image with versamark ink and sprinkled it with Gold Stampin’ Emboss Powder. I used a small paint brush to eliminate the extra powder that stuck to the porcelain, and then I embossed it using my heat tool. It took longer to melt than it does on paper, but the end result is really beautiful. I embellished with some gold foil stars and rhinestones, and VOILA!
I had a lot of fun seeing what would happen if I stamped on surfaces I had never tried before. I purchased a few other items that I haven’t experimented yet, so stay tuned for the results. If you like this project, I hope you will pin it to Pinterest for me. You will find a “pin it” button at the end of this post below the supply list.
Also, Please consider selecting me as your demonstrator for your stamping needs. I would love the opportunity to earn your business. If you need any supplies you can shop now in my online store! Feel free to drop me an email if you have any questions or if you would like a catalog. I’m here to help!
Click hereto see the Weekly Deals from Stampin’ Up! in my online store. The Weekly Deals are only while supplies last and only available at these great prices through November 17th.
Stampin’ Up! Products Used for Today’s Projects
If you would like to order any of the products featured in today’s project, click the images below to order from my online store.
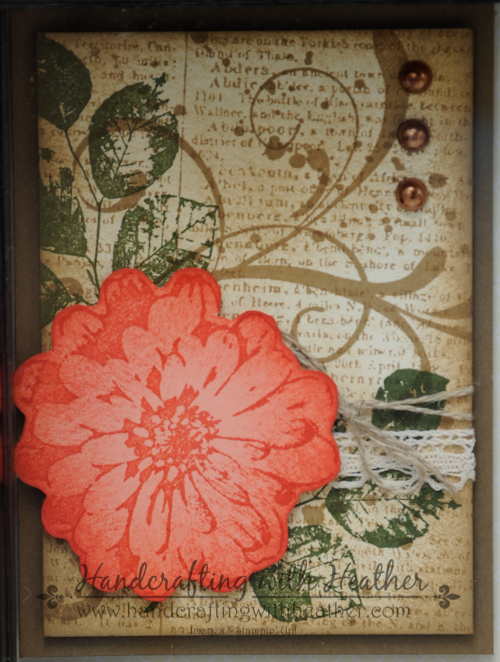
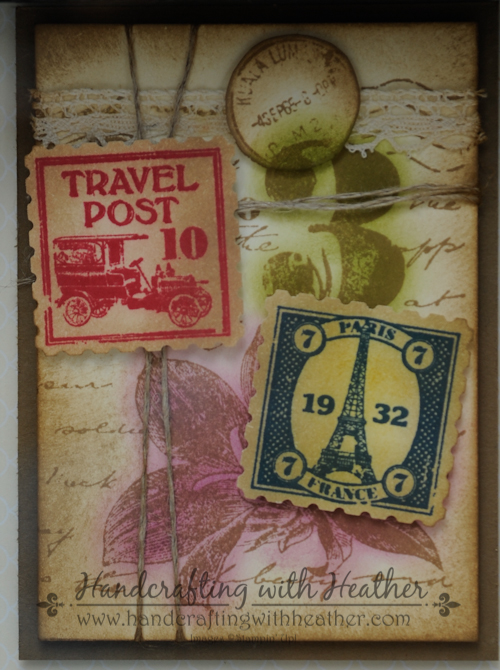
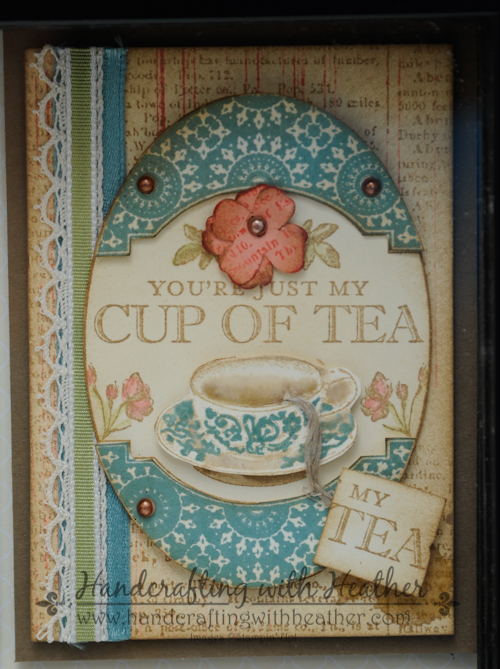
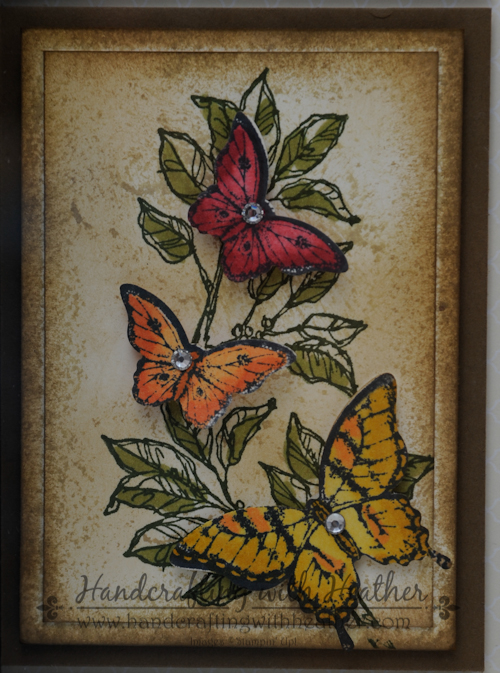
Today’s project is a special collaborative project created by several members of an online stamping group that I participate in. Each of us designed an Artist Trading Card (ATC), which measures 2-1/2″ x 3-1/2″, and duplicated it 10 times. The cards were mailed all around the country and the project you see here is the result.
This project is similar to another grid project I participated in a few months ago. If you missed that one, you can view it here. Here are some close-ups of each individual card. Because I wanted to create a 3 x 4 grid to fit inside a 12″ x 12″ shadowbox, I ended up creating a few extra ATCs of my own.
Created by Heather Van Looy
Created by Cathy Barbera
Created by Heather Van Looy
Created by Sandi MacIver
Created by Sylvia Wilson
Created by Sandra Santiago
Created by Heather Van Looy
Created by Shelagh Freemantle
Created by Denise Melia
Created by Judy Wright
Created by Cheryl Sanders
Created by Dawn Sorenson
I love doing these collaborative projects! It is so interesting to see how such different styles come together to create one unified piece. I would encourage you to give it a try with some of your friends. Or, if you are interested in having me host a grid project, just leave me a comment to let me know. If there is enough interest, I will organize one for you.
Love this project? You should pin it to Pinterest! You will find a “pin it” button at the bottom of this post below the supply list and card stock cuts. Also, please subscribe to my blog via email by clicking on the “follow” button if you are a fan of my work.
I hope you will consider selecting me as your demonstrator for your stamping needs. I also offer free catalogs to all of my customers. If you are my customer or want to be my customer, please email me your name and mailing address. I’ll be more than happy to send you the gorgeous book. You can email me at handcraftingheather@icloud.com.
If you need any supplies you can shop now in my online store! Feel free to drop me an email if you have any questions or if you would like a catalog. I’m here to help!
Click hereto see the Weekly Deals from Stampin’ Up! in my online store. The Weekly Deals are only while supplies last and only available at these great prices through July 28.
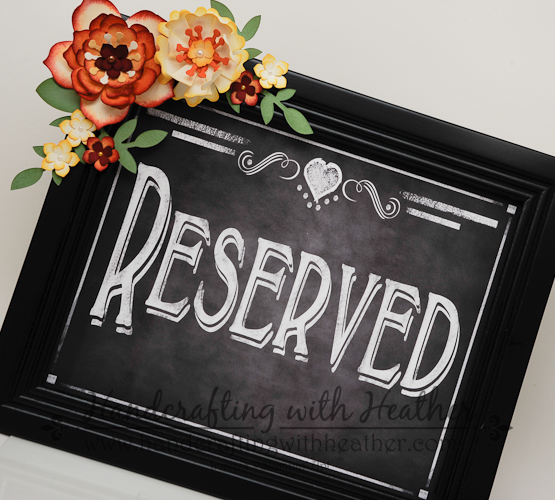
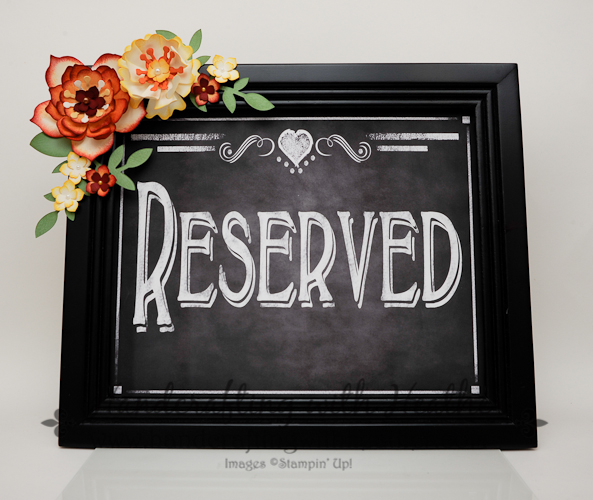
As many of you know, my sister is getting married this week. For today’s project, I wanted to share one of the signs that we made for the wedding using the Flower Frenzy Bigz Die.
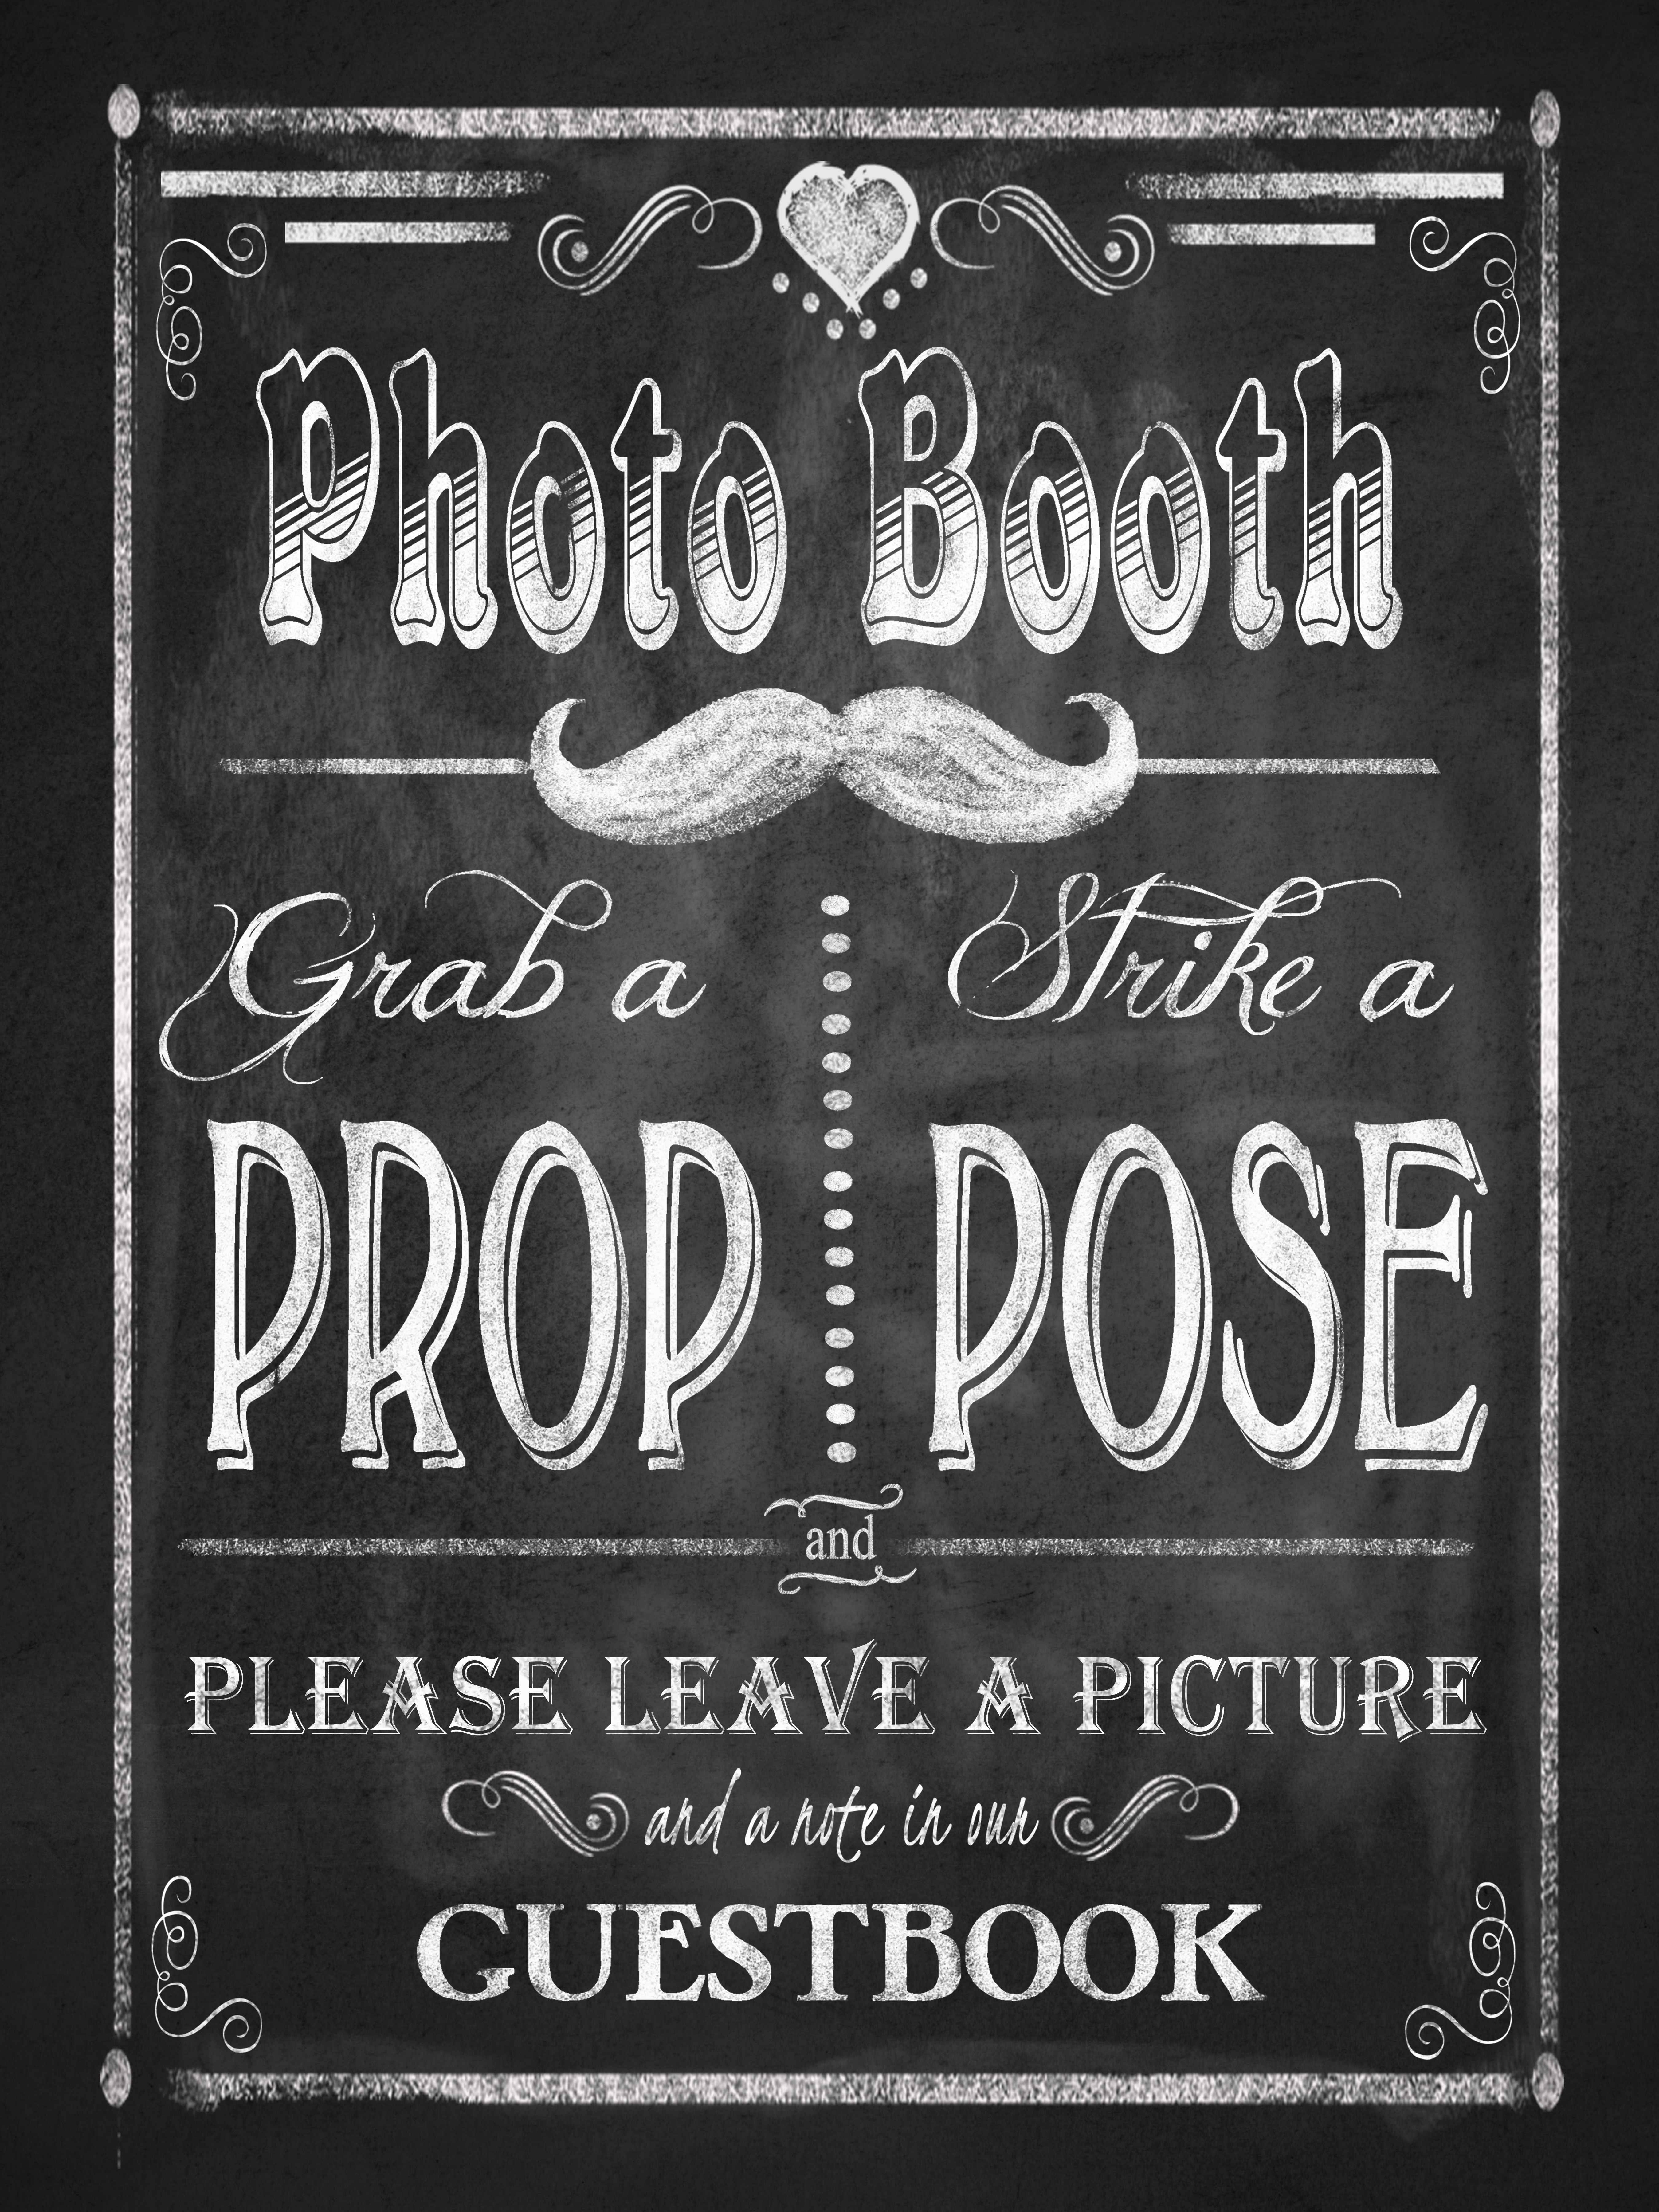
If you have ever planned a wedding, you know that there is a lot of signage needed, reserved signs for the family, a thank you message for the gift table, instructions for the photo booth (all the rage at weddings these days), etc. Of course, you know I couldn’t just put a plain old framed sign out there… what a perfect opportunity to make our signage something beautiful for the wedding using dies and punches from Stampin’ Up!
For the flowers, I used the Flower Frenzy Die, Fun Flower Punch, Pansy Punch, Petite Petals Punch, and the flower from the Itty Bitty Accents Punch. There isn’t a magic combination, I just played around with layering the different shapes and came up with something that I liked.
Here are a few tips I discovered along the way…
Use lots of layers & curl them with a bone folder.
Sponging the edges of the petals makes a world of difference!
Attach the layers together with Stampin’ Dimensionals to make them pop!
Use Stampin’ Blendabilities markers to color the pearls in the center (I used the Bronze marker from the skin tone assortment for the largest flower).
By the way, the actual signs were digital downloads purchased from Pineapple Soup Printables on Etsy. We were able to purchase several custom signs that met our needs. Lisa was great to work with and she got our order together very quickly. Here are the other signs she created for us. I would highly recommend working with her if you need any custom signage for any event.
I think these signs turned out beautifully and they will add a touch of whimsy and a pop of color to my sister’s wedding. The frames would also make a great gift for someone you love. Imagine giving a treasured photo of a grandchild in a beautifully decorated frame! The possibilities are really endless.
If you are a fan of this project and want to pin it to Pinterest, you will find a “pin it” button at the bottom of this post below the supply list and card stock cuts. Also, please subscribe to my blog via email by clicking on the “follow” button if you are a fan of my work.
I hope you will consider selecting me as your demonstrator for your stamping needs. I also offer free catalogs to all of my customers. If you are my customer or want to be my customer, please email me your name and mailing address. I’ll be more than happy to send you the gorgeous book. You can email me at handcraftingheather@icloud.com.
Also, it is not too late to sign up for my one-to-one card swap. The details and registration link are below.
If you need any supplies you can shop now in my online store! Feel free to drop me an email if you have any questions or if you would like a catalog. I’m here to help!
2014 Annual Catalog One-to-One Swap…
there’s still time to join in!
Just a reminder about my one-to-one swap. I hope you will join in the fun! It is so great when I get to actually connect with all of you and this is a wonderful way for us to share our inspiration and creativity with each other. To participate, you will send me one card created with current Stampin’ Up! products (no retired items please) and a self-addressed stamped envelope. Once all the swaps have arrived, I will send you someone else’s card in the mail. It’s that easy! If you have questions, please feel free to contact me at handcraftingheather@icloud.com.
To participate, please register for the event by clicking on the button below. Once registration is complete, you will receive an email with specific instructions (including the address for where to send your swaps). Projects are due in hand by July 10, 2014. I can’t wait to see what you create! Happy Stamping!
WEEKLY DEALS for July 1 – 7
Click hereto see the Weekly Deals from Stampin’ Up! in my online store. The Weekly Deals are only while supplies last and only available at these great prices through July 7.
Stampin’ Up! items used to create today’s project:
If you would like to order any of the products featured in today’s project, click the images below to order from my online store.
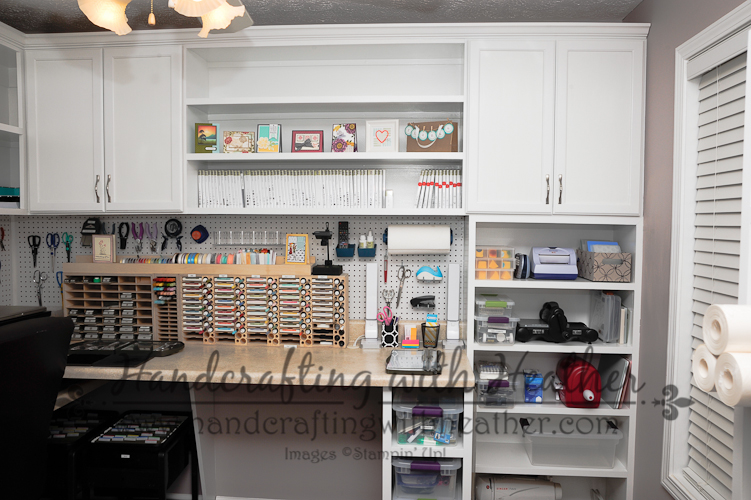
Hello Everyone! I am SO EXCITED about my post today! It is finally finished! My craft studio remodel is complete and I’m ready for the big reveal! I have never before had a dedicated space for my crafting, so I can’t even begin to tell you how psyched I am about this space!
The room started out as a guest bedroom that rarely saw any action. Here it is after the furniture was taken out.
As you can see, it wasn’t anything to write home about, but now look at it in all its wonderful crafting glory!
Look at all that storage and beautiful organization!
I’ve filmed a little virtual tour of the space for you. I hope you enjoy it!
I would also like to give a big shout out to Brett Haugen at Stamp-n-Storage. I love, love, love all the fabulous storage units they have designed specifically for all the products from Stampin’ Up!
Stamp-n-Storage Combo Ink Pad Holder houses all of my ink pads, ink refills, and Stampin’ Write Markers.
Check out the Blendabilities Exclusive Side-by-Side Marker Holder and Lock Down Punch Holder… Fabulous!
The Stamp-n-Storage Ribbon Holder fits perfectly on top of my ink pads and punches. The peg board backing is the perfect storage solution for other miscellaneous tools.
Stamp-n-Storage 12″ x 12″ paper holder on the center shelf… love!
In addition to all the fantastic products I got from Stamp-n-Storage, I would also like to point out a few other details about the room for you. I often find myself standing as I work on projects. Typically, this makes my back hurt because I am stooped over my dining room table as I work. My solution to this problem was to create two different heights for my work surfaces. One section of my desk is taller for when I need to stand to do a project, and the other section is the perfect height for sitting.
A tall work surface for standing and a lower one for sitting.
As I designed this space, I really wanted to maximize all the storage potential. Check out how I have even used the space between the two desks to store my larger rotary trimmer!
And here is one last gem for you… I have found the perfect solution to eliminate all those wires cluttering up the space below the desk!
I am in love with my new crafting studio. So much so, that I find myself lingering in the doorway at night before I go to bed, just to gaze at its glory a little longer! I can hardly tear myself away, lol! This room will get so much more use now than it did as a guest room, that’s for sure.
If you like how I have organized my space please pin this post to Pinterest for me. You will find a “pin it” button at the very bottom of this post. Also, if you are a fan of my work, why not have my posts delivered directly to your inbox. Just click on the “follow” button in the sidebar of this post.
And of course, don’t forget to sign up for my one-to-one swap! I can’t wait to see what you are creating. Swaps are a fun way to interact and create together. The details and registration link are below.
If you haven’t gotten your very own copy of the new 2014 Annual Stampin’ Up! catalog yet, I would love to get one to you. I offer free catalogs to all of my customers. If you are my customer or want to be my customer, please email me your name and mailing address. I’ll be more than happy to send you the gorgeous book. You can email me at handcraftingheather@icloud.com.
I hope you will consider selecting me as your demonstrator for your stamping needs. If you need any supplies you can shop now in my online store! Feel free to drop me an email if you have any questions or if you would like a catalog. I’m here to help!
Hello Stampers! I am so excited about the launch of the new 2014 Annual Catalog from Stampin’ Up! There are so many awesome products in there. I would love the chance to see what you are creating. Let’s do a one-to-one swap! To participate, you will send me one card created with current Stampin’ Up! products (no retired items please) and a self-addressed stamped envelope. Once all the swaps have arrived, I will send you someone else’s card in the mail. It’s that easy! The motto of Stampin’ Up! is Inspire, Create, Share. This swap is the perfect opportunity for us to support one another and share all our creative ideas. If you have questions, please feel free to contact me at handcraftingheather@icloud.com.
To participate, please register for the event by clicking on the button below. Once registration is complete, you will receive an email with specific instructions (including the address for where to send your swaps). Projects are due in hand by July 10, 2014. I can’t wait to see what you create! Happy Stamping!
Demonstrator Sign Up Special Available through June 30th!
Do you have $50 worth of products you would like to purchase from the new annual catalog? Do you want to purchase Stampin’ Blendabilities Markers now, without having to wait until they are available to the public? If so, now is a great time to join my team. During the month of June, new recruits can join Stampin’ Up! at one of two great prices. Stampin’ Up! will continue to offer their traditional starter kit priced at $99 ($125 product value + FREE Shipping), but only during the month of June they will also be offering a reduced priced starter kit at the low price of $50 ($55 product value + FREE Shipping). Drop me a note at handcraftingheather@icloud.com if you have any questions or if you’d like additional details. I’d love to have you on my team! You can read more information about the benefits of being a Demonstrator here.
WEEKLY DEALS for June 17-23
Click hereto see the Weekly Deals from Stampin’ Up! in my online store. The Weekly Deals are only while supplies last and only available at these great prices through June 23.
Happy Father’s Day everyone! I made my Father’s Day card ages ago so today’s project is something a bit different. If you would like to see the card my dad will be receiving you can click here. (I think that one may be one of my all time favorites).
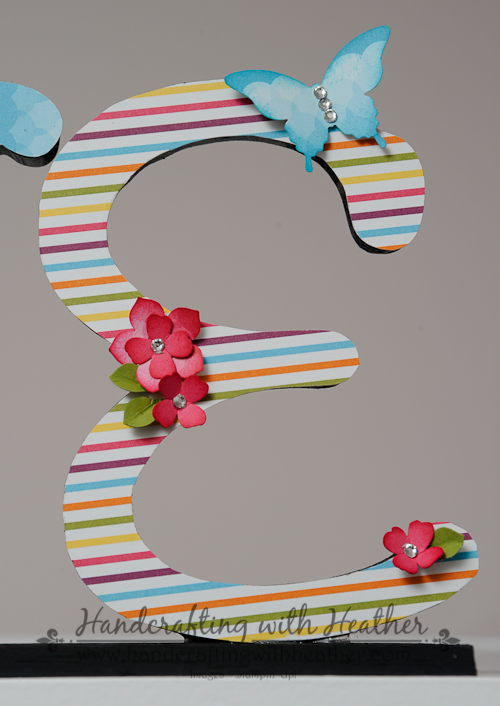
Meanwhile… I’m so excited to share a home decor project that I created using the Sweet Taffy Designer Series Paper from Stampin’ Up! and some fabulous punches. As many of you know, I have been in the throws of converting the guest room in my house into a crafting studio. Today’s project is the first creation made in my new space. I love, love, love having a dedicated place for all my crafting.
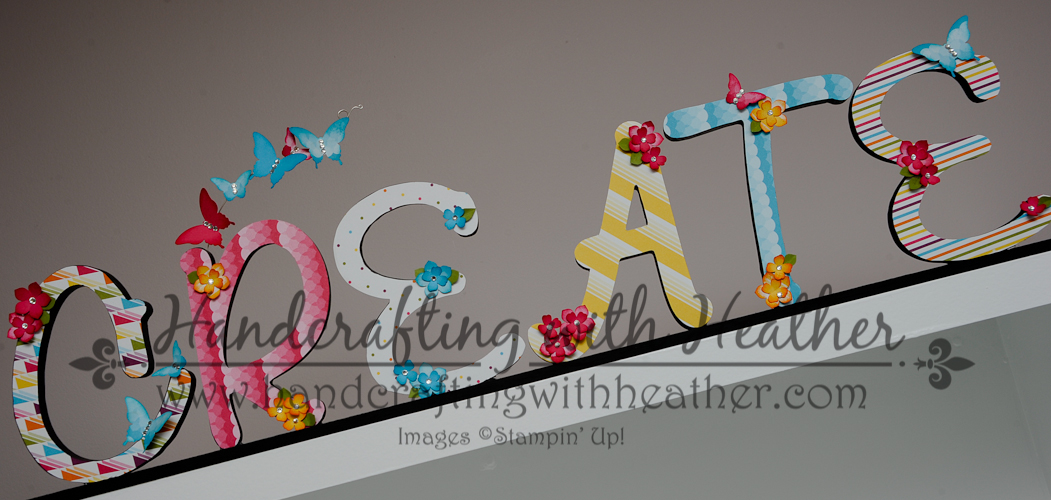
I purchased some wooden letters and a small board made of Balsa wood from my local craft store. The letters were pre-painted black, and I painted the wood board to match. The board was a bit longer than I needed, but the Balsa wood is so soft that I was able to cut it with a straight edge and craft knife.
Next, I cut panels of Sweet Taffy DSP and traced the letters using a pencil. In order to avoid having trace lines on the front of my project, I traced on the back of the paper, being sure to flip over my letters so they were backwards as I traced. After cutting out my letters, I adhered them to the wooden letters using Multipurpose Liquid Glue. Then I used E-6000 Quick Hold adhesive to glue the letters to the board.
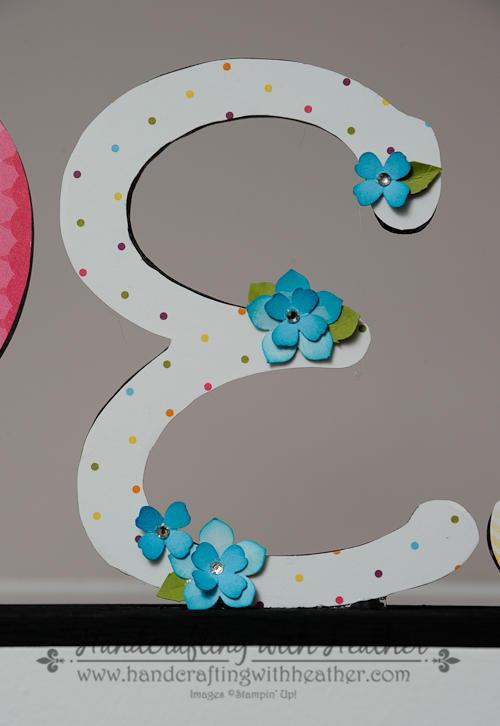
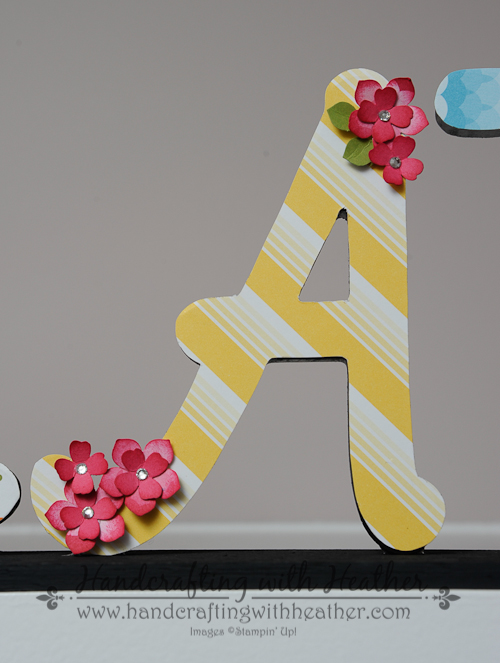
Once my letters were mounted and the glue had dried, it was time for some embellishments. I used my Bitty Butterfly, Elegant Butterfly, Petite Petals, and Itty Bitty Accents Punches to decorate my project. I punched out several shapes using the Sweet Taffy DSP and coordinating card stock in Melon Mambo, Tempting Turquoise, and Daffodil Delight. Then I sponged around the edges of everything, added some rhinestones, and began decorating my project.
I wanted the butterflies to fly off of my sign to add a bit of whimsy, so I added them to a length of sterling silver wire that I use for jewelry design. I attached the wire to the back of my sign using a hot glue gun. Doesn’t it just add the perfect touch!
Here are some close up shots of each letter. You might notice that I used a cute little leaf with my flowers. Want to know my secret? I punched a few flowers from Old Olive card stock using the Petite Petals Punch, then I cut the petals apart, creating five perfect little leaves from each punch.
I am in love with the way this project turned out. It is the perfect addition to my crafting studio. Look for it next week when I unveil the finished remodel! I plan to post a virtual tour on Wednesday once I’ve put on all the finishing touches. If you are a fan of this project, please pin it to Pinterest for me. You will find a “pin it” button at the very bottom of this post. Also, if you are a fan of my work, why not have my posts delivered directly to your inbox. Just click on the “follow” button in the sidebar of this post.
Don’t forget to sign up for my one-to-one swap! I can’t wait to see what you are creating. Swaps are a fun way to interact and create together. The details and registration link are below.
If you haven’t gotten your very own copy of the new 2014 Annual Stampin’ Up! catalog yet, I would love to get one to you. I offer free catalogs to all of my customers. If you are my customer or want to be my customer, please email me your name and mailing address. I’ll be more than happy to send you the gorgeous book. You can email me at handcraftingheather@icloud.com.
I hope you will consider selecting me as your demonstrator for your stamping needs. If you need any supplies you can shop now in my online store! Feel free to drop me an email if you have any questions or if you would like a catalog. I’m here to help!
Hello Stampers! I am so excited about the launch of the new 2014 Annual Catalog from Stampin’ Up! There are so many awesome products in there. I would love the chance to see what you are creating. Let’s do a one-to-one swap! To participate, you will send me one card created with current Stampin’ Up! products (no retired items please) and a self-addressed stamped envelope. Once all the swaps have arrived, I will send you someone else’s card in the mail. It’s that easy! The motto of Stampin’ Up! is Inspire, Create, Share. This swap is the perfect opportunity for us to support one another and share all our creative ideas. If you have questions, please feel free to contact me at handcraftingheather@icloud.com.
To participate, please register for the event by clicking on the button below. Once registration is complete, you will receive an email with specific instructions (including the address for where to send your swaps). Projects are due in hand by July 10, 2014. I can’t wait to see what you create! Happy Stamping!
Demonstrator Sign Up Special Available through June 30th!
Do you have $50 worth of products you would like to purchase from the new annual catalog? Do you want to purchase Stampin’ Blendabilities Markers now, without having to wait until they are available to the public? If so, now is a great time to join my team. During the month of June, new recruits can join Stampin’ Up! at one of two great prices. Stampin’ Up! will continue to offer their traditional starter kit priced at $99 ($125 product value + FREE Shipping), but only during the month of June they will also be offering a reduced priced starter kit at the low price of $50 ($55 product value + FREE Shipping). Drop me a note at handcraftingheather@icloud.com if you have any questions or if you’d like additional details. I’d love to have you on my team! You can read more information about the benefits of being a Demonstrator here.
WEEKLY DEALS for June 10-16
Click hereto see the Weekly Deals from Stampin’ Up! in my online store. The Weekly Deals are only while supplies last and only available at these great prices through June 16.
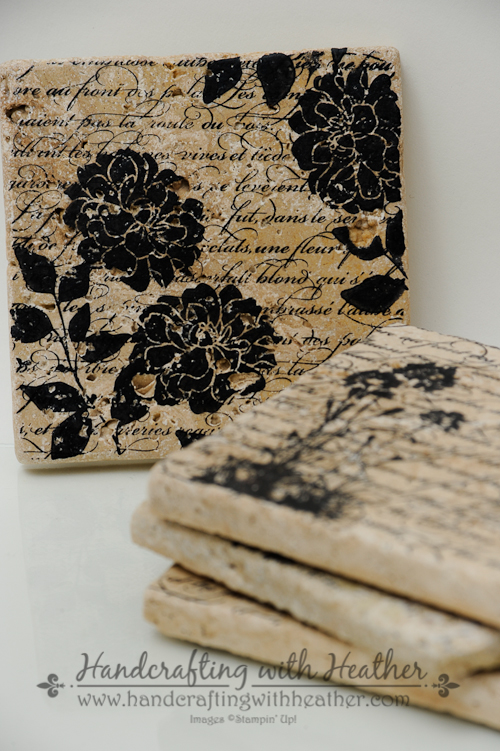
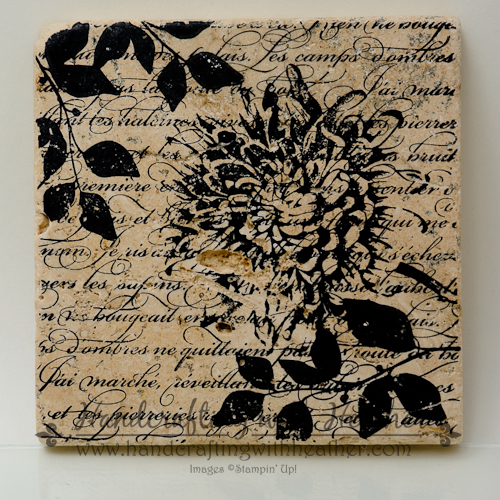
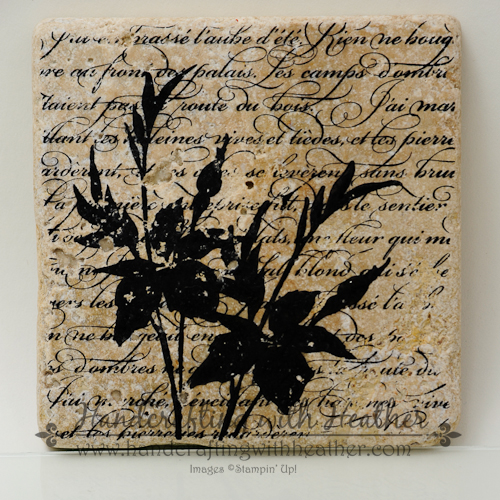
With Mother’s Day right around the corner, I decided to show you a really simple, yet fabulous home decor project I created using Stampin’ Up! products. I wanted elegant, but bold stamps, so I chose the following sets for my project today: Summer Silhouettes, FabulousFlorets (retiring stamp set), Serene Silhouettes, Blooming with Kindness, and for my background En Francais (retiring stamp).
These coasters are so easy to make, and they are the perfect gift! I made a set for mother’s day, and I also made a set for my son’s daycare provider for teacher appreciation week. Not only are these coasters beautiful, but they are also extremely affordable (i.e. “dirt cheap”)! I would love to hear what you think of my project today. Please leave me a comment. Also, if you like my work, why not have my posts delivered to your inbox automatically? Just click on the “follow” button in the sidebar to subscribe now.
I used Stazon Black Ink for my project today because it is permanent. I began by stamping each coaster with the En Francais background stamp. (This stamp is retiring, but as of the time I am writing this, it is still available in clear mount.) Then I stamped the four different coaster designs using a combination of stamp sets. I found that stamps with a lot of solid surface area worked well for this project. I just love the black silhouettes against the scripted font of the background.
Coaster #1: Serene Silhouettes
Coaster #2: Blooming with Kindness & Summer Silhouettes
Coaster #3: Fabulous Florets
Coaster #4: Fabulous Florets & Summer Silhouettes
Once the coasters were stamped, I put them on a cookie sheet in a cold oven and brought the temperature up to 375 degrees. Then I baked them for 30 minutes and let them cool in the oven. Once everything was completely cooled, I used Minwax Paste Finishing Wax to seal in my designs. Finally, I added felt pads to the corners on the bottom of the coaster to protect the table from scratching.
My mom is just finishing up a big renovation at her house and she is sprucing everything up. I know she is going to love these coasters! If you love them too, you should pin them to Pinterest! At the bottom of this post you will find a complete list of supplies used in this project. Just below the supply list is a “pin it” button.
If you need any stamping supplies, including any of the fabulous stamp sets used in this project, I would love to help you out. Click here to shop online now! If you find inspiration from my blog, one way you can show your support is by selecting me as your personal Stampin’ Up! Demonstrator. Feel free to email me if you have any questions. I’m here to help!
Happy Stamping!
Heather
Weekly Deals from Stampin’ Up! – May 6-12
Click here to see the Weekly Deals from Stampin’ Up! in my online store. The Weekly Deals are only while supplies last and only available at these great prices through May 12.
Retiring Stampin’ Up! Products – Available while supplies last until June 4, 2014
Many of the retiring products from Stampin’ Up! have already sold out! Be sure to check out the links below to check to see which items are still available. Stampin’ Up! is updating these lists daily to tell us which items are gone. The last column has a little “x” next to the products that are no longer available. If you want any of the products on the retiring list, be sure to order soon, so you don’t miss out!
Retiring Stamps (Available April 21-June 4, 2014, or while supplies last)
If you need any stamping supplies, I’d be very happy to be your Demonstrator. Just click on Order Stampin’ Up! Online Now in the main menu or in the sidebar to go directly to my online store or drop me an email if you have any questions.
Stampin’ Up! items used to create today’s project:
If you would like to order any of the products featured in today’s project, click the images below to order from my online store.