Mosaic Madness… Hello Card – Stampin’ Up!

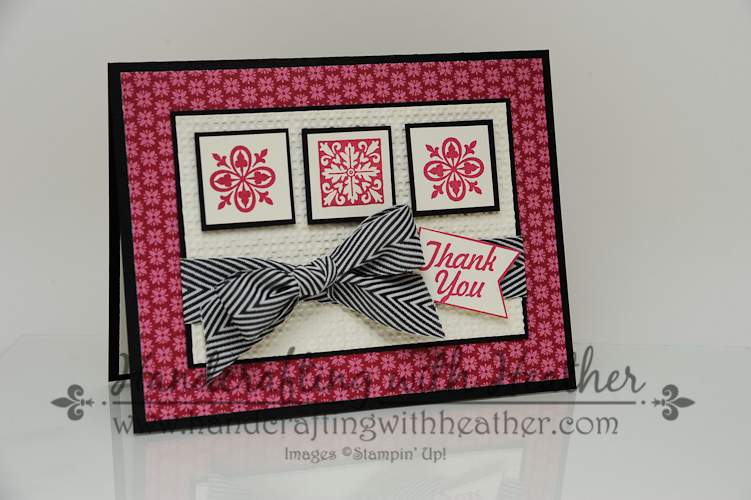
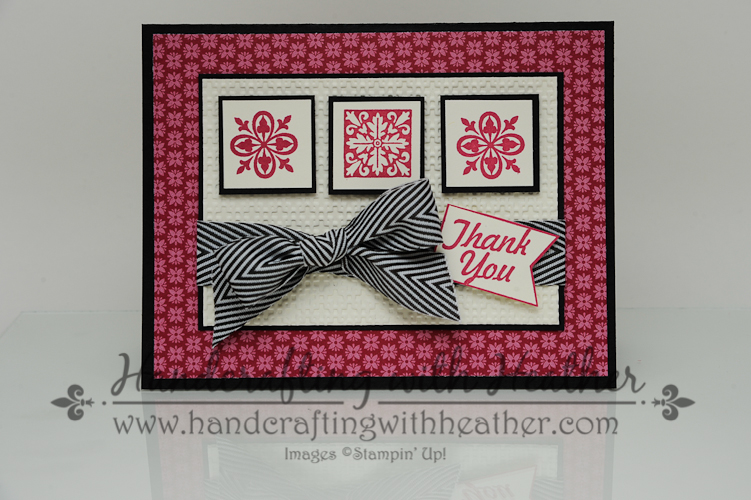
Sometimes when life gets busy you just need a super quick card!  Today’s project fits that bill just perfectly with two versions of an everyday card to say “Hello” featuring the Mosaic Madness and Four  You stamp sets from Stampin’ Up!

Mosaic Madness (1 of 11)

If you enjoy reading my posts I would love to hear from you.  It is so uplifting to connect with all of you and hear your thoughts and creative suggestions.  If you are a fan, why not have my posts delivered to your inbox automatically.  Just click on the “follow” button in the sidebar.

Mosaic Madness (7 of 11)

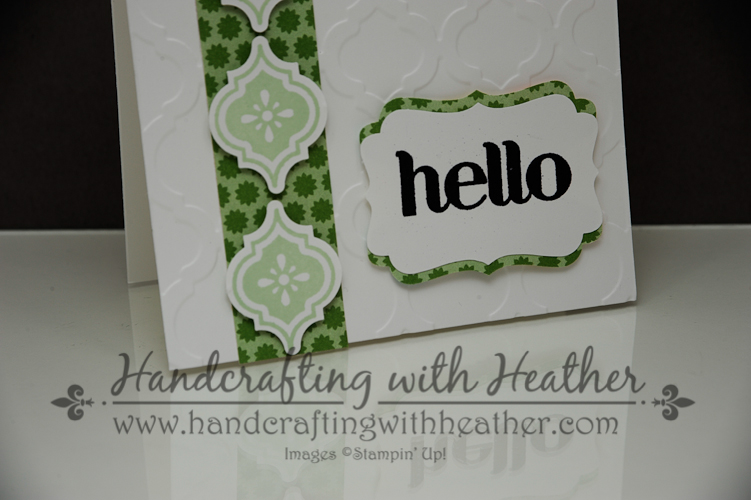
I started my card today with a Whisper White card base, which I dry embossed using the Modern Mosaic Textured Impresssions Embossing Folder.  Next, I added a strip of Gumball Green designer series paper from the Birthday Basics Pack.  That set has so many cute patterns in it!  If you don’t have it in your collection, you should grab some before it is gone.  The Birthday Basics set is one that is available only while supplies last through June 4th.

Mosaic Madness (2 of 11)

Next, I stamped one of the designs from the Mosaic Madness stamp set onto Whisper White card stock using my Pistachio Pudding Classic Stampin’ Pad.  I punched out the stamped images using the Mosaic Punch.  (The Mosaic Madness stamp set and Mosaic Punch are available as a bundle for a 15% discount through June 4th.)  Then I adhered the punched pieces to the front of my card using Stampin’ Dimensionals.

Mosaic Madness (8 of 11)

For my sentiment, I chose the “Hello” greeting from the Four You stamp set.  I stamped it on Whisper White card stock using Versamark Ink and then heat embossed it with Black Stampin’ Emboss Powder and my Heat Tool.  I punched out my sentiment using the Decorative Label Punch.  Then I created a partial mat for my greeting by punching the same shape in Gumball Green DSP.  I cut the green punch in half lengthwise, and then cut out the pointed part on the sides (click here to see a visual).

Mosaic Madness (3 of 11)

To finish off the inside of my card, I stamped one of the border stamps from Mosaic Madness in Pistachio Pudding ink along the top and bottom of the inside of my card.

Mosaic Madness (4 of 11)

Mosaic Madness (6 of 11)

I love how quick and easy these cards are to create!  I hope you will try it out when you are in need of a fast solution.  A great way to store all your ideas for creative inspiration is to pin them to Pinterest.  If you scroll to the bottom of this post, you will find a complete list of supplies used to make today’s project, including the dimensions for the card stock cuts.  Below the supply list, you will find a “pin it” button.  I would appreciate your help in spreading the word about my work.

If you find inspiration from this blog, one way you can show your support is by selecting me as your personal Stampin’ Up! Demonstrator.  If you are interested in purchasing the Mosaic Madness or Four You stamp sets from Stampin’ Up! you can shop now in my online store!

If you need any stamping supplies or have any questions, I would love to help you out.  Just click on Order Stampin’ Up! Online Now in the main menu or in the sidebar to go directly to my online store.  Feel free to drop me an email if you have any questions.  I’m here to help!

Happy Stamping!

Heather

  • Visit my online store here.
  • Shop the Clearance Rack here.

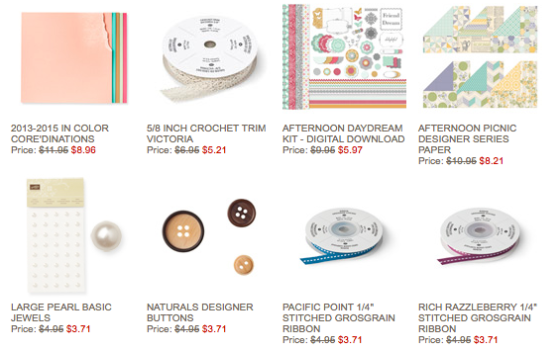
WEEKLY DEALS for April 29 – May 5

 Weekly Deals

Click here to see the Weekly Deals from Stampin’ Up! in my online store.  The Weekly Deals are only while supplies last and only available at these great prices through May 5.


Stampin’ Up! items used to create today’s project:

If you would like to order any of the products featured in today’s project, click the images below to order from my online store.


Card Stock Cuts

Card Base:  Whisper White – 4-1/4″ x 11″

Panels:  Birthday Basics DSP (Gumball Green) – 1″ x 5-1/2″ strip OR 1″ x 4-1/4″ strip depending on which layout you choose.

Sentiment/Die Cuts: Very Vanilla – four mosaic punches, one decorative label punch; Birthday Basics DSP (Gumball Green) – one decorative label punch.


Advertisement

Hello, Lovely Thank You Card – Stampin’ Up!

Today’s project is a Thank You card featuring the Hello, Lovely stamp set, Square Lattice Embossing Folder, and Birthday Basics Designer Series Paper from Stampin’ Up!  Each of these items are slated to retire on June 4th and are available only while supplies last.

Hello Lovely (2 of 8)

During the month of April, I have been doing a drawing each Sunday.  One lucky winner who leaves me a comment receives one of the featured products from Sale-a-bration.  Today is the last day to enter for your chance to win.  I would love to hear what you think of today’s card.  Also, if you enjoy reading my posts, why not have them delivered to your inbox automatically.  Just click on the “follow” button in the sidebar.

Hello Lovely (1 of 8)

I started my card today with a Basic Black card base and added a panel of Raspberry Ripple designer series paper from the Birthday Basics Pack.  This design coordinated perfectly with the geometric designs from the Hello, Lovely stamp set.

Hello Lovely (3 of 8)

Next, I dry embossed a panel of Very Vanilla card stock using the Square Lattice embossing folder and my Big Shot.  I mounted that panel onto a panel of Basic Black.  Then I stamped the geometric designs from Hello, Lovely onto Very Vanilla card stock using my Rose Red Classic Stampin’ Pad.  I punched out the stamped images using the 1″ square punch and mounted them on Basic Black card stock mats.  I adhered the stamped images to the embossed panel using Stampin’ Dimensionals.

Hello Lovely (6 of 8)

I used the cute  Basic Black Chevron Ribbon to tie a bow around my panel.  I just love the design of that ribbon.  Finally, I stamped the “Thank You” greeting from the Hello, Lovely stamp set onto Very Vanilla card stock.  I cut it out using my paper snips and adhered it to the front of the card with Stampin’ Dimensionals.

Hello Lovely (7 of 8)

To finish off the inside of my card, I stamped the square design four times along the short side of a Very Vanilla panel using Rose Red ink.  I used my stamp-a-ma-jig to help with placement.

Hello Lovely (8 of 8)

I am very pleased with how this card turned out.  I love the color combination and the use of texture.  Hopefully, you have enjoyed it too.  If so, I hope you will pin this project to Pinterest for me.  If you scroll to the bottom of this post, you will find a complete list of supplies used to make today’s project, including the dimensions for the card stock cuts.  Below the supply list, you will find a “pin it” button.  I would appreciate your help in spreading the word about my work.  Also, don’t forget to leave me a comment for your chance to win a free stamp set from Sale-a-bration!

If you find inspiration from this blog, one way you can show your support is by selecting me as your personal Stampin’ Up! Demonstrator.  If you are interested in purchasing the Birthday Basics DSP, Square Lattice Embossing Folder, or the Hello, Lovely stamp set from Stampin’ Up! now is the perfect time.  Remember, these items are on the retiring list, so they are only available while supplies last through June 4th.  Don’t miss out… shop now in my online store!

If you need any stamping supplies or have any questions, I would love to help you out.  Just click on Order Stampin’ Up! Online Now in the main menu or in the sidebar to go directly to my online store.  Feel free to drop me an email if you have any questions.  I’m here to help!

Happy Stamping!

Heather

  • Visit my online store here.
  • Shop the Clearance Rack here.

WEEKLY DEALS for April 22-28

 Screen Shot 2014-04-22 at 6.20.14 AM

Click here to see the Weekly Deals from Stampin’ Up! in my online store.  The Weekly Deals are only while supplies last and only available at these great prices through April 28.


Stampin’ Up! items used to create today’s project:

If you would like to order any of the products featured in today’s project, click the images below to order from my online store.


Card Stock Cuts

Card Base:  Basic Black – 5-1/2″ x 8-1/2″

Panels:  Birthday Basics DSP (Raspberry Ripple) – 4″ x 5-1/4″ panel; Basic Black – 3″ x 4-1/4″ panel, three 1-1/8″ x 1-1/8″ squares; Very Vanilla – 2-7/8″ x 4-1/8″ panel, 4″ x 5-1/4″ panel (inside of card).

Sentiment/Die Cuts: Very Vanilla – three 1″ square punches, one sentiment


Create a Cupcake & Birthday Basics Birthday Card Set – Stampin’ Up!

Today I created a set of birthday cards using the Birthday Basics DSP, the Stripes Embossing Folder and the Create a Cupcake stamp set form Stampin’ Up!  All of these products are available only while supplies last until June 4th.  If you would like to order any of these items, please place your order today and enjoy FREE Shipping from Stampin’ Up!  Today is the last day for the free shipping promotion.  As an added benefit, I will send a free gift in the mail to anyone who places a $50 order today.

Create a Cupcake Birthday (1 of 13)

During the month of April, I will be doing a drawing each Sunday.  One lucky winner who left me a comment will receive one of the featured products from Sale-a-bration.  So, if you missed out on the free items during the sale, now is your chance to win one!  I would love to hear from you!  Also, if you enjoy reading my posts, why not have them delivered to your inbox automatically.  Just click on the “follow” button in the sidebar.

Create a Cupcake Birthday (4 of 13)

I love the Birthday Basics Designer Series Paper Pack.  It has so many cute patterns that make creating cheerful birthday cards a breeze.  And, Stampin’ Up! makes coordinating colors so easy because they include the colors that were used in the design right on the package!

Create a Cupcake Birthday (8 of 13)

The Create a Cupcake stamp set goes just perfectly with the Birthday Basics DSP too!  I love the cute sentiments and the flexibility of this set.  I selected a Very Vanilla background for my card, to make my punched focal point pop, but I wanted to add some interest to the background, so I used the Stripes Textured Impressions Embossing Folder to dry emboss the panel.  I like the fact that the striped design adds a simple detail that really finishes off the whole card without drawing attention away from the punch art.

Create a Cupcake Birthday (5 of 13)

I decided to use the cute quotes from the Create a Cupcake stamp set to finish off the inside of my cards.

Create a Cupcake Birthday (10 of 13)

Create a Cupcake Birthday (3 of 13)

I love that these cards can be used for people of all ages.  They will be perfect for all the birthday parties we get invited to for Carter’s friends!  At the same time, I would gladly give them to my friends at work.  I hope you are inspired by them too.  If so, I hope you will pin this project to Pinterest for me.  If you scroll to the bottom of this post, you will find a complete list of supplies used to make today’s project, including the dimensions for the card stock cuts.  Below the supply list, you will find a “pin it” button.  I would appreciate your help in spreading the word about my work.  Also, don’t forget to leave me a comment for your chance to win a free stamp set from Sale-a-bration!

If you find inspiration from this blog, one way you can show your support is by selecting me as your personal Stampin’ Up! Demonstrator.  If you are interested in purchasing the Birthday Basics DSP, Stripes Embossing Folder, or the Create a Cupcake stamp set from Stampin’ Up! now is the perfect time.  Remember, these items are on the retiring list, so they are only available while supplies last through June 4th.  Also, don’t forget, today is the last day you can enjoy FREE SHIPPING.  Don’t miss out… shop now in my online store! Every $50 order will qualify for a free gift from me.

If you need any stamping supplies or have any questions, I would love to help you out.  Just click on Order Stampin’ Up! Online Now in the main menu or in the sidebar to go directly to my online store.  Feel free to drop me an email if you have any questions.  I’m here to help!

Happy Stamping!

Heather

  • Visit my online store here.
  • Shop the Clearance Rack here.

WEEKLY DEALS for April 22-28

 Screen Shot 2014-04-22 at 6.20.14 AM

Click here to see the Weekly Deals from Stampin’ Up! in my online store.  The Weekly Deals are only while supplies last and only available at these great prices through April 28.

And, don’t forget… Today is the last day for FREE SHIPPING on all orders!  There is no minimum order to qualify.

Screen Shot 2014-04-18 at 11.04.07 AM


Stampin’ Up! items used to create today’s project:

If you would like to order any of the products featured in today’s project, click the images below to order from my online store.

Card Stock Cuts

Card Base:  Rich Razzleberry – 5-1/2″ x 8-1/2″; Bermuda Bay – 4-1/4″ x 11″; Crisp Canteloupe – 4-1/4″ x 11″

Panels:  Very Vanilla – 4″ x 5-1/4″ two panels (front and inside of card)

Sentiment/Die Cuts: Scalloped Tag Topper – 2″ x 3-1/2″ panel punched on both ends (various designs from the Birthday Basics DSP); one 1-3/4″ scalloped circle punch – Rich Razzleberry, Bermuda Bay, or Crisp Canteloupe; one Cupcake stamped on Very Vanilla; one Modern Label Punch – Rich Razzleberry or Bermuda Bay; one Word Window Punch – Very Vanilla