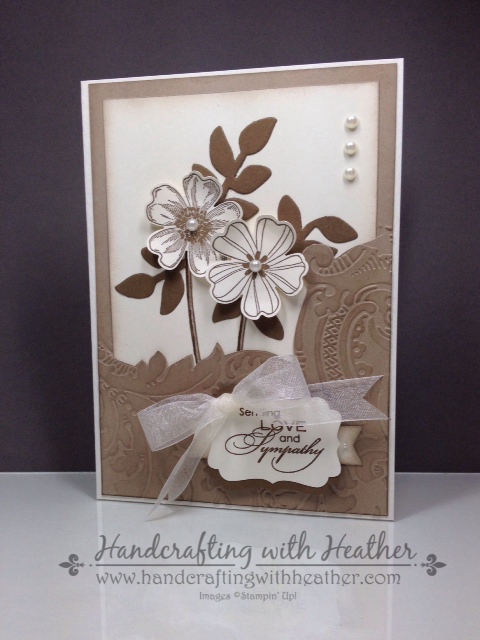
Today I have a project to share with you created using the Flower Shop stamp set (wood mount and clear mount) from Stampin’ Up! I’m very excited about this project because I used several techniques I had never tried before. It is always exciting when a new venture works out the way you hoped it would!
There are also a lot of updates from Stampin’ Up! today… new Clearance Rack items, new Weekly Deals, new MDS downloads and an announcement about My Paper Pumpkin refills so be sure to look past my card information to see all of the latest updates.
 For this project, I began by cutting panels of Crumb Cake and Very Vanilla Card Stock (from the Neutrals card stock pack) for the front of the card. Next, I used an embossing folder to partially emboss the Crumb Cake panel.
In order to emboss part of the panel, I first created a shim to cover the portion of the embossing folder that I wanted to use for my project.

To create the shim, I embossed a piece of white computer paper using my embossing folder and my Big Shot. Then, I cut out the part of the image that I wanted to use. I used that as a template to cut the same outline on 4 sheets of card stock, which I taped together to give my shim some thickness.
Once my shim was created, I placed my Crumb Cake panel into the embossing folder, closed the folder and lined up the shim on top before running my sandwich through the Big Shot.
Next, I used a sponge dauber and my crumb cake classic stampin’ pad to accentuate the embossing on the panel. I also used a circular motion to add light touches of ink around the edges of the panel. I followed this same procedure on the edges of the very vanilla panel. Then I used a craft knife to cut a slit in the crumb cake card stock panel along the line where my embossing ended.
After creating my “pocket” I used my Stamp-a-ma-jig to place the stem stamp from the Secret Garden Stamp Set (wood mount and clear mount) on the vanilla panel. I used a Crumb Cake Stampin Write Marker to shade in the stems of the flowers. Then, I inserted the vanilla panel into the slit in the crumb cake panel and adhered it with SNAIL. I used SNAIL to glue the crumb cake panel to a very vanilla card base, then I stamped two flowers using the Flower Shop stamp set on very vanilla card stock using the Soft Suede Classic Stampin’ Pad. I punched out the flowers using the Pansy Punch and adhered them to the card front using stampin’ dimensionals.
I used the Secret Garden Framelits set to cut out two leaf die cuts for my flowers using soft suede card stock from the Neutrals collection. I cut the leaves apart into smaller sections and placed them decoratively around the flowers. I attached them using SNAIL adhesive. Finally, I gave my flowers a finishing touch by adding a Basic Pearl Jewel Accent to the center of each bloom.
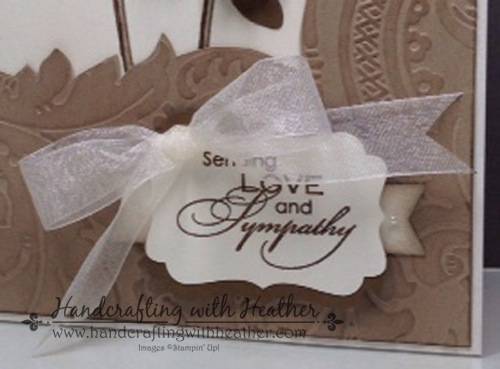
My card was looking beautiful at this point, but I still needed to add my message. I stamped a sentiment from the Love and Sympathy stamp set (wood mount and clear mount) on very vanilla card stock and punched it out using the decorative label punch. I added two little banners using the Banner Punch (available FREE with a $50 purchase until March 31 as part of the Sale-a-bration Promotion) and decorated them with a small pearl. I used a glue dot to adhere each banner to the card front, and then used stampin’ dimensionals to adhere the sentiment over them.
Now all that was left to finish the front was to add a chiffon bow and pearl accents in the upper right corner of the card. I used a glue dot to adhere the bow.
 I finished the inside of my card by stamping a sentiment from the Love and Sympathy stamp set in the center of the card. In the bottom corner, I placed one of the blooms from the Flower Shop stamp set that I used on the front of the card, and added a leaf from the secret garden stamp set.
I hope you have enjoyed my share today. If you would like to order the Flower Shop stamp set, or any of the other wonderful supplies used in this project, please click here to shop in my online store.
You can find a complete list of supplies, including card stock cuts, and the very bottom of this post.
____________________________________________________________
Weekly Deals from Stampin’ Up! February 18-24
Here are the Weekly Deals from Stampin’ Up!:

Click here to see the Weekly Deals from Stampin’ Up! in my online store. The Weekly Deals are only while supplies last and only available at these great prices through February 17.
____________________________________________________________
Clearance Rack Updated!
Stampin’ Up! has updated the Clearance Rack in the online store! I saw some punches, dies, card stock, DSP and embellishments at great deals. And Clearance Rack items count toward your merchandise total for Sale-a-bration items!! So click here to head over and start shopping now! Clearance Rack deals are only available while supplies last. ____________________________________________________________
My Paper Pumpkin Refills and Past Kits Now Available

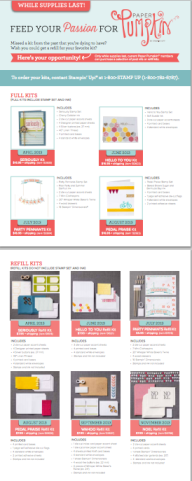
Only while supplies last, active Paper Pumpkin subscribers can purchase a selection of past Paper Pumpkin Kits and Paper Pumpkin Refill Kits.
The Fine Print
- This special offer is available to any active Paper Pumpkin subscribers. Former Paper Pumpkin subscribers are not eligible unless they re-subscribe.
-
- An active or current subscriber is someone who is receiving one or more Paper Pumpkin Kits on a monthly basis.
- If a subscriber decides to skip a month, they are still considered an active subscriber.
- Kits and refill kits will count toward Sale-A-Bration rewards (through March 31) and hostess benefits for all subscribers.
- Active subscribers can order as many kits and refill kits as they’d like; however, this offer is good only while supplies last. Once Stampin’ Up!’s current inventory of a kit is depleted, the kit will not be available for ordering.
- There is no guarantee that Stampin’ Up! will sell additional past kits or kit refills again. Stampin’ Up! will be monitoring the effectiveness of selling past kits and refill kits prior to offering additional kits or refill kits in the future.
- Kit prices do not include shipping; standard shipping rates apply.
- To order these kits, Paper Pumpkin subscribers must call Demonstrator Support during normal business hours (M-F, 7 AM [MT] – 7 PM [MT]) at 1-800-STAMP UP (1-800-782-6787).
- Kits cannot be ordered in the Online Store.
- Kits can be added to a customer, or workshop order.
- Kits cannot be used on incentive orders or as a Starter Kit item.
- Kits can be purchased with hostess dollars or as hostess 50%-off items.
- Paper Pumpkin Refill Kits do NOT include the stamp set or ink from the original kit and are $7.95 + shipping.
- Full Paper Pumpkin Kits are $16.95 + shipping.
Click the flyer below to see the kits and refills that are currently available and let me know if you have any questions.
____________________________________________________________
New My Digital Studio Downloads Now Available
Click here to see the new My Digital Studio downloads available now from Stampin’ Up! in my online store. Click here to see all of the latest My Digital Studio Downloads available.
____________________________________________________________
If you need any stamping supplies, I’d be very happy to be your Demonstrator. Just click on Order Stampin’ Up! Online Now in the main menu or in the sidebar to go directly to my online store or drop me an email if you have any questions.
Happy Stamping!
Heather
- It’s Sale-a-bration time!! You’ll get a free item from Stampin’ Up! for every $50 that you purchase between now and March 31! Click on my Stampin’ Up! Promotions page for more information!
- Visit my online store here.
- Shop the Clearance Rack here.
____________________________________________________________
Stampin’ Up! items used to create this project:
stamps: Flower Shop (130939 wood, 130942 clear); Love & Sympathy (128652 wood, 122797 clear); Secret Garden (131940 wood, 129144 clear)
Dies, Punches, & Embossing Folders: Secret Garden Framelits Dies (129372); Pansy Punch (130698); Decorative Label Punch (120907); Banner Punch (Sale-A-Bration Free item with $50 purchase)
Embellishments: Pearl Basic Jewels (119247)
Card Stock: Very Vanilla (101650) – 7″ x 10″ card base; 4-1/4″ x 5″ panel (front of card), two flowers (pansy punch), two banners (banner punch), one sentiment label (decorative label punch); Crumb Cake (120953) – 4-3/4″ x 6-3/4″ panel; Soft Suede (115318) – two Secret Garden Framelits die cuts.
Markers & Ink: Crumb Cake Classic Stampin’ Pad (126975); Soft Suede Classic Stampin’ Pad (126978); Crumb Cake Stampin Write Marker (120967)
Tools: Big Shot Die-Cutting Machine (113439); Sponge Daubers (102892); Stamp-a-ma-jig (101049)
Adhesive: SNAIL (104332); Glue Dots (103683); Stampin’ Dimensionals (104430)
Non-Stampin’ Up!: Embossing folder & Ribbon


gorgeous card!!!! but where did you get that embossing folder??
LikeLike
Really love the card and would also like to know the name of the embossing folder.
TFS
Trina
LikeLike
Heather, This is beautiful. I am having a little trouble understanding the concept of using only part of the embossing folder. I’d appreciate a video tutorial! (Maybe I can find one on You Tube.) Where did you acquire the embossing folder? I have been browsing for it but have not located it. Thank you!
LikeLike