Bloom With Hope & Label Love Wedding Card – Stampin’ Up!

My little sister got married yesterday!  I am so happy for her and her new husband.  It is so exciting to welcome my new brother-in-law into the family.  Today’s project is a wedding card featuring the Bloom with HopeChalk Talk, & Label Love stamp sets from Stampin’ Up!

Bloom With Hope Label Love Wedding (2 of 6)

I think the Bloom with Hope background in black and vanilla is so elegant and just perfect for this occasion.

Bloom With Hope Label Love Wedding (3 of 6)

I finished off the inside of the card by stamping the same floral design from the Bloom with Hope stamp set which is available as a hostess reward from Stampin’ Up!

Bloom With Hope Label Love Wedding (5 of 6)

Bloom With Hope Label Love Wedding (6 of 6)

This lovely card was just perfect to honor my sister and her groom on their special day.  If you love this project as much as I do, please pin it to Pinterest.  You will find a “pin it” button at the bottom of this post below the supply list and card stock cuts.  Also, please subscribe to my blog via email by clicking on the “follow” button if you are a fan of my work.

I hope you will consider selecting me as your demonstrator for your stamping needs.  If you would like to earn the Bloom with Hope stamp set by hosting a party, please contact me at handcraftingheather@icloud.com.

If you need any supplies you can shop now in my online store!  Feel free to drop me an email if you have any questions or if you would like a catalog.  I’m here to help!

Happy Stamping!

Heather

  • Visit my online store here.
  • Shop the Clearance Rack here.

WEEKLY DEALS for July 8-14

Screen Shot 2014-07-08 at 9.59.36 PM

Click here to see the Weekly Deals from Stampin’ Up! in my online store.  The Weekly Deals are only while supplies last and only available at these great prices through July 14.


Stampin’ Up! items used to create today’s project:

If you would like to order any of the products featured in today’s project, click the images below to order from my online store.


Card Stock Cuts

Card Base: Basic Black – 4-1/4″ x 11″

Panels:  Very Vanilla – 4″ x 5-1/4″ (two panels – one on front, one inside), 2-1/2″ x 3-1/2″ panel, 2-1/8″ x 3-1/8″ panel; Basic Black – 2-5/8″ x 3-5/8″ panel, 2-3/8″ x 3-3/8″ panel

Sentiment & Die Cuts:  Very Vanilla – Artisan Label Punch


Advertisement

Happy Fourth of July with Paper Pumpkin – Stampin’ Up!

Happy Fourth of July everyone!  I finally got around to breaking out my June Paper Pumpkin kit.  It was just perfect to celebrate Independence Day!  I created a few different projects with the kit: a wreath, a card, and some pinwheels in a wall vase.  This was my first month of My Paper Pumpkin.  It was really easy to put together with simple instructions, and kind of fun to get a surprise craft in the mail.  To subscribe to My Paper Pumpkin click here.

June Paper Pumpkin (2 of 14)

This whimsical wreath was created by gluing several pinwheels from the kit onto a styrofoam wreath form.  Then I embellished by pushing tulle into the styrofoam with a skewer to fill in the gaps.  I took inspiration from my friend Amy Koenders, and flattened some of the straws that came with the kit and then wrapped them around a pencil to create some curly cue embellishments.

June Paper Pumpkin (3 of 14)

Although the wreath was fun to create, the pinwheels also were really cute all by themselves.  I have a wall vase that one of my students gave me, and I put a few of the pinwheels in there.  It was a great festive decoration, with very little effort.

June Paper Pumpkin (7 of 14)

Finally, I used some of the leftover pinwheels and punched a few banners with the banner punch.  I used those to create a 4th of July inspired card.  I chose to use the Everything Eleanor stamp set because I thought it gave a suggestion of fireworks.

June Paper Pumpkin (9 of 14)

I hope you have a wonderful 4th of July!  Enjoy spending time with friends and family and try to squeeze in a little creative time for yourself.

If you are a fan of this project and want to pin it to Pinterest, you will find a “pin it” button at the bottom of this post below the supply list and card stock cuts.  Also, please subscribe to my blog via email by clicking on the “follow” button if you are a fan of my work.

I hope you will consider selecting me as your demonstrator for your stamping needs.  I also offer free catalogs to all of my customers.  If you are my customer or want to be my customer, please email me your name and mailing address.  I’ll be more than happy to send you the gorgeous book.  You can email me at handcraftingheather@icloud.com.

Also, it is not too late to sign up for my one-to-one card swap.  The details and registration link are below.

If you need any supplies you can shop now in my online store!  Feel free to drop me an email if you have any questions or if you would like a catalog.  I’m here to help!

Happy Stamping!

Heather

  • Visit my online store here.
  • Shop the Clearance Rack here.

2014 Annual Catalog One-to-One Swap…
there’s still time to join in!

Just a reminder about my one-to-one swap.  I hope you will join in the fun!  It is so great when I get to actually connect with all of you and this is a wonderful way for us to share our inspiration and creativity with each other.  To participate, you will send me one card created with current Stampin’ Up! products (no retired items please) and a self-addressed stamped envelope.  Once all the swaps have arrived, I will send you someone else’s card in the mail.  It’s that easy!  If you have questions, please feel free to contact me at handcraftingheather@icloud.com.

To participate, please register for the event by clicking on the button below.   Once registration is complete, you will receive an email with specific instructions (including the address for where to send your swaps).  Projects are due in hand by July 10, 2014.  I can’t wait to see what you create!  Happy Stamping!

Eventbrite - 2014 Annual Catalog One-to-One Swap


WEEKLY DEALS for July 1 – 7

Screen Shot 2014-07-01 at 6.54.36 AM

Click here to see the Weekly Deals from Stampin’ Up! in my online store.  The Weekly Deals are only while supplies last and only available at these great prices through July 7.


Stampin’ Up! items used to create today’s project:

If you would like to order any of the products featured in today’s project, click the images below to order from my online store.

Bridal Shower “Celebrate” Banner – Stampin’ Up!

My sister’s bridal shower is next week!  I can hardly believe it.  I have been having so much fun pulling all the details together… like this gorgeous banner that I made for the mantle of the fireplace.

Bridal Banner (4 of 11)

This banner was made using Stampin’ Up! punches and paper, as well as my Brother Scan N’ Cut e-cutter (one of my new toys).  I used the e-cutter to cut out the letters, wedding cake, and diamond ring die cuts.   Bridal Banner (7 of 11)

Check this out… the words “the bride” in the photo above were handwritten on a piece of white paper using a sharpie marker.  Then I scanned the file and converted it to a cut file, which I cut out of silver foil from Stampin’ Up!  Isn’t that amazing!

Bridal Banner (6 of 11)

I love how the Dazzling Diamonds Glimmer PaperSilver Foil,  and Silver Satin Ribbon all came together to create such an elegant banner.  The flowers from the Itty Bitty Accents Punch Pack were the perfect addition for embellishing the banner.

I hope my sister and her friends enjoy the festivities of the bridal shower.  I think this banner and the other details I have created are going to create the perfect environment to honor my sister on her special night.  If you are a fan of this project and want to pin it to Pinterest, you will find a “pin it” button at the bottom of this post below the supply list and card stock cuts.  Also, please subscribe to my blog via email by clicking on the “follow” button if you are a fan of my work.

I hope you will consider selecting me as your demonstrator for your stamping needs.  I also offer free catalogs to all of my customers.  If you are my customer or want to be my customer, please email me your name and mailing address.  I’ll be more than happy to send you the gorgeous book.  You can email me at handcraftingheather@icloud.com.

Also, it is not too late to sign up for my one-to-one card swap.  The details and registration link are below.

If you need any supplies you can shop now in my online store!  Feel free to drop me an email if you have any questions or if you would like a catalog.  I’m here to help!

Happy Stamping!

Heather

  • Visit my online store here.
  • Shop the Clearance Rack here.

2014 Annual Catalog One-to-One Swap…
there’s still time to join in!

Just a reminder about my one-to-one swap.  I hope you will join in the fun!  It is so great when I get to actually connect with all of you and this is a wonderful way for us to share our inspiration and creativity with each other.  To participate, you will send me one card created with current Stampin’ Up! products (no retired items please) and a self-addressed stamped envelope.  Once all the swaps have arrived, I will send you someone else’s card in the mail.  It’s that easy!  If you have questions, please feel free to contact me at handcraftingheather@icloud.com.

To participate, please register for the event by clicking on the button below.   Once registration is complete, you will receive an email with specific instructions (including the address for where to send your swaps).  Projects are due in hand by July 10, 2014.  I can’t wait to see what you create!  Happy Stamping!

Eventbrite - 2014 Annual Catalog One-to-One Swap


WEEKLY DEALS for July 1 – 7

Screen Shot 2014-07-01 at 6.54.36 AM

Click here to see the Weekly Deals from Stampin’ Up! in my online store.  The Weekly Deals are only while supplies last and only available at these great prices through July 7.


Stampin’ Up! items used to create today’s project:

If you would like to order any of the products featured in today’s project, click the images below to order from my online store.

Bridal Shower Wine Charms – Stampin’ Up!

I’m back today with another project for my sister’s bridal shower.  As young adults, whenever we would have dinner parties at my mom’s house, my sister would run to the printer and print out the guests’ names on strips of paper and tape them around the stem of all the wine glasses.  This was of course before there were a gazillion cute wine charms on the market (yes, that is an official number… I’m a math teacher, I should know).  Anyway, when I started planning this shower, I knew I would have to create some cute wine charms just for her special occasion.  Mine are a bit fancier than paper taped to the bottom of the glass though. 🙂

Girls' Night OUt (8 of 10)

I had some scraps of paper from my local craft store leftover from another project, which I used to make these wine charms.  However, as I describe the project, I will tell you the Stampin’ Up! products that would make perfect substitutions. (I’ve also listed those in the supply list at the bottom of the post.)


For this project, I purchased some 1/2″ Loose Leaf Rings from Amazon.com.  They are the perfect size for wine charms, and they open and close so you can easily put them on and switch out the charm for your next occasion.

Girls' Night OUt (6 of 10)

For each charm I punched one Scallop Oval Punch from Silver Glimmer Paper, and one Modern Label Punch from Silver Foil.  I printed the names of all the guests on a sheet of Whisper White card stock and punched them out using the Word Window Punch.  (For those who are interested, the font I used is called Centeria Script Demo.)  I layered the three punches together with Stampin’ Dimensionals and punched a hole in one end using the 1/4″ Circle Handheld Punch.

Girls' Night OUt (10 of 10)

Finally, I punched a flower from Dazzling Diamonds Glimmer Paper using the Itty Bitty Accents Punch Pack.  I added a rhinestone to the center and added it to the end of my charm with a glue dot.  Didn’t this project just turn out to be adorable?  I know my sister will love this extra detail at her party.  These were really easy to do and the colors could be changed to match any occasion.  So next time you are entertaining and want to “WOW” your guests with all the extra little details you put into the event, this project is for you.

I love Pinterest, don’t you?  You should pin this project so you can remember it next time you are planning a party.  You will find a “pin it” button at the bottom of this post below the supply list and card stock cuts.  Also, please subscribe to my blog via email by clicking on the “follow” button if you are a fan of my work.

Girls' Night OUt (9 of 10)

I hope you will consider selecting me as your demonstrator for your stamping needs.  I offer free catalogs to all of my customers.  If you are my customer or want to be my customer, please email me your name and mailing address.  I’ll be more than happy to send you the gorgeous 2014 Annual Catalog.  You can email me at handcraftingheather@icloud.com.

Also, don’t forget… it is not too late to sign up for my one-to-one card swap!  The details and registration link can be found below.

If you need any supplies you can shop now in my online store!  Feel free to drop me an email if you have any questions or if you would like a catalog.  I’m here to help!

Happy Stamping!

Heather

  • Visit my online store here.
  • Shop the Clearance Rack here.

Last Week to Sign Up for Only $50!

This is the last week to take advantage of the $50 sign up special from Stampin’ Up!  If you have at least $50 worth of products you would like to purchase from the new annual catalog you should really consider joining.  There are many benefits of becoming a demonstrator including a great discount and access to advanced products.  Did you know you could order several of the Stampin’ Blendabilities marker sets now if you were a Stampin’ Up! Demonstrator?

Now is a great time to join my team!  I welcome Hobbyist Demonstrators, and during the month of June, new recruits can join Stampin’ Up! at one of two great prices. Stampin’ Up! will continue to offer their traditional starter kit priced at $99 ($125 product value + FREE Shipping), but only during the month of June they will also be offering a reduced priced starter kit at the low price of $50 ($55 product value + FREE Shipping).  Drop me a note at handcraftingheather@icloud.com if you have any questions or if you’d like additional details.  I’d love to have you on my team!  You can read more information about the benefits of being a Demonstrator here.


2014 Annual Catalog One-to-One Swap

Just a reminder about my one-to-one swap.  I hope you will join in the fun!  It is so great when I get to actually connect with all of you and this is a wonderful way for us to share our inspiration and creativity with each other.  To participate, you will send me one card created with current Stampin’ Up! products (no retired items please) and a self-addressed stamped envelope.  Once all the swaps have arrived, I will send you someone else’s card in the mail.  It’s that easy!  If you have questions, please feel free to contact me at handcraftingheather@icloud.com.

To participate, please register for the event by clicking on the button below.   Once registration is complete, you will receive an email with specific instructions (including the address for where to send your swaps).  Projects are due in hand by July 10, 2014.  I can’t wait to see what you create!  Happy Stamping!

Eventbrite - 2014 Annual Catalog One-to-One Swap


WEEKLY DEALS for June 24-30

Screen Shot 2014-06-24 at 6.01.06 AM

Click here to see the Weekly Deals from Stampin’ Up! in my online store.  The Weekly Deals are only while supplies last and only available at these great prices through June 30.


Stampin’ Up! items used to create today’s project:

If you would like to order any of the products featured in today’s project, click the images below to order from my online store.

“Create” with Sweet Taffy Designer Series Paper – Stampin’ Up!

Happy Father’s Day everyone!  I made my Father’s Day card ages ago so today’s project is something a bit different.  If you would like to see the card my dad will be receiving you can click here. (I think that one may be one of my all time favorites).

Meanwhile… I’m so excited to share a home decor project that I created using the Sweet Taffy Designer Series Paper from Stampin’ Up! and some fabulous punches.  As many of you know, I have been in the throws of converting the guest room in my house into a crafting studio.  Today’s project is the first creation made in my new space.  I love, love, love having a dedicated place for all my crafting.

Sweet Taffy Create Sign (9 of 15)

I purchased some wooden letters and a small board made of Balsa wood from my local craft store. The letters were pre-painted black, and I painted the wood board to match.  The board was a bit longer than I needed, but the Balsa wood is so soft that I was able to cut it with a straight edge and craft knife.

Sweet Taffy Create Sign (8 of 15)

Next, I cut panels of Sweet Taffy DSP and traced the letters using a pencil.  In order to avoid having trace lines on the front of my project, I traced on the back of the paper, being sure to flip over my letters so they were backwards as I traced.  After cutting out my letters, I adhered them to the wooden letters using Multipurpose Liquid Glue.  Then I used E-6000 Quick Hold adhesive to glue the letters to the board.

Sweet Taffy Create Sign (6 of 15)

Once my letters were mounted and the glue had dried, it was time for some embellishments.  I used my Bitty ButterflyElegant ButterflyPetite Petals, and Itty Bitty Accents Punches to decorate my project.  I punched out several shapes using the Sweet Taffy DSP and coordinating card stock in Melon Mambo, Tempting Turquoise, and Daffodil Delight.  Then I sponged around the edges of everything, added some rhinestones, and began decorating my project.

Sweet Taffy Create Sign (3 of 15)

I wanted the butterflies to fly off of my sign to add a bit of whimsy, so I added them to a length of sterling silver wire that I use for jewelry design.  I attached the wire to the back of my sign using a hot glue gun.  Doesn’t it just add the perfect touch!

Here are some close up shots of each letter.  You might notice that I used a cute little leaf with my flowers.  Want to know my secret?  I punched a few flowers from Old Olive card stock using the Petite Petals Punch, then I cut the petals apart, creating five perfect little leaves from each punch.

Sweet Taffy Create Sign (10 of 15)
Sweet Taffy Create Sign (11 of 15)

Sweet Taffy Create Sign (12 of 15)

Sweet Taffy Create Sign (13 of 15)

Sweet Taffy Create Sign (14 of 15)

Sweet Taffy Create Sign (15 of 15)I am in love with the way this project turned out.  It is the perfect addition to my crafting studio. Look for it next week when I unveil the finished remodel!  I plan to post a virtual tour on Wednesday once I’ve put on all the finishing touches.  If you are a fan of this project, please pin it to Pinterest for me.  You will find a “pin it” button at the very bottom of this post.  Also, if you are a fan of my work, why not have my posts delivered directly to your inbox.  Just click on the “follow” button in the sidebar of this post.

Don’t forget to sign up for my one-to-one swap!  I can’t wait to see what you are creating.  Swaps are a fun way to interact and create together.  The details and registration link are below.

If you haven’t gotten your very own copy of the new 2014 Annual Stampin’ Up! catalog yet, I would love to get one to you.  I offer free catalogs to all of my customers.  If you are my customer or want to be my customer, please email me your name and mailing address.  I’ll be more than happy to send you the gorgeous book.  You can email me at handcraftingheather@icloud.com.

I hope you will consider selecting me as your demonstrator for your stamping needs.  If you need any supplies you can shop now in my online store!  Feel free to drop me an email if you have any questions or if you would like a catalog.  I’m here to help!

Happy Stamping!

Heather

  • Visit my online store here.
  • Shop the Clearance Rack here.

2014 Annual Catalog One-to-One Swap

Hello Stampers!  I am so excited about the launch of the new 2014 Annual Catalog from Stampin’ Up!  There are so many awesome products in there.  I would love the chance to see what you are creating.  Let’s do a one-to-one swap!  To participate, you will send me one card created with current Stampin’ Up! products (no retired items please) and a self-addressed stamped envelope.  Once all the swaps have arrived, I will send you someone else’s card in the mail.  It’s that easy!  The motto of Stampin’ Up! is Inspire, Create, Share.  This swap is the perfect opportunity for us to support one another and share all our creative ideas.  If you have questions, please feel free to contact me at handcraftingheather@icloud.com.

To participate, please register for the event by clicking on the button below.   Once registration is complete, you will receive an email with specific instructions (including the address for where to send your swaps).  Projects are due in hand by July 10, 2014.  I can’t wait to see what you create!  Happy Stamping!

Eventbrite - 2014 Annual Catalog One-to-One Swap


Demonstrator Sign Up Special Available through June 30th!


Do you have $50 worth of products you would like to purchase from the new annual catalog?  Do you want to purchase Stampin’ Blendabilities Markers now, without having to wait until they are available to the public?  If so, now is a great time to join my team.  During the month of June, new recruits can join Stampin’ Up! at one of two great prices. Stampin’ Up! will continue to offer their traditional starter kit priced at $99 ($125 product value + FREE Shipping), but only during the month of June they will also be offering a reduced priced starter kit at the low price of $50 ($55 product value + FREE Shipping).  Drop me a note at handcraftingheather@icloud.com if you have any questions or if you’d like additional details.  I’d love to have you on my team!  You can read more information about the benefits of being a Demonstrator here.


WEEKLY DEALS for June 10-16

Screen Shot 2014-06-10 at 7.53.54 AM

Click here to see the Weekly Deals from Stampin’ Up! in my online store.  The Weekly Deals are only while supplies last and only available at these great prices through June 16.


Expressing Sympathy with Flower Shop – Stampin’ Up!

Today  I have a project to share with you created using the Flower Shop stamp set (wood mount and clear mount) from Stampin’ Up!  I’m very excited about this project because I used several techniques I had never tried before.  It is always exciting when a new venture works out the way you hoped it would!

There are also a lot of updates from Stampin’ Up! today… new Clearance Rack items, new Weekly Deals, new MDS downloads and an announcement about My Paper Pumpkin refills so be sure to look past my card information to see all of the latest updates.

Flower Shop 1
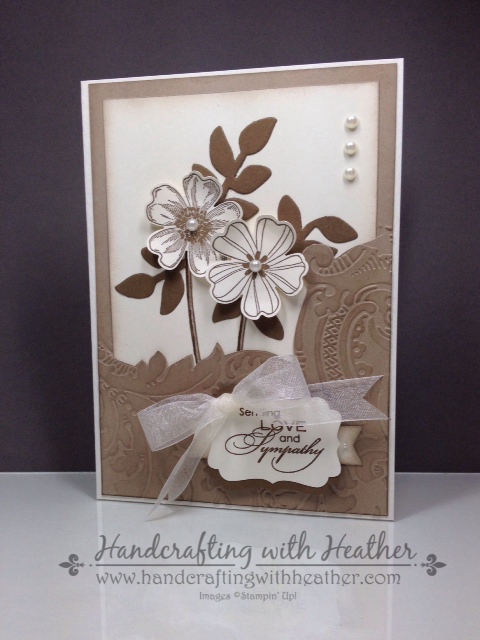
For this project, I began by cutting panels of Crumb Cake and Very Vanilla Card Stock (from the Neutrals card stock pack) for the front of the card.  Next, I used an embossing folder to partially emboss the Crumb Cake panel.

Flower Shop 3

In order to emboss part of the panel, I first created a shim to cover the portion of the embossing folder that I wanted to use for my project.
Partial Embossing Shim

To create the shim, I embossed a piece of white computer paper using my embossing folder and my Big Shot.  Then, I cut out the part of the image that I wanted to use.  I used that as a template to cut the same outline on 4 sheets of card stock, which I taped together to give my shim some thickness.

Once my shim was created, I placed my Crumb Cake panel into the embossing folder, closed the folder and lined up the shim on top before running my sandwich through the Big Shot.

Flower Shop 3

Next, I used a sponge dauber and my crumb cake classic stampin’ pad to accentuate the embossing on the panel.  I also used a circular motion to add light touches of ink around the edges of the panel.  I followed this same procedure on the edges of the very vanilla panel.  Then I used a craft knife to cut a slit in the crumb cake card stock panel along the line where my embossing ended.

Flower Shop 4

After creating my “pocket” I used my Stamp-a-ma-jig to place the stem stamp from the Secret Garden Stamp Set (wood mount and clear mount) on the vanilla panel. I used a Crumb Cake Stampin Write Marker to shade in the stems of the flowers.  Then, I inserted the vanilla panel into the slit in the crumb cake panel and adhered it with SNAIL. I used SNAIL to glue the crumb cake panel to a very vanilla card base, then I stamped two flowers using the Flower Shop stamp set on very vanilla card stock using the Soft Suede Classic Stampin’ Pad.  I punched out the flowers using the Pansy Punch and adhered them to the card front using stampin’ dimensionals.

I used the Secret Garden Framelits set to cut out two leaf die cuts for my flowers using soft suede card stock from the Neutrals collection. I cut the leaves apart into smaller sections and placed them decoratively around the flowers.  I attached them using SNAIL adhesive.  Finally, I gave my flowers a finishing touch by adding a Basic Pearl Jewel Accent to the center of each bloom.

Flower Shop 5

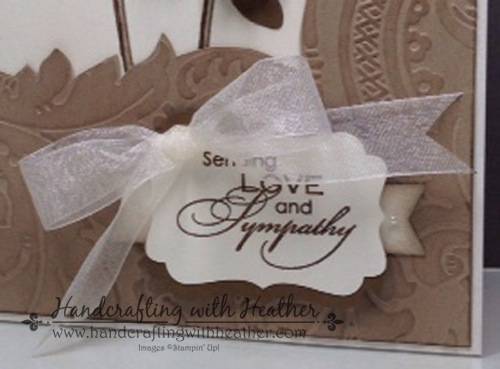
My card was looking beautiful at this point, but I still needed to add my message.  I stamped a sentiment from the Love and Sympathy stamp set (wood mount and clear mount) on very vanilla card stock and punched it out using the decorative label punch.  I added two little banners using the Banner Punch (available FREE with a $50 purchase until March 31 as part of the Sale-a-bration Promotion) and decorated them with a small pearl. I used a glue dot to adhere each banner to the card front, and then used stampin’ dimensionals to adhere the sentiment over them.

Flower Shop 1

Now all that was left to finish the front was to add a chiffon bow and pearl accents in the upper right corner of the card.  I used a glue dot to adhere the bow.
Flower Shop 2I finished the inside of my card by stamping a sentiment from the Love and Sympathy stamp set in the center of the card.  In the bottom corner, I placed one of the blooms from the Flower Shop stamp set that I used on the front of the card, and added a leaf from the secret garden stamp set.

I hope you have enjoyed my share today.   If you would like to order the Flower Shop stamp set, or any of the other wonderful supplies used in this project, please click here to shop in my online store.

You can find a complete list of supplies, including card stock cuts, and the very bottom of this post.

____________________________________________________________

Weekly Deals from Stampin’ Up! February 18-24

Here are the Weekly Deals from Stampin’ Up!:

Click here to see the Weekly Deals from Stampin’ Up! in my online store.  The Weekly Deals are only while supplies last and only available at these great prices through February 17.

____________________________________________________________

Clearance Rack Updated!

Screen Shot 2014-02-18 at 6.30.12 AM

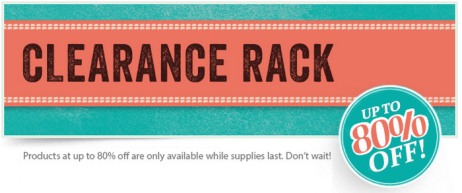
Stampin’ Up! has updated the Clearance Rack in the online store!  I saw some punches, dies, card stock, DSP and embellishments at great deals.  And Clearance Rack items count toward your merchandise total for Sale-a-bration items!!  So click here to head over and start shopping now!  Clearance Rack deals are only available while supplies last. ____________________________________________________________

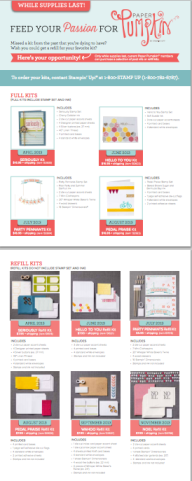
My Paper Pumpkin Refills and Past Kits Now Available

Screen Shot 2014-02-18 at 6.36.02 AM

Only while supplies last, active Paper Pumpkin subscribers can purchase a selection of past Paper Pumpkin Kits and Paper Pumpkin Refill Kits.

The Fine Print

  • This special offer is available to any active Paper Pumpkin subscribers. Former Paper Pumpkin subscribers are not eligible unless they re-subscribe.
    • An active or current subscriber is someone who is receiving one or more Paper Pumpkin Kits on a monthly basis.
    • If a subscriber decides to skip a month, they are still considered an active subscriber.
  • Kits and refill kits will count toward Sale-A-Bration rewards (through March 31) and hostess benefits for all subscribers.
  • Active subscribers can order as many kits and refill kits as they’d like; however, this offer is good only while supplies last. Once Stampin’ Up!’s current inventory of a kit is depleted, the kit will not be available for ordering.
  • There is no guarantee that Stampin’ Up! will sell additional past kits or kit refills again. Stampin’ Up! will be monitoring the effectiveness of selling past kits and refill kits prior to offering additional kits or refill kits in the future.
  • Kit prices do not include shipping; standard shipping rates apply.
  • To order these kits, Paper Pumpkin subscribers must call Demonstrator Support during normal business hours (M-F, 7 AM [MT] – 7 PM [MT]) at 1-800-STAMP UP (1-800-782-6787).
    • Kits cannot be ordered in the Online Store.
    • Kits can be added to a customer, or workshop order.
    • Kits cannot be used on incentive orders or as a Starter Kit item.
    • Kits can be purchased with hostess dollars or as hostess 50%-off items.
  • Paper Pumpkin Refill Kits do NOT include the stamp set or ink from the original kit and are $7.95 + shipping.
  • Full Paper Pumpkin Kits are $16.95 + shipping.

Click the flyer below to see the kits and refills that are currently available and let me know if you have any questions.

Screen Shot 2014-02-18 at 7.58.17 AM

____________________________________________________________

New My Digital Studio Downloads Now Available

Screen Shot 2014-02-18 at 6.28.16 AM

Click here to see the new My Digital Studio downloads available now from Stampin’ Up! in my online store.  Click here to see all of the latest My Digital Studio Downloads available.

____________________________________________________________

If you need any stamping supplies, I’d be very happy to be your Demonstrator.  Just click on Order Stampin’ Up! Online Now in the main menu or in the sidebar to go directly to my online store or drop me an email if you have any questions.

Happy Stamping!

Heather

  • It’s Sale-a-bration time!!  You’ll get a free item from Stampin’ Up! for every $50 that you purchase between now and March 31!  Click on my Stampin’ Up! Promotions page for more information!
  • Visit my online store here.
  • Shop the Clearance Rack here.

____________________________________________________________

Stampin’ Up! items used to create this project:

stamps: Flower Shop (130939 wood, 130942 clear); Love & Sympathy (128652 wood, 122797 clear); Secret Garden (131940 wood, 129144 clear)

Dies, Punches, & Embossing Folders: Secret Garden Framelits Dies (129372); Pansy Punch (130698); Decorative Label Punch (120907); Banner Punch (Sale-A-Bration Free item with $50 purchase)

Embellishments: Pearl Basic Jewels (119247)

Card Stock:  Very Vanilla (101650) – 7″ x 10″ card base; 4-1/4″ x 5″ panel (front of card), two flowers (pansy punch), two banners (banner punch), one sentiment label (decorative label punch); Crumb Cake (120953) – 4-3/4″ x 6-3/4″ panel; Soft Suede (115318) – two Secret Garden Framelits die cuts.

Markers & Ink:  Crumb Cake Classic Stampin’ Pad (126975); Soft Suede Classic Stampin’ Pad (126978); Crumb Cake Stampin Write Marker (120967)

Tools:  Big Shot Die-Cutting Machine (113439); Sponge Daubers (102892); Stamp-a-ma-jig (101049)

Adhesive: SNAIL (104332); Glue Dots (103683); Stampin’ Dimensionals (104430)

Non-Stampin’ Up!: Embossing folder & Ribbon