Finish My Card Collaboration (Part 2)… Something for Baby – Stampin’ Up!

Finish My Card Collaboration – Part 2

On Friday, I posted part 1 of a “finish my card” collaboration with my friend and fellow Stampin’ Up! Demonstrator, Amy Koenders.  If you missed that post, you can see it here.   For this collaborative project, each one of us created an art piece and sentiment for a card, then we traded to finish things up.  For her art piece, Amy created an adorable onesie using the Something for Baby stamp set from Stampin’ Up!  She also made a darling banner for the greeting featuring the “Sweet Baby” sentiment from Baby, We’ve Grown.  I just loved her creative use of the elements from these two sets!

Something for Baby (4 of 13)

As soon as I saw Amy’s pieces, I could imagine that cute outfit hanging up in a baby’s room.  I decided to build a dresser using pieces I cut from the Hardwood background stamp.  I stamped it on Soft Suede card stock with Soft Suede ink.  Then I cut the boards apart and assembled them to look like a chest of drawers.  I cut a Stampin’ Dimensional apart into tiny pieces and used them to adhere Neutrals Candy Dots for knobs on the drawers.  Then I added Amy’s onesie.

Something for Baby (8 of 13)

Next, I created the “walls” of my room by stamping a polka dot design on a panel of Whisper White card stock using the Work of Art stamp set in Blushing Bride, Pistachio Pudding, and So Saffron ink.  Then I layered a panel of So Saffron Designer Series Background Paper along the bottom and added a length of Whisper White Organza Ribbon with sticky strip along the middle to resemble a chair rail.

Something for Baby (3 of 13)

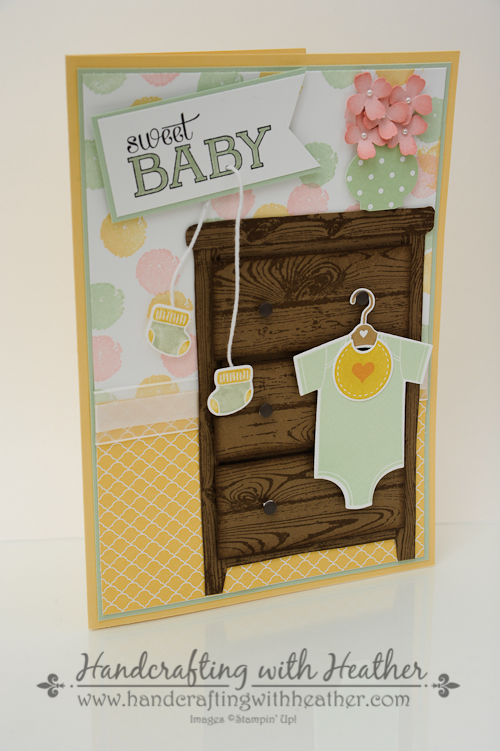
I added the dresser and Amy’s sentiment to the front of my card, but decided that the dresser needed something on top.  I used my Mosaic Punch to create a vase from Pistachio Pudding DSP.  Then, I punched some flowers in Blushing Bride card stock using the Itty Bitty Accents Punch Pack.  I inked around the edges of the flowers using Blushing Bride ink to add a little interest, then I finished them off with a little pearl in the center.  I added them to my vase using mini glue dots.

Something for Baby (10 of 13)

To finish off the inside of my card, I stamped the polka dot design along the bottom of my card and added a strip of the So Saffron DSP.

Something for Baby (11 of 13)


Finally, I created a coordinating envelope using Pistachio Pudding Background DSP and my Envelope Punch Board.  I just love that tool!  It is so versatile, and it allows me to create cards of any dimension without fear about not being able to find a suitable envelope.


Something for Baby (2 of 13)

I love the way this card turned out!  I think it is so darling!  Amy sure did give me great material to work with! Thank you Amy!  I hope you will head over to her blog to see how she created the cute baby elements, just click here.  If you are a fan of this project, please pin it to Pinterest and leave me a comment.  You will find a “pin it” button at the very bottom of this post below the supply list.  Also, if you like my work, why not subscribe to my blog via email.  All you have to do is click on “follow” in the sidebar.

If you haven’t gotten your very own copy of the new 2014 Annual Stampin’ Up! catalog yet, now is the perfect time.  There are so many great new items available for purchase.  I offer free catalogs to all of my customers.  If you are my customer or want to be my customer, please email me your name and mailing address.  I’ll be more than happy to send you the gorgeous book.  You can email me at handcraftingheather@icloud.com.

I hope you will consider selecting me as your demonstrator for your stamping needs.  If you need any supplies you can shop now in my online store!  Feel free to drop me an email if you have any questions or if you would like a catalog.  I’m here to help!

Happy Stamping!

Heather

  • Visit my online store here.
  • Shop the Clearance Rack here.

Demonstrator Sign Up Special Available through June 30th!


Have you been considering joining Stampin’ Up! as a Demonstrator?  If so, now is a great time to join.  Between now and June 30, new recruits can join Stampin’ Up! at one of two great prices. Stampin’ Up! will continue to offer their traditional starter kit priced at $99 ($125 product value), but for the month of June only they will also be offering a reduced priced starter kit at the low price of $50 ($55 product value).  Drop me a note at handcraftingheather@icloud.com if you have any questions or if you’d like additional details.  I’d love to have you on my team!  You can read more information about the benefits of being a Demonstrator here.


WEEKLY DEALS for June 3 – 9

Screen Shot 2014-06-03 at 7.51.44 AM

Click here to see the Weekly Deals from Stampin’ Up! in my online store.  The Weekly Deals are only while supplies last and only available at these great prices through June 9.


Stampin’ Up! items used to create today’s project:

If you would like to order any of the products featured in today’s project, click the images below to order from my online store.

Card Stock Cuts

Card Base:  So Saffron – 7″ x 10″

Panels:  Pistachio Pudding – 4-3/4″ x 6-3/4″; Whisper White – 4-5/8″ x 6-5/8″ panel (front of card), 4-3/4″ x 6-3/4″ panel (inside of card); So Saffron Background DSP – 4-5/8″ x 2-3/4″ panel, 1/2″ x 4-3/4″ strip (inside of card)

Sentiment & Die Cuts:  Soft Suede – Hardwood Background Stamp (x2); Blushing Bride – Itty Bitty Accents Punch Flower (x5); Pistachio Pudding Background DSP – Mosaic Punch

Envelope: Pistachio Pudding Background DSP – 9-1/2″ x 9-1/2″ scored at 4″ using the envelope punch board.

Advertisement

Finish My Card Collaboration… We’re “In This Together” – Stampin’ Up!

Finish My Card Collaboration – Part 1

My friend and fellow Stampin’ Up! Demonstrator, Amy Koenders, helped me to create a fun collaborative project for you today.  Each one of us created an art piece and sentiment for a card.  I chose to use the new In This Together stamp set from Stampin’ Up! for my piece. Once our focal points were finished, we traded and finished each other’s card.  For my post today, I will be showing you my art piece, but you will have to link over to Amy’s blog, Stamp with Amy K, to see the finished product.  Part 2 of this collaboration will be coming soon, so you can see what I created using Amy’ art piece as my focal point.

In This Together (6 of 7)

I love the scenes of girlfriends from the In This Together stamp set from Stampin’ Up! However, I’m not a fan of the sentiments.  For my project today I chose the darling image of the girl with a cocktail and I masked over the sentiment with a post-it note when I inked it up.  I used memento ink because I wanted to color my image with Stampin’ Blendabilities alcohol markers (available soon).

In This Together (7 of 7)

I decided to create my own sentiment using the Endless Birthday Wishes photopolymer stamp set.  I love this set.  It is so versatile; and because the photopolymer stamps are completely clear, it makes it easy to combine the images to create your own custom sentiments.  As a finishing touch, I added some rhinestones around the sentiment, which I colored with my Blendabilities markers.  Finally, I inked around the edges of my Whisper White panel with Baked Brown Sugar ink and a stamping sponge.

Note:  I just learned that the Endless Birthday Wishes stamp set has sold out and is temporarily unavailable.  If you missed out on this wonderful set, don’t worry, it will be back soon.  In the meantime, there are lots of other stamp sets that would make nice substitutions.  The Sumthin’ Sumthin’ stamp set or Remembering Your Birthday set are a couple of options you might consider.  I particularly like the “Let’s Celebrate” sentiment from the Sumthin’ Sumthin’ stamp set, which is brand new with the 2014 Annual Catalog that went live just this week!

In This Together (6 of 7)
This collaborative project was really fun to do.  To see the finished card, click here to go to Amy’ blog.

If you are a fan of this project, please pin it to Pinterest and leave me a comment.  You will find a “pin it” button at the very bottom of this post below the supply list.  Also, if you like my work, why not subscribe to my blog via email.  All you have to do is click on “follow” in the sidebar.

The new catalog is finally live!  If you haven’t gotten your very own copy of the new catalog yet, now is the perfect time.  There are so many great new items available for purchase.  I offer free catalogs to all of my customers.  If you are my customer or want to be my customer, please email me your name and mailing address.  I’ll be more than happy to send you the gorgeous book.  You can email me at handcraftingheather@icloud.com.

I hope you will consider selecting me as your demonstrator for your stamping needs.  If you need any supplies you can shop now in my online store!  Feel free to drop me an email if you have any questions or if you would like a catalog.  I’m here to help!

Happy Stamping!

Heather

  • Visit my online store here.
  • Shop the Clearance Rack here.

WEEKLY DEALS for June 3 – 9

Screen Shot 2014-06-03 at 7.51.44 AM

Click here to see the Weekly Deals from Stampin’ Up! in my online store.  The Weekly Deals are only while supplies last and only available at these great prices through June 9.


Stampin’ Up! items used to create today’s project:

If you would like to order any of the products featured in today’s project, click the images below to order from my online store.

Collective Creativity with Stampin’ Up!

For today’s post, I’ve got something a little different for you.  I recently participated in a group project with some other Stampin’ Up! Demonstrators, and I wanted to share the end result with you.  I just love how this framed art piece turned out.  It really is amazing that it came together so well, since each piece was created in isolation… collective creativity at its finest!

Spring Grid Project (3 of 20)

Isn’t it pretty!  I can’t wait to see it hanging on the wall of my new craft room!  I’m remodeling a guest bedroom, so I will finally have a dedicated space for all my creative endeavors.  Don’t worry, I’m taking pictures as the process evolves, and I will show you everything once it is finished!

This is a great project to create with friends.  I hope you will try it out and leave me a comment.  Speaking of comments, that brings me to my drawing for April!  Sale-a-bration is over, but it isn’t too late to get your hands on some of the great products featured during the promotion.  Leave me a comment, and I will enter you into my drawing.  During the month of April, I will be doing a drawing every Sunday.  One lucky person will receive one of the items from Sale-a-bration as a special show of appreciation to you, my readers.  Also, if you like my work, why not get my post delivered right to your inbox.  Click on “follow” in the sidebar to subscribe to my blog via email!

Spring Grid Project (8 of 20)

Now, let’s get to the details about this project.  First, the group decided on a color scheme and each person was assigned a background color either Bermuda Bay or Daffodil Delight.  Then every person created nine copies of a 2″ x 2″ art piece using Stampin’ Up! products.  We chose a spring theme and limited our color choices to the brights collection.  We shared with each other which stamp sets we would be using, so that we didn’t end up with nine squares all featuring the same ones.  Once our squares were finished, we kept one, and mailed the other eight to the other participants.  It was so fun getting these little gems in the mail and seeing it all come together piece by piece.

Here are more detailed views of each of the grid sections:

Spring Grid Project (20 of 20)

Created by Sue Prather

Spring Grid Project (16 of 20)

Created by Nancy Pellows

Spring Grid Project (15 of 20)

Created by Loyda Montanez

Spring Grid Project (14 of 20)

Created by Amy Austin Kinler in collaboration with Heather Van Looy

Spring Grid Project (13 of 20)

Created by Dawn Sorenson in collaboration with Heather Van Looy

Spring Grid Project (12 of 20)

Created by Sandi MacIver

Spring Grid Project (11 of 20)

Created by Kristi Gray

Spring Grid Project (10 of 20)

Created by Sheryl Whitmer

Spring Grid Project (9 of 20)

Created by Heather Van Looy

If you would like to create one of these projects, here are few logistical items to consider:

  • Set a due date for mailing the pieces and allow everyone enough work time to meet the due date.Each art piece should measure 1-7/8″ x 1-7/8″ and be mounted on a 2″ x 2″ piece of whisper white card stock.
  • The background pieces (Bermuda Bay/Daffodil Delight) measure 2-1/4″ x 2-1/4″.  They are added by the recipient once all the pieces have been received.  This allows each person more flexibility in deciding how to put the final product together.
  • Since these are framed in a shadow box, it is okay to have quite a bit of dimensionality to them.  In fact, the more three-dimensional the art is, the better!
  • When you receive all of the squares, cut a 7-1/8″ square of whisper white card stock to help mount all the squares evenly.  I started with the corner pieces and worked my way in.  I lined up the outside edges flush with the edge of the 7-1/8″ square.
  • Mount the 7-1/8″ square onto an 8″ x 8″ square of whisper white.
  • Mount that onto a 10″ x 10″ piece of Designer Series Paper of your choice.
  • Place in a 10″ x 10″ shadow box frame.
  • NOTE:  I assembled my project according the directions above, and then when I went to buy my frame, they only had 12″ x 12″.  I added my finished piece to a 12″ x 12″ square of Daffodil Delight DSP, and I actually like how it tied all the squares together.

Spring Grid Project (17 of 20)

If you like this project, please do me a favor and pin it to Pinterest for me.  I always appreciate your help in getting the word out about my blog.  You will find a “pin it” button at the very bottom of this post below the list of stamp sets that were used to create this project.  And don’t forget to leave me a comment for your chance to win a free stamp set from Sale-a-bration!

If you would like to purchase any of the wonderful products featured in this project, I would love to help you out.  You can shop in my online store now by clicking here.  Also, if you would like to create one of these projects with your friends at a workshop it would be a great chance to earn the Simply Sketched stamp set through our hostess program.  I hope you will consider contacting me to be your demonstrator.  I would love to help you and group of friends put a similar project together as a fun social occasion!

You can find a complete list of stamp sets and punches used for this project at the very bottom of this post.

___________________________________________

WEEKLY DEALS from Stampin’ Up! April 1-7

Click here to see the Weekly Deals from Stampin’ Up! in my online store.  The Weekly Deals are only while supplies last and only available at these great prices through April 7.

Screen Shot 2014-04-01 at 9.41.23 PM

Other Stampin’ Up! Links & Promotions

  • Visit my online store here.
  • Shop the Clearance Rack here.

If you need any stamping supplies, I’d be very happy to be your Demonstrator.  Just click on Order Stampin’ Up! Online Now in the main menu or in the sidebar to go directly to my online store or drop me an email if you have any questions.

Happy Stamping!

Heather

____________________________________________________________

Stampin’ Up! items used to create this project:

Stamp Sets: Simply Sketched (Hostess Reward – 129672); Fabulous Florets (123027); Serene Silhouettes (127324); Papillon Potpourri (123759); Wetlands (126697); Secret Garden (129144); Hardwood (133035); For the Birds (126407)

Dies, Punches, & Embossing Folders: Itty Bitty Shapes Punch Pack (118309); Bitty Butterfly punch (129406); Little Leaves Sizzlits (114511); 1-3/4″ Scallop Circle Punch (119854); Beautiful Wings Embosslits (118138)