Bridal Shower “Celebrate” Banner – Stampin’ Up!

My sister’s bridal shower is next week!  I can hardly believe it.  I have been having so much fun pulling all the details together… like this gorgeous banner that I made for the mantle of the fireplace.

Bridal Banner (4 of 11)

This banner was made using Stampin’ Up! punches and paper, as well as my Brother Scan N’ Cut e-cutter (one of my new toys).  I used the e-cutter to cut out the letters, wedding cake, and diamond ring die cuts.   Bridal Banner (7 of 11)

Check this out… the words “the bride” in the photo above were handwritten on a piece of white paper using a sharpie marker.  Then I scanned the file and converted it to a cut file, which I cut out of silver foil from Stampin’ Up!  Isn’t that amazing!

Bridal Banner (6 of 11)

I love how the Dazzling Diamonds Glimmer PaperSilver Foil,  and Silver Satin Ribbon all came together to create such an elegant banner.  The flowers from the Itty Bitty Accents Punch Pack were the perfect addition for embellishing the banner.

I hope my sister and her friends enjoy the festivities of the bridal shower.  I think this banner and the other details I have created are going to create the perfect environment to honor my sister on her special night.  If you are a fan of this project and want to pin it to Pinterest, you will find a “pin it” button at the bottom of this post below the supply list and card stock cuts.  Also, please subscribe to my blog via email by clicking on the “follow” button if you are a fan of my work.

I hope you will consider selecting me as your demonstrator for your stamping needs.  I also offer free catalogs to all of my customers.  If you are my customer or want to be my customer, please email me your name and mailing address.  I’ll be more than happy to send you the gorgeous book.  You can email me at handcraftingheather@icloud.com.

Also, it is not too late to sign up for my one-to-one card swap.  The details and registration link are below.

If you need any supplies you can shop now in my online store!  Feel free to drop me an email if you have any questions or if you would like a catalog.  I’m here to help!

Happy Stamping!

Heather

  • Visit my online store here.
  • Shop the Clearance Rack here.

2014 Annual Catalog One-to-One Swap…
there’s still time to join in!

Just a reminder about my one-to-one swap.  I hope you will join in the fun!  It is so great when I get to actually connect with all of you and this is a wonderful way for us to share our inspiration and creativity with each other.  To participate, you will send me one card created with current Stampin’ Up! products (no retired items please) and a self-addressed stamped envelope.  Once all the swaps have arrived, I will send you someone else’s card in the mail.  It’s that easy!  If you have questions, please feel free to contact me at handcraftingheather@icloud.com.

To participate, please register for the event by clicking on the button below.   Once registration is complete, you will receive an email with specific instructions (including the address for where to send your swaps).  Projects are due in hand by July 10, 2014.  I can’t wait to see what you create!  Happy Stamping!

Eventbrite - 2014 Annual Catalog One-to-One Swap


WEEKLY DEALS for July 1 – 7

Screen Shot 2014-07-01 at 6.54.36 AM

Click here to see the Weekly Deals from Stampin’ Up! in my online store.  The Weekly Deals are only while supplies last and only available at these great prices through July 7.


Stampin’ Up! items used to create today’s project:

If you would like to order any of the products featured in today’s project, click the images below to order from my online store.

Advertisement

Watercolor Wonder Good Thoughts – Stampin’ Up!

I recently learned that a former co-worker of mine has been diagnosed with breast cancer.  I made this get well card featuring a sentiment from Perfect Pennants and the beautiful flowers from the Watercolor Wonder Designer Series Paper pack for her in an attempt to lift her spirits.  It is never fun to have the occasion to make this type of card, but I hope that it will brighten her day a little to know that she is not alone and that I am sending good thoughts her way!

Watercolor Wonder & Perfect Pennants (1 of 9)

This card was pretty quick and very simple to create.  I started with a Whisper White card base and layered on two different panels from Watercolor Wonder.  I inked around the edges of the panels with Tangerine Tango ink to add a little definition to the layers.

Watercolor Wonder & Perfect Pennants (3 of 9)

Next, I stamped the leaf image from Summer Silhouettes three times in Old Olive on the yellow and orange watercolor wash design from the DSP pack.  I cut out three flowers from a sheet of the rose design paper in the Watercolor Wonder pack and added them to the front of my card using Stampin’ Dimensionals.

Watercolor Wonder & Perfect Pennants (6 of 9)

Finally, I stamped the “Sending Good Thoughts Your Way” greeting on to a piece of polka-dot DSP and cut it out using my banner framelits dies.  I inked around the edges of the banner with Tangerine Tango ink.

Watercolor Wonder & Perfect Pennants (4 of 9)

I finished the inside of my card with the leaf motif and another rose from the Watercolor Wonder DSP.

Watercolor Wonder & Perfect Pennants (8 of 9)

Watercolor Wonder & Perfect Pennants (7 of 9)

I hope that this card is able to lift my friend’s spirits.  If you are a fan of this card, please pin this project to Pinterest and leave me a comment.  You will find a “pin it” button at the very bottom of this post below the supply list and cards stock cuts.  Also, if you like my work, why not subscribe to my blog via email.  All you have to do is click on “follow” in the sidebar.

Although, I’m sad to see this beautiful paper being retired, I’m excited about all the new designs that will be available with the new catalog on June 2nd.  If you haven’t gotten your very own copy of the new catalog yet, now is a great time.  I’ve got a stack of them hot off the presses waiting for you. I offer free catalogs to all of my customers.  If you are my customer or want to be my customer, please email me your name and mailing address.  I’ll be more than happy to send you the gorgeous book.  You can email me at handcraftingheather@icloud.com.

I hope you will consider selecting me as your demonstrator for your stamping needs.  If you need any supplies or want to grab some retiring products before they are gone, you can shop now in my online store!  Remember, the Stampin’ Up! Retiring Products are 20%-50% off while supplies last!  Feel free to drop me an email if you have any questions or if you would like a catalog.  I’m here to help!

Happy Stamping!

Heather

  • Visit my online store here.
  • Shop the Clearance Rack here.

WEEKLY DEALS for May 20-26

Screen Shot 2014-05-20 at 6.06.42 AM

Click here to see the Weekly Deals from Stampin’ Up! in my online store.  The Weekly Deals are only while supplies last and only available at these great prices through May 26.


Stampin’ Up! items used to create today’s project:

If you would like to order any of the products featured in today’s project, click the images below to order from my online store.

Card Stock Cuts

Card Base: Whisper White – 5-1/2″ x 8-1/2″

Panels: Watercolor Wonder – (front of card) two panels 5-3/8″ x 4-1/8″ and 5″ x 3-3/4″

Sentiment & Die Cuts: Watercolor Wonder DSP – 1 banner


Watercolor Wonder Tri-fold Banner Card – Stampin’ Up!

I absolutely adore the patterns in the Watercolor Wonder Designer Series Paper pack.  I am bound and determined not to let this gorgeous paper go to waste, so you will probably see lots of it in the next couple of weeks (along with the Retro Fresh DSP).  Remember, there is only a short time left to order your retiring products, so act now!

Watercolor Wonder dozen thoughts (1 of 8)

Although, I’m sad to see this beautiful paper being retired, I’m excited about all the new designs that will be available with the new catalog on June 2nd.  If you haven’t gotten your very own copy of the new catalog yet, now is a great time.  I offer free catalogs to all of my customers.  If you are my customer or want to be my customer, please email me your name and mailing address.  I’ll be more than happy to send you the gorgeous book.  You can email me at handcraftingheather@icloud.com.

Watercolor Wonder dozen thoughts (2 of 8)

I had a great time playing around with all the different patterns from Watercolor Wonder for these cards.  I began with card bases in Island Indigo and Tangelo Twist.  I scored these to create a tri-fold effect.  Then I added panels of Watercolor Wonder DSP to the front flaps.  I used my Banner Framelits Dies to cut three banners from Wild Wasabi and Daffodil Delight card stock for each card.  For these banners, I wanted them to be narrower than the die, so I cut strips of card stock 1-1/4″ wide and then centered the die over my strips.  This allowed me to have a perfect angle on the banner to mat my smaller banner, without the mat being too big.  Next, I cut banners from my DSP using the 2nd die from the center.  I glued my banner layers together with multipurpose liquid adhesive and then added them to the front of the card.  I put two banners on the right flap, and the banner in the center on the left flap.  This creates a cool “interlocking” closure effect, which adds a lot of interest to the card design.

Watercolor Wonder dozen thoughts (6 of 8)

Next, I stamped three flowers from the Petite Petals stamp set in Island Indigo and Tangelo Twist ink.  I used a sponge to ink around the edges of the flower, which really made them pop.  Then I colored a pearl using my Stampin’ Blendabilities markers in Coastal Cabana and Daffodil delight and placed it in the center of each flower.  I popped up the petals of the flowers and added them to the banners using mini glue dots.

Watercolor Wonder dozen thoughts (4 of 8)

For my sentiment, I chose the “Just Because” stamp from A Dozen Thoughts.  I love the curly script of this greeting.  I stamped the greeting in Island Indigo and Tangelo Twist, using my stamp-a-ma-jig for perfect placement.  Then I embellished with some more pearls.

Watercolor Wonder dozen thoughts (8 of 8)

I played around with different combinations of the DSP for my panels to create slightly different versions of my card.  As you can see, the possibilities for this design are endless!

Watercolor Wonder dozen thoughts (5 of 8)

I finished off the inside of my card by adding panels of Watercolor Wonder DSP on the inside.  I inked around the edges of the top layer to give some added contrast with the mat.

Watercolor Wonder dozen thoughts (3 of 8)

I love the cheerful colors of these cards.  I also like the contrast between the soft florals and the geometric design of the banners.  I am looking forward to sending these out when those “just because” moments arise in life.  I hope you have enjoyed today’s project as well.  As always, if you find inspiration from my work, please pin this project to Pinterest and leave me a comment.  You will find a “pin it” button at the very bottom of this post below the supply list and cards stock cuts.  Also, if you like my work, why not subscribe to my blog via email.  All you have to do is click on “follow” in the sidebar.

I hope you will consider selecting me as your demonstrator for your stamping needs.  If you need any supplies or want to grab some retiring products before they are gone, you can shop now in my online store!  Also, remember that I’ve got a stack of brand new catalogs hot off the presses waiting for you.  Feel free to drop me an email if you have any questions or if you would like a catalog.  I’m here to help!

Happy Stamping!

Heather

  • Visit my online store here.
  • Shop the Clearance Rack here.

WEEKLY DEALS for May 20-26

Screen Shot 2014-05-20 at 6.06.42 AM

Click here to see the Weekly Deals from Stampin’ Up! in my online store.  The Weekly Deals are only while supplies last and only available at these great prices through May 26.


Stampin’ Up! items used to create today’s project:

If you would like to order any of the products featured in today’s project, click the images below to order from my online store. (Keep in mind that some sneak peek items will not be available for purchase until June 2, 2014.)

Card Base: Island Indigo and Tangelo Twist – 5-1/2″ x 8-1/2″ scored at 2-1/2″ and 6-3/4″

Panels: Watercolor Wonder – (front of card) two panels 2-1/4″ x 5-1/4″ and 1-1/2″ x 5-1/4″; (inside of card) two panels 4″ x 5-1/4″ and 3-3/4″ x 5-1/4″

Sentiment & Die Cuts: Whisper White – 3 petite petals punches; Watercolor Wonder DSP – 3 small banners per card; Wild Wasabi and Daffodil Delight – 3 banners per card.


Life is Wonderful with Perfect Pennants and Mixed Bunch from Stampin’ Up!

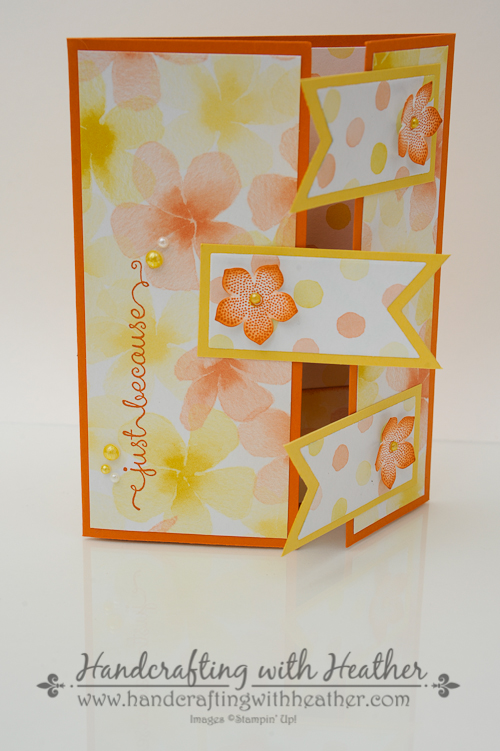
My card today was created using the Perfect Pennants, Mixed Bunch, and Flower Shop stamp sets from Stampin’ Up!  It also features the Modern Mosaic and Decorative Dots (Sale-a-bration item) embossing folders.  The Decorative Dots embossing folder is one of my favorite items available FREE with a $50 purchase through March 31st!  There are just so many things you can create with that cute design.  So, if you love this card and want to get some of the supplies, now is a great time.  For your convenience, I have hyperlinked the names of products to my online store… just click and you’ll be on your way to creating this beautiful card too!

Perfect Pennants Mixed Bunch3

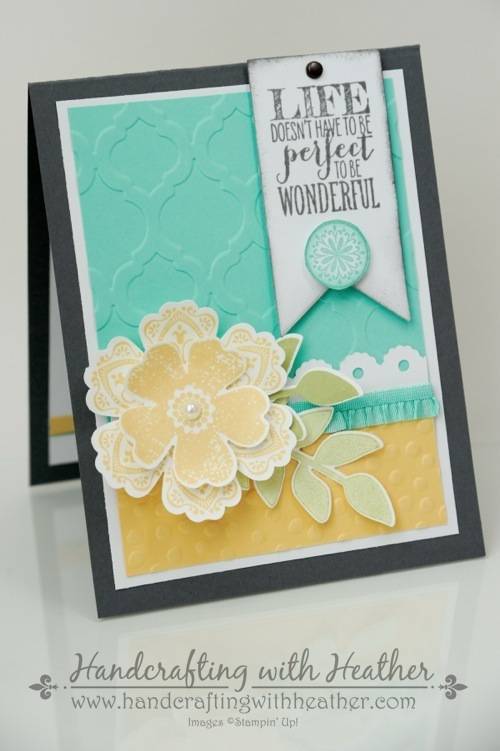
I started my creation by cutting panels of Whisper WhiteCoastal Cabana and So Saffron card stock.  Next, I dry embossed the Coastal Cabana and So Saffron panels using the Modern Mosaic and Decorative Dots embossing folders using my Big Shot Die-Cut Machine.  Then, I added some Coastal Cabana Stretch Ruffle Trim to the top of the yellow panel with SNAIL adhesive.  I used the Adorning Accents Edgelits to cut a scalloped strip of Whisper White card stock, and I used a small hole punch to create a hole at each scallop to give my trim an eyelet lace effect.  Finally, I  adhered it to the bottom of the Coastal Cabana panel and layered all of my panels on a  Basic Gray card base.

Perfect Pennants Mixed Bunch12

Once the foundation for my card was finished, it was time to embellish it with a lovely flower and my card greeting.  I chose the “Life doesn’t have to be perfect to be wonderful” sentiment from the Perfect Pennants stamp set (wood mount and clear mount) for my greeting.  I love this one because it can be used for many different occasions.  I stamped it on Whisper White card stock using the Basic Gray Classic Stampin’ Padthen I cut it out using the 3rd smallest Banner Framelits Die.   (Remember, the Perfect Pennants stamp set and Banner Framelits Dies can be purchased together as a bundle for 15% off the regular price. Available in wood mount or clear mount bundles.)

Perfect Pennants Mixed Bunch17

After stamping the greeting, I used a sponge dauber to apply ink to the edges of my banner for a little added contrast.  I attached a brad from the Vintage Trinkets accents and elements  set to the top of the banner and stuck it to the front of my card using Stampin’ Dimensionals.  I stamped two round medallions using my  Coastal Cabana Classic Stampin’ Pad and inked around the edges after I cut them out.  Then I attached one of them to the bottom of the banner using Stampin’ Dimensionals.  I set the other one aside to use on the inside of my card later.

Perfect Pennants Mixed Bunch5

For my flower, I used my So Saffron Classic Stampin’ Pad to stamp a large flower using the Mixed Bunch stamp set (wood mount and clear mount) and a small flower using the Flower Shop stamp set (wood mount and clear mount).  Then I punched out the flowers using the Blossom Punch and the Pansy Punch.  (The Flower Shop stamp set and Pansy Punch are available as a bundle for 15% discount off the regular price.  Available in  wood mount and clear mount).

The leaves of the flower were stamped using the leaf stamp from the  Secret Garden stamp set (wood mount and clear mount) and my Pear Pizzazz Classic Stampin’ Pad.  I inked up my leaf stamp and then stamped it twice without re-inking between stamps.  This gave my design some added dimension and contrast.  Then I used the Secret Garden Framelits Dies to cut out the leaf images.

Perfect Pennants Mixed Bunch12

Finally, I attached my leaves with Glue Dots and layered my flowers using Stampin’ Dimensionals.  The center of the flower was finished by adding a large pearl from the Basic Pearls Jewel Accents.

Perfect Pennants Mixed Bunch13

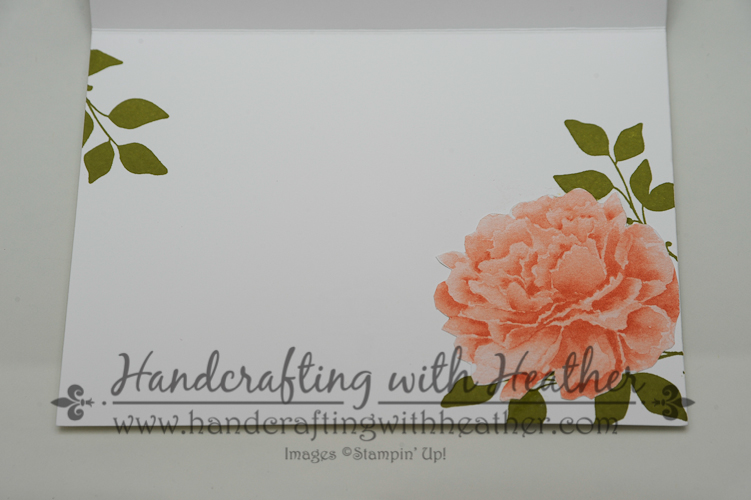
I finished the inside of my card by adding a panel of Whisper White card stock with a strip of So Saffron card stock along the bottom.  I brushed Coastal Cabana ink along the bottom edge of the trim using a sponge dauber to give it some extra contrast.  Then I attached the second medallion I created earlier to the center of the yellow strip using Stampin’ Dimensionals.

I hope you have enjoyed my share today.  I certainly enjoyed creating it.  I just love the color combination.  I know that someone special will enjoy receiving it at just the right moment.

If you would like to order the Perfect Pennants, Mixed Bunch, or Flower Shop stamp sets and earn the Decorative Dots embossing folder for FREE (Sale-a-bration item), please click here to shop in my online store.

You can find a complete list of supplies, including card stock cuts, and the very bottom of this post.

____________________________________________________________

Weekly Deals from Stampin’ Up! February 18-24

Here are the Weekly Deals from Stampin’ Up!:

Click here to see the Weekly Deals from Stampin’ Up! in my online store.  The Weekly Deals are only while supplies last and only available at these great prices through February 17.

____________________________________________________________

Clearance Rack Updated!

Screen Shot 2014-02-18 at 6.30.12 AM

Stampin’ Up! has updated the Clearance Rack in the online store!  I saw some punches, dies, card stock, DSP and embellishments at great deals.  And Clearance Rack items count toward your merchandise total for Sale-a-bration items!!  So click here to head over and start shopping now!  Clearance Rack deals are only available while supplies last.

____________________________________________________________

If you need any stamping supplies, I’d be very happy to be your Demonstrator.  Just click on Order Stampin’ Up! Online Now in the main menu or in the sidebar to go directly to my online store or drop me an email if you have any questions.

Happy Stamping!

Heather

  • It’s Sale-a-bration time!!  You’ll get a free item from Stampin’ Up! for every $50 that you purchase between now and March 31!  Click on my Stampin’ Up! Promotions page for more information!
  • Visit my online store here.
  • Shop the Clearance Rack here.

____________________________________________________________

Stampin’ Up! items used to create this project:

Stamp Sets: Perfect Pennants (133230); Mixed Bunch (125537); Flower Shop (130942); Secret Garden (129144)

Dies, Punches, & Embossing Folders: Banner Framelits Dies (132173); Secret Garden Framelits Dies (129372); Modern Mosaic Embossing Folder (129984); Adorning Accents Edgelits (125595); Blossom Punch (125603); Pansy Punch (130698); Decorative Dots Embossing Folder  (Sale-A-Bration item available FREE with $50 purchase until March 31, 2014)

Embellishments: Basic Pearl Jewel Accents (119247); Coastal Cabana Ruffle Stretch Trim (130024); Vintage Trinkets Accents & Elements – Brad (118764)

Card Stock:  Basic Gray (121044) – 4-14″ x 11″ card base; Whisper White (100730) – two 3-3/4″ x 5″ panels (front and inside of card),  one greeting (Banners Collection Framelits), strip for Adorning Accents Edgelits trim, two flowers, two leaves, two small medallions; Coastal Cabana (130024) – 3-1/2″ x 3-1/2″ panel; So Saffron (105118) – 3-1/2″ x 1-1/2″ panel, and 1/4″ x 3-3/4″ strip for inside of card.

Markers & Ink:  Basic Gray Classic Stampin’ Pad (126981); So Saffron Classic Stampin’ Pad (126957); Coastal Cabana Classic Stampin’ Pad (131175); Pear Pizzazz Classic Stampin’ Pad (131180)

Tools:  Big Shot Die-Cutting Machine (113439); Sponge Daubers (102892)

Adhesive: SNAIL (104332); Stampin’ Dimensionals (104430); Glue Dots (103683)

A “See Ya Later” Birthday Sale-A-Bration – Stampin’ Up!

Today’s share was created using the See Ya Later stamp set and Decorative Dots (Sale-a-bration items) embossing folder from Stampin’ Up! Both of these items are available FREE with a $50 purchase through March 31st!  I just love this card!  I can’t wait to send it to someone special.

See Ya Later Birthday SAB7

I wish I could take full credit for this cute design, but I actually got the idea from a similar card I saw on Pinterest, created by Selene Kempton.  I changed it up a little bit to make it my own, but I want to be sure to give credit where credit is due.

See Ya Later Birthday SAB9

I started by cutting panels of Coastal Cabana and Pink Pirouette card stock.  Next, I dry embossed the pink panel using the Decorative Dots embossing folder and my Big Shot Die-Cut Machine.

See Ya Later Birthday SAB11

I used the three largest Banner Framelits Dies to cut banners from the Birthday Basics Designer Series Paper.  I wanted my banners to be different lengths, but they were too wide for my project, so I trimmed each of them to be 1-1/4 inches wide. Then I adhered them to the Pink Pirouette panel using SNAIL adhesive.

See Ya Later Birthday SAB12

I wrapped my pink panel with Coastal Cabana Stretch Ruffle Trim and tied it in a knot. Then I adhered the two panels together and placed them on a Whisper White card base using SNAIL.

See Ya Later Birthday SAB8

I used stampin’ write markers (So Saffron, Wild Wasabi, Strawberry Slush, & Coastal Cabana) to color the birthday sentiment from the See Ya Later stamp set.  Then I used the Labels Collection Framelits to cut it out.

Next I used a sponge dauber to color the edges of the sentiment using my Strawberry Slush Classic Stampin’ Pad and adhered the final product to the card front using Stampin’ Dimensionals.

See Ya Later Birthday SAB3

Finally, I completed the front of the card by adding three small Basic Rhinestones Jewel Accents in the bottom right hand corner.

See Ya Later Birthday SAB4

I finished the inside of my card by adding a strip of Coastal Cabana card stock along the bottom.  Then I used the banner punch (Sale-a-bration item) to create three small banners using the same Birthday Basics Designer Series Paper which was used on the front of the card.

I hope you have enjoyed my share today.  I certainly enjoyed creating it.  If you would like to place an order and earn the See Ya Later stamp set, Decorative Dots embossing folder, or the banner punch for FREE (Sale-a-bration items), please click here to shop in my online store.

You can find a complete list of supplies, including card stock cuts, and the very bottom of this post.

____________________________________________________________

Weekly Deals from Stampin’ Up! February 18-24

Here are the Weekly Deals from Stampin’ Up!:

Click here to see the Weekly Deals from Stampin’ Up! in my online store.  The Weekly Deals are only while supplies last and only available at these great prices through February 17.

____________________________________________________________

Clearance Rack Updated!

Screen Shot 2014-02-18 at 6.30.12 AM

Stampin’ Up! has updated the Clearance Rack in the online store!  I saw some punches, dies, card stock, DSP and embellishments at great deals.  And Clearance Rack items count toward your merchandise total for Sale-a-bration items!!  So click here to head over and start shopping now!  Clearance Rack deals are only available while supplies last.

____________________________________________________________

If you need any stamping supplies, I’d be very happy to be your Demonstrator.  Just click on Order Stampin’ Up! Online Now in the main menu or in the sidebar to go directly to my online store or drop me an email if you have any questions.

Happy Stamping!

Heather

  • It’s Sale-a-bration time!!  You’ll get a free item from Stampin’ Up! for every $50 that you purchase between now and March 31!  Click on my Stampin’ Up! Promotions page for more information!
  • Visit my online store here.
  • Shop the Clearance Rack here.

____________________________________________________________

Stampin’ Up! items used to create this project:

Stamp Sets: See Ya Later (Sale-A-Bration item available FREE with $50 purchase until March 31, 2014)

Dies, Punches, & Embossing Folders: Banner Framelits Dies (132173); Labels Collection Framelits (125598); Decorative Dots Embossing Folder & Banner Punch (Sale-A-Bration Free items with $50 purchase)

Embellishments: Basic Rhinestone Jewel Accents (119246)

Card Stock:  Whisper White (100730) – 4-14″ x 11″ card base, one sentiment label (Labels Collection Framelits); Coastal Cabana (130024) – 4″ x 5-1/4″ panel, and 1/4″ x 4-1/4″ strip for inside of card; Pink Pirouette (111351) – 3-3/4″ x 5″ panel.

Designer Series Paper: Birthday Basics (130145) – 3 large banners (Banners Framelits Dies) and 3 small banners (Banner Punch)

Markers & Ink:  Strawberry Slush Classic Stampin’ Pad (131178); So Saffron & Wild Wasabi Stampin Write Markers – Subtles Collection (131263); Coastal Cabana and Strawberry Slush Stampin’ Write Markers – In Color 2013-2015 Collection (131260)

Tools:  Big Shot Die-Cutting Machine (113439); Sponge Daubers (102892)

Adhesive: SNAIL (104332); Stampin’ Dimensionals (104430)