
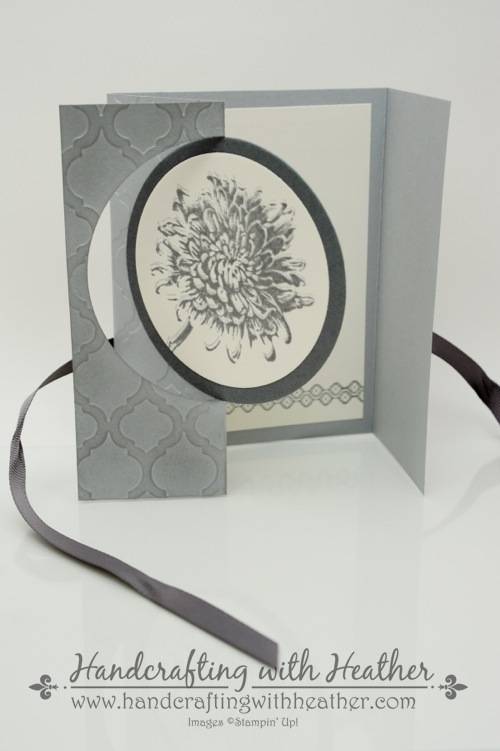
As you can tell, I am in love with the Blooming with Kindness stamp set (wood mount and clear mount) from Stampin’ Up! This is my second card in a week that features that beautiful flower! I just think it is so pretty and elegant. In addition to the lovely flower, this card also uses the Circles Collection Framelits Dies to create great flip card effect. This was a brand new technique that I learned from fellow Stampin’ Up! Demonstrator, Brandy Cox. If you love the flip card effect, I have included a link to Brandy’s tutorial at the bottom of this post after the supply list.

This card is my submission for Splitcoast Stampers Clean and Simple Challenge #262: Neutrals. Please leave me a comment to let me know what you think of this creation. I would love to hear from you. On March 31st, I will do a drawing and one lucky person who left me a comment will receive a beautiful handcrafted card in the mail! Also, if you enjoy reading my posts, why not have them delivered to your inbox automatically. Just click on the “follow” button in the sidebar.
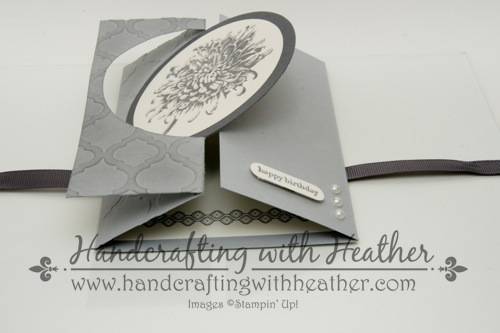
I love the flip card design, but I wanted to be able to write on the inside of my card without having it visible when the card was closed. Therefore, I extended the length of my card base to make a tri-fold style flip card. I began with a Smoky Slate card base (5-1/2″ x 11″) which I scored at 2-1/8″, 4-1/4″, and 8-1/2″. I followed the instructions in Brandy’s video tutorial to cut half of a circle on the front of my card using the the third largest Circle Framelits Die (counting from the outside in toward the middle). Then I dry embossed the front of my card using the Modern Mosaic textured impressions embossing folder and my Big Shot. Next, I folded back the front flap, created with my framelits, and used a sponge dauber to apply ink from my Smoky Slate Classic Stampin’ Pad to the left side of my card. I wanted to pick up the detail of the embossing and provide some contrast on the front of my card. I used a scrap piece of card stock to cover the parts of my card that I did not want affected.

For the focal point of my card, I stamped the flower from the Blooming with Kindness stamp set onto Very Vanilla card stock using Smoky Slate ink. I wanted to stamp the flower twice, overlapping the two images to provide depth, but I have found that this works best when the first image is very light. Therefore, I inked up my stamp and stamped it onto a scrap piece of card stock before stamping it on my Very Vanilla panel. Then I used my Stamp-a-ma-jig to stamp the image a second time using my Basic Gray Classic Stampin’ Pad. I offset the two images just slightly. This gives the flower the illusion of depth and really makes it pop!

Once my flower was complete, I used the fourth largest Circles Collection Framelits Die (counting from the outside in toward the middle) to cut out my flower. Then, I cut a circle of Basic Gray card stock using the third largest circle die. I layered the two circles together and adhered them to the card front using SNAIL Adhesive. For my senitment I chose the “Happy Birthday” greeting from the Teeny Tiny Wishes stamp set (wood mount and clear mount). I stamped it in Basic Gray ink and punched it out using the Word Window Punch. I needed my sentiment to be a little narrower than the word window punch, so I punched it so that the edge of the words were near the end of the punch. Then I attached a post-it-note to the punched sentiment and punched it a second time, trimming off the extra length that I did not need. I used Stampin’ Dimensionals to adhere my sentiment to the front of the card, and added three Basic Pearl Jewel Accents for a finishing touch.

This card was really coming together nicely, but I didn’t like the fact that it didn’t lie flat, so I added some gray grosgrain ribbon to tie it closed… Now it was perfect! Finally, I finished the inside of my card by stamping one of the border stamps from the Mosaic Madness stamp set (wood mount and clear mount) along the bottom edge of a Very Vanilla card stock panel in Basic Gray ink.
I have to say that I am really pleased with how this card turned out! When I watched Brandy’s video tutorial, I could just picture how elegant the flower from the Blooming with Kindness stamp set would look on the front of a flip card, and the end result did not disappoint! If you enjoyed my post, please pin it to Pinterest for me. I am working on building up my blog following and could use your help in getting the word out! If you scroll to the bottom of the post, you will find a “pin it” button just below my supply list for the project… and, don’t forget to leave me a comment for your chance to win a handcrafted card in the mail!
If you would like to order the Blooming with Kindness stamp set or any of the other beautiful products featured in this card, please click here to shop in my online store. Remember it’s Sale-a-bration with Stampin’ Up! Choose from a wide variety of FREE items with any $50 purchase until March 31, 2014.
You can find a complete list of supplies, including card stock cuts, and Brandy Cox’s video tutorial at the very bottom of this post.
____________________________________________________________
Weekly Deals from Stampin’ Up! March 4 – 10
Here are the new Weekly Deals from Stampin’ Up!:
Click here to see the Weekly Deals from Stampin’ Up! in my online store. The Weekly Deals are only while supplies last and only available at these great prices through March 10.
____________________________________________________________
If you need any stamping supplies, I’d be very happy to be your Demonstrator. Just click on Order Stampin’ Up! Online Now in the main menu or in the sidebar to go directly to my online store or drop me an email if you have any questions.
Happy Stamping!
Heather
- It’s Sale-a-bration time!! You’ll get a free item from Stampin’ Up! for every $50 that you purchase between now and March 31! Click on my Stampin’ Up! Promotions page for more information!
- Visit my online store here.
- Shop the Clearance Rack here.
____________________________________________________________
Stampin’ Up! items used to create this project:
Stamp Sets: Blooming with Kindness (126422); Teeny Tiny Wishes (127802); Mosaic Madness (130249)
Dies, Punches, & Embossing Folders: Circles Collection Framelits Dies (130911); Modern Mosaic Textured Impressions Embossing Folder (129984); Word Window Punch (119857)
Embellishments: Basic Pearls Jewel Accents (119247)
Card Stock: Smoky Slate (131202) – card base 5-1/2″ x 11″; Basic Gray (121044) – one circle framelits die cut; Very Vanilla (101650) – one circle framelit die cut, one word window punch, 5″ x 3-3/4″ panel (inside)
Markers & Ink: Smoky Slate Classic Stampin’ Pad (131179); Basic Gray Classic Stampin’ Pad (126981)
Tools: Stamp-a-ma-jig (101049); sponge daubers (102892); Big Shot (113439)
Adhesive: SNAIL (104332); Stampin’ Dimensionals (104430)
Non-Stampin’ Up! Products Used: gray grosgrain ribbon
Flip Card Tutorial from Brandy Cox

