Work of Art Gift Bag… A Sneak Preview from Stampin’ Up!

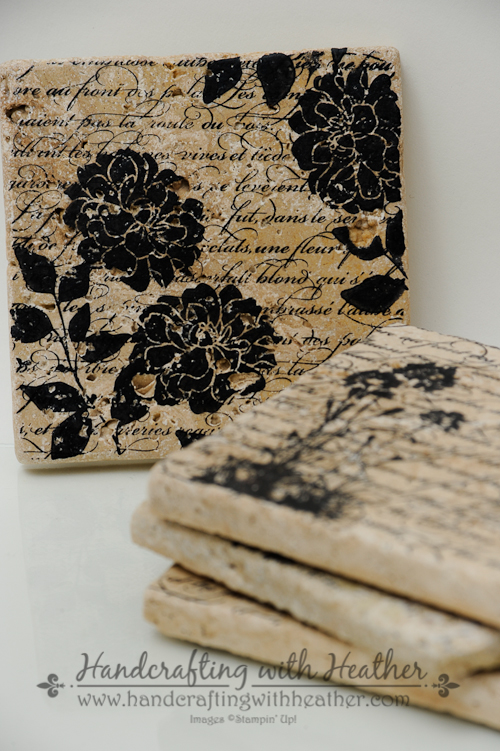
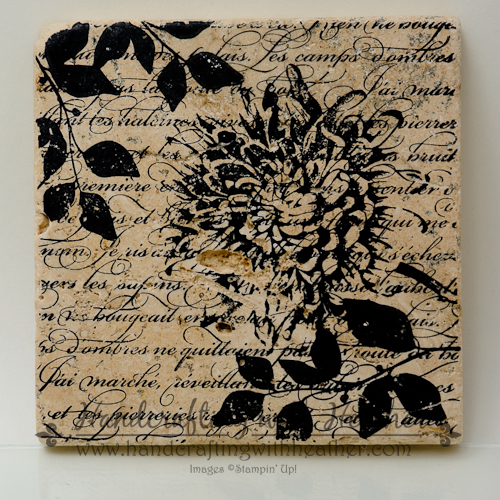
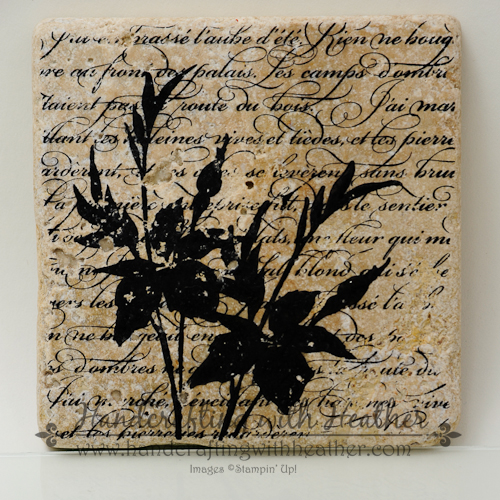
On Wednesday, I shared with you the lovely coasters that I made for my mom for mother’s day.  Today, I’m going to show you how I used the fabulous Work of Art stamp set form Stampin’ Up! to create a super cute gift bag to put them in.  This stamp set is one of the brand new sets that will be available with the release of the new annual catalog on June 1st.  I just received my catalogs in the mail yesterday and I will be sending out complimentary copies to my customers!  If you place a $25 order with me during the month of May you will receive a copy of the new catalog in the mail for your reading enjoyment!  Just one more reason to go ahead and order those items from the Spring occasions catalog and the retiring list before they are gone!  Happy shopping! (I will also be launching a new customer loyalty program soon.  Every $25 purchase will earn creativity credits that can be used for free stuff.  More details will follow, but all orders placed during the month of May will qualify.)

Work of Art (2 of 7)-Edit

Isn’t that just adorable?  I know my mom will love it, and it was really quick and easy too!  If you are a fan of this project, I would love to hear your thoughts.  Also, if you find inspiration from my work, why not have my posts delivered to your inbox automatically.  Just click the “follow” button in the sidebar to subscribe.  Please help me get to 200 followers by telling your friends who love crafting about my blog!

Work of Art (7 of 7)-Edit

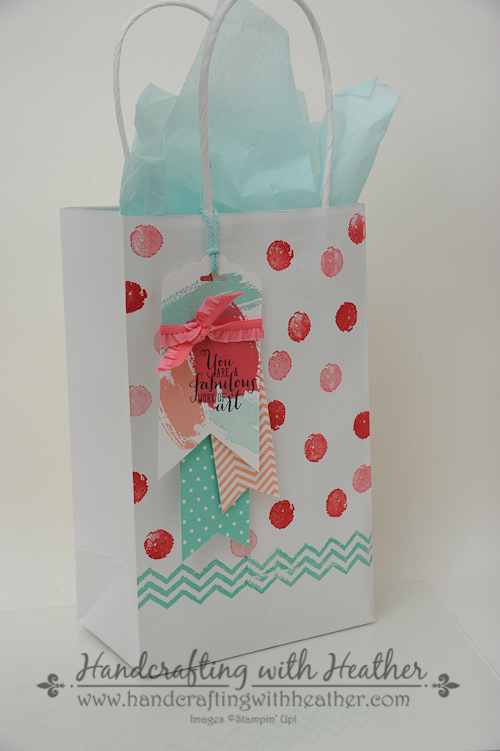
I started my project by cutting a banner in Whisper White card stock using the second largest Banner Framelits Die.  Then I trimmed the banner to be 2″ wide and punched the top using my Scalloped Tag Topper Punch.   Next, I stamped the “paint stroke” stamps from Work of Art in Coastal Cabana, Strawberry Slush, and Crisp Cantaloupe ink.  Then I stamped my sentiment on top using Stazon Black ink.

Work of Art (4 of 7)-Edit

For a layered effect, I cut strips of Designer Series Paper (from the In Color DSP stack) in Coastal Cabana and Crisp Cantaloupe.  I used my hexagon punch to create the banner end at the bottom.  Then I adhered the layers together with Stampin’ Dimensionals and tied a length of Strawberry Slush Stretch Ruffle Trim around them.

Work of Art (3 of 7)-Edit

Next, I used my Stamp-a-ma-jig to stamp the chevron image across the bottom of a white gift bag in Coastal Cabana ink.  I stamped the circle image in Strawberry Slush above the chevrons to get a polkadot effect.  To add a little dimension, I stamped off for some of the circles and stamped others full strength.

Work of Art (6 of 7)-Edit

I think the packaging of this gift is almost as great as what is inside.  I can’t wait to give them to my mom!  I hope you will give this a try too.  Be sure to pin this project to Pinterest for future inspiration!  If you scroll to the bottom of this post, you will find a complete list of supplies used to make today’s project.  Below the supply list, you will find a “pin it” button.  I would appreciate your help in spreading the word about my work.

If you find inspiration from this blog, one way you can show your support is by selecting me as your personal Stampin’ Up! Demonstrator.  One great thing about being a demonstrator is getting to preview some of the new products before they are available to the general public!  But don’t worry, you will be able to purchase the Work of Art stamp set from Stampin’ Up! in just a few short weeks.  In the meantime, if you need any stamping supplies you can shop now in my online store!  I would love to help you out.  Feel free to drop me an email if you have any questions.  I’m here to help!

Happy Stamping!

Heather

  • Visit my online store here.
  • Shop the Clearance Rack here.

WEEKLY DEALS for May 5 – 12

 weekly deals 5-6

Click here to see the Weekly Deals from Stampin’ Up! in my online store.  The Weekly Deals are only while supplies last and only available at these great prices through May 12.


Stampin’ Up! items used to create today’s project:

If you would like to order any of the products featured in today’s project, click the images below to order from my online store.


Advertisement

Home Decor… Stampin’ Up! Style!

With Mother’s Day right around the corner, I decided to show you a really simple, yet fabulous home decor project I created using Stampin’ Up! products.  I wanted elegant, but bold stamps, so I chose the following sets for my project today:  Summer Silhouettes, Fabulous Florets (retiring stamp set), Serene Silhouettes, Blooming with Kindness, and for my background En Francais (retiring stamp).

Stampin' Up! Coasters (1 of 10)

These coasters are so easy to make, and they are the perfect gift!  I made a set for mother’s day, and I also made a set for my son’s daycare provider for teacher appreciation week.  Not only are these coasters beautiful, but they are also extremely affordable (i.e. “dirt cheap”)!  I would love to hear what you think of my project today.  Please leave me a comment.  Also, if you like my work, why not have my posts delivered to your inbox automatically?  Just click on the “follow” button in the sidebar to subscribe now.

Stampin' Up! Coasters (6 of 10)

I used Stazon Black Ink for my project today because it is permanent.  I began by stamping each coaster with the En Francais background stamp.  (This stamp is retiring, but as of the time I am writing this, it is still available in clear mount.)  Then I stamped the four different coaster designs using a combination of stamp sets.  I found that stamps with a lot of solid surface area worked well for this project.  I just love the black silhouettes against the scripted font of the background.

Coaster #1: Serene Silhouettes

Stampin' Up! Coasters (5 of 10)

Coaster #2: Blooming with Kindness & Summer Silhouettes

Stampin' Up! Coasters (2 of 10)

Coaster #3: Fabulous Florets

Stampin' Up! Coasters (4 of 10)

Coaster #4:  Fabulous Florets & Summer Silhouettes

Stampin' Up! Coasters (3 of 10)

Once the coasters were stamped, I put them on a cookie sheet in a cold oven and brought the temperature up to 375 degrees.  Then I baked them for 30 minutes and let them cool in the oven.  Once everything was completely cooled, I used Minwax Paste Finishing Wax to seal in my designs.  Finally, I added felt pads to the corners on the bottom of the coaster to protect the table from scratching.

Stampin' Up! Coasters (10 of 10)

My mom is just finishing up a big renovation at her house and she is sprucing everything up.  I know she is going to love these coasters!  If you love them too, you should pin them to Pinterest!  At the bottom of this post you will find a complete list of supplies used in this project. Just below the supply list is a “pin it” button.

Stampin' Up! Coasters (9 of 10)

If you need any stamping supplies, including any of the fabulous stamp sets used in this project, I would love to help you out.  Click here to shop online now!  If you find inspiration from my blog, one way you can show your support is by selecting me as your personal Stampin’ Up! Demonstrator.  Feel free to email me if you have any questions.  I’m here to help!

Happy Stamping!

Heather


Weekly Deals from Stampin’ Up! – May 6-12

weekly deals 5-6

Click here to see the Weekly Deals from Stampin’ Up! in my online store.  The Weekly Deals are only while supplies last and only available at these great prices through May 12.


Retiring Stampin’ Up! Products – Available while supplies last until June 4, 2014

Many of the retiring products from Stampin’ Up! have already sold out!  Be sure to check out the links below to check to see which items are still available.  Stampin’ Up! is updating these lists daily to tell us which items are gone.  The last column has a little “x” next to the products that are no longer available.  If you want any of the products on the retiring list, be sure to order soon, so you don’t miss out!

  • Retiring Stamps (Available April 21-June 4, 2014, or while supplies last)
  • Retiring Accessories (Available April 21-June 4, 2014, or while supplies last)

If you need any stamping supplies, I’d be very happy to be your Demonstrator.  Just click on Order Stampin’ Up! Online Now in the main menu or in the sidebar to go directly to my online store or drop me an email if you have any questions.


Stampin’ Up! items used to create today’s project:

If you would like to order any of the products featured in today’s project, click the images below to order from my online store.