Make a “Mosaic Madness” Wish with Stampin’ Up!

I have been having lots of fun with challenges this week.  I wanted to see how many challenges I could cover with a single card.  It really gets the creative juices flowing!  Today’s card features the Perfect Pennants (wood mount and clear mountand Mosaic Madness (wood mount and clear mount) stamp sets from Stampin’ Up!  I love that the Modern Mosaic stamp set also has a coordinating punch and embossing folder… oh the possibilities! LOL!

If you enjoy this card, please leave me a comment.  I would love to hear what you think.  On March 31st, I will do a drawing and one lucky person who left me a comment will receive a beautiful handcrafted card in the mail!  Also, if you enjoy reading my posts, why not have them delivered to your inbox automatically.  Just click on the “follow” button in the sidebar.

Mosaic Madness4

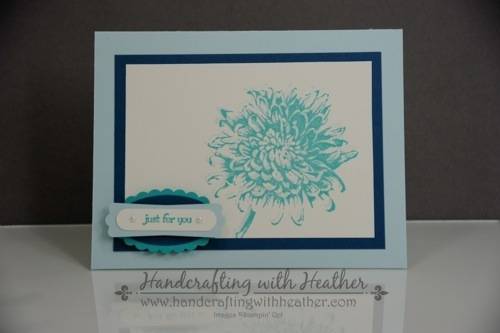
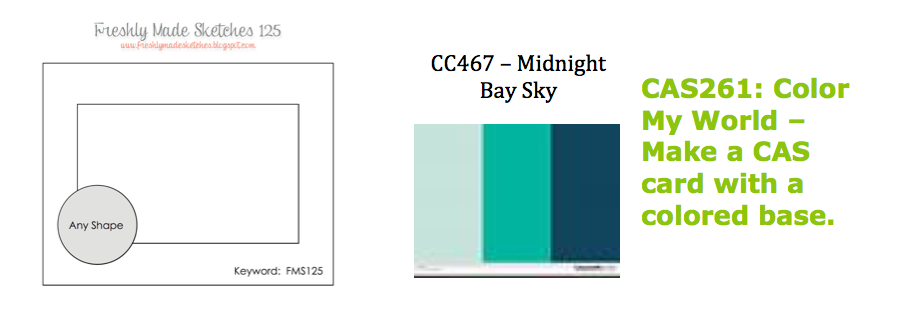
This card combines three challenges in one:  SCS Sketch Challenge #477,  Color Challenge #467, and SUO #91

Screen Shot 2014-03-01 at 10.14.17 PM

I began my card with a Bermuda Bay card base, then I dry embossed a Soft Sky panel using the Modern Mosaic Textured Impressions Embossing Folder.  I adhered this panel to the card base using SNAIL adhesive.  Next, I cut a banner in Midnight Muse card stock using the largest of the Banner Framelits Dies.  I trimmed 1/2 inch off of the banner from each side to make it the appropriate width for my card design.  Then, I added panels of Bermuda Bay and Very Vanilla using SNAIL.  (Before adhering the panels, I inked the outside edge of the Very Vanilla panel using a sponge dauber and my Bermuda Bay Classic Stampin’ Pad.)

Mosaic Madness2

After creating the basic design, it was time to add the details. I used Bermuda Bay ink for all of the stamping in this project.  I stamped the “Make a Wish” greeting from the Perfect Pennants stamp set (available as a bundle with the Banner Framelits Dies for a 15% discount off the regular price; wood mount and clear mount).

Mosaic Madness8

Next, I stamped some of the stamps from the Mosaic Madness stamp set and cut them out using the Mosaic Punch.  (The Mosaic Madness stamp set and the Mosaic Punch are also available as a bundle for 15% off the normal price; wood mount and clear mount.)  For a little bit of “bling” I added some Basic Rhinestone Jewel Accents to my punched pieces.  Finally, I stamped some banners using the Perfect Pennants and Banner Blast (Sale-a-bration item) stamp sets.  I punched out the small banners using the Banner Punch (Sale-a-bration item), and I attached all of the detail pieces to the front of the card using  Stampin’ Dimensionals.  

Mosaic Madness6

As a finishing touch, I added a Very Vanilla panel to the inside of my card and stamped it with the banner stamps I used on the front.

I am pleased with how this card turned out.  I like that it could be used for a man’s birthday card too.  I tend to make my cards very “girly” so this one is pretty neutral for me!  If you enjoyed my post, please pin it to Pinterest for me.  I am working on building up my blog following and could use your help in getting the word out!  If you scroll to the bottom of the post, you will find a “pin it” button just below my supply list for the project… and, don’t forget to leave me a comment for your chance to win a handcrafted card in the mail!

If you would like to order the Mosaic Madness stamp set, Perfect Pennants stamp set or any of the other beautiful products featured in this card, please click here to shop in my online store.  Remember it’s Sale-a-bration with Stampin’ Up! Choose from a wide variety of FREE items (including the Banner Punch and Banner Blast stamp set) with any $50 purchase until March 31, 2014.

You can find a complete list of supplies, including card stock cuts, and the very bottom of this post.

____________________________________________________________

Weekly Deals from Stampin’ Up! March 4-10

Here are the new Weekly Deals from Stampin’ Up!:

WEEKLY DEALS

We hope you enjoy this week’s Weekly Deals!

Coastal Cabana 3/8″ Ruffle Stretch Trim Item # 130024
Regular Price: 8.95 US/12.5 CAN
Discounted Price: 6.7125 US/9.375 CAN
Strawberry Slush 3/8″ Ruffle Stretch Trim Item # 130023
Regular Price: 8.95 US/12.5 CAN
Discounted Price: 6.7125 US/9.375 CAN
Adorning Accents Textured Impressions Embossing Folders Item # 125601
Regular Price: 8.95 US/10.95 CAN
Discounted Price: 6.7125 US/8.2125 CAN
Large Rhinestone Basic Jewels Item # 129324
Regular Price: 4.95 US/6.5 CAN
Discounted Price: 3.7125 US/4.875 CAN
Midnight Muse 3/8″ Stitched Satin Ribbon Item # 126847
Regular Price: 8.95 US/12.25 CAN
Discounted Price: 6.7125 US/9.1875 CAN
Betsy’S Blooms Stampin’ Around Standard Wheel Item # 126943
Regular Price: 6.5 US/7.95 CAN
Discounted Price: 4.875 US/5.9625 CAN
2012-2014 In Color Designer Series Paper Stack Item # 130137
Regular Price: 21.95 US/26.95 CAN
Discounted Price: 16.4625 US/20.2125 CAN
Everything Easter Ensemble – Digital Download Item # 129363
Regular Price: 14.95 US/16.5 CAN
Discounted Price: 8.97 US/9.9 CAN

Click here to see the Weekly Deals from Stampin’ Up! in my online store.  The Weekly Deals are only while supplies last and only available at these great prices through March 10.

____________________________________________________________

If you need any stamping supplies, I’d be very happy to be your Demonstrator.  Just click on Order Stampin’ Up! Online Now in the main menu or in the sidebar to go directly to my online store or drop me an email if you have any questions.

Happy Stamping!

Heather

  • It’s Sale-a-bration time!!  You’ll get a free item from Stampin’ Up! for every $50 that you purchase between now and March 31!  Click on my Stampin’ Up! Promotions page for more information!
  • Visit my online store here.
  • Shop the Clearance Rack here.

____________________________________________________________

Stampin’ Up! items used to create this project:

Stamp Sets: Mosaic Madness (130249); Perfect Pennants (133230); Banner Blast (Sale-a-bration item)

Dies, Punches, & Embossing Folders: Banner Framelits Dies (132173); Modern Mosaic Textured Impressions Embossing Folder (129984); Mosaic Punch (131267); Banner Punch (Sale-a-bration item)

Embellishments: Basic Rhinestones Jewel Accents (119246)

Card Stock:  Bermuda Bay (131197) – 4-1/4″ x 11″ card base, 2-1/2″ x 2-1/2″ panel (front of card), one banner; Soft Sky (131203) – 3-3/4″ x 5″ panel, two banners (banner punch); Midnight Muse (126843) – one large banner (Banner Framelits Dies); Very Vanilla (101650) – 2-1/4″ x 2-1/4″ panel (front of card), 3-3/4″ x 5″ panel (inside of card), two Mosaic Punches.  

Markers & Ink:  Bermuda Bay Classic Stampin’ Pad (131171)

Tools:  Big Shot (113439); Sponge Dauber (102892)

Adhesive: SNAIL (104332); Stampin’ Dimensionals (104430)


Advertisement

Blooming with Kindness and Elegance – Stampin’ Up!

Today’s card is my first step into the world of card challenges.  I created this card using the Blooming with Kindness stamp set from Stampin’ Up! (wood mount and clear mount), which I absolutely adore!  I think the bloom from that stamp set is simply gorgeous.  I can’t wait to send this one to someone special.  If you enjoy this card, please leave me a comment.  I would love to hear what you think.  On March 31st, I will do a drawing and one lucky person who left me a comment will receive a beautiful handcrafted card in the mail!  Also, if you enjoy reading my posts, why not have them delivered to your inbox automatically.  Just click on the “follow” button in the sidebar.

Blooming with Kindness4

This card combines three challenges in one:  Freshly Made Sketches #124, Clean and Simple #261, and Color Challenge #467

Screen Shot 2014-03-01 at 9.12.44 PM

I began my card with a Soft Sky card base, and layered it with panels of Midnight Muse and Very Vanilla card stock using SNAIL adhesive.   Then I used my Stamp-a-ma-jig to place the flower from the Blooming with Kindness stamp set. I stamped the image twice; first with my Soft Sky Classic Stampin’ Pad and then with Bermuda Bay.  I offset the two stamps just slightly to give the image some added depth.

Blooming with Kindness8

Next, I stamped the “Just for You” greeting from the Teeny Tiny Wishes stamp set (wood mount and clear mount) in Bermuda Bay ink and punched it out using the Word Window Punch.  I layered that onto a piece of Soft Sky card stock, cut out with the Modern Label Punch, and added two small Basic Pearl Jewel Accents on either side of the sentiment. I used Stampin’ Dimensionals to adhere my sentiment to a Large Oval in Midnight muse, and layered that onto an Extra Large Scalloped Oval in Bermuda Bay.  I adhered the whole combination to the front of the card using Stampin’ Dimensionals.

Blooming with Kindness3

Finally, I finished the inside of my card by stamping one of the border stamps from the Mosaic Madness stamp set (wood mount and clear mount) along the bottom edge of a Very Vanilla card stock panel.

Blooming with Kindness6

I love how this card came together.  The simple design and elegance of the flower make it special in my mind.  If you enjoyed my post, please pin it to Pinterest for me.  I am working on building up my blog following and could use your help in getting the word out!  If you scroll to the bottom of the post, you will find a “pin it” button just below my supply list for the project… and, don’t forget to leave me a comment for your chance to win a handcrafted card in the mail!

If you would like to order the Blooming with Kindness stamp set or any of the other beautiful products featured in this card, please click here to shop in my online store.  Remember it’s Sale-a-bration with Stampin’ Up! Choose from a wide variety of FREE items with any $50 purchase until March 31, 2014.

You can find a complete list of supplies, including card stock cuts, and the very bottom of this post.

____________________________________________________________

Weekly Deals from Stampin’ Up! February 25 – March 3

Here are the new Weekly Deals from Stampin’ Up!:

Click here to see the Weekly Deals from Stampin’ Up! in my online store.  The Weekly Deals are only while supplies last and only available at these great prices through March 3.

____________________________________________________________

If you need any stamping supplies, I’d be very happy to be your Demonstrator.  Just click on Order Stampin’ Up! Online Now in the main menu or in the sidebar to go directly to my online store or drop me an email if you have any questions.

Happy Stamping!

Heather

  • It’s Sale-a-bration time!!  You’ll get a free item from Stampin’ Up! for every $50 that you purchase between now and March 31!  Click on my Stampin’ Up! Promotions page for more information!
  • Visit my online store here.
  • Shop the Clearance Rack here.

____________________________________________________________

Stampin’ Up! items used to create this project:

Stamp Sets: Blooming with Kindness (126422); Teeny Tiny Wishes (127802); Mosaic Madness (130249)

Dies, Punches, & Embossing Folders: Word Window Punch (119857); Modern Label Punch (119849); Extra Large Scalloped Oval Punch (119856); Large Oval Punch (119855)

Embellishments: Basic Pearls Jewel Accents (119247)

Card Stock:  Soft Sky (131203) card base – 5-1/2″ x 8-1/2″, one modern label punch; Midnight Muse (126843) – 4-3/4″ x 3-1/2″ panel, large oval punch; Very Vanilla (101650) – 4-3/8″ x 3-1/8″ panel (front of card), 5″ x 3-3/4″ panel (inside), one word window punch; Bermuda Bay (131197) – Extra Large Scalloped Oval Punch

Markers & Ink:  Bermuda Bay Classic Stampin’ Pad (131171); Soft Sky Classic Stampin’ Pad (131181)

Tools:  Stamp-a-ma-jig (101049)

Adhesive: SNAIL (104332); Stampin’ Dimensionals (104430)


A “Beautifully Baroque” and “Mixed Bunch” Birthday! – Stampin’ Up!

The card I have created for you today features the Beautifully Baroque embossing folder and the Mixed Bunch stamp set (wood mount and clear mount).  It is not only beautiful, but also very quick!  The best of both worlds for this busy mom and teacher!  If you enjoy this card, please leave me a comment.  I would love to hear what you think.  On March 31st, I will do a drawing and one lucky person who left me a comment will receive a beautiful handcrafted card in the mail!  Also, if you enjoy reading my posts, why not have them delivered to your inbox automatically.  Just click on the “follow” button in the sidebar.

Beautifully Baroque Mixed Bunch7

This card is loosely based on the Freshly Made Sketches #124.

I began my card by cutting a panel of Whisper White stock, which I dry embossed using the Beautifully Baroque embossing folder and my Big Shot.  Then I cut my panel into thirds and adhered them to a Whisper White card base using  SNAIL adhesiveleaving about 1/8″ of space between the three panels.

Beautifully Baroque Mixed Bunch9

Next, I cut a thin strip of card stock and adhered a length of Strawberry Slush Stretch Ruffle Trim to it using SNAIL.  I layered that at the bottom of my embossed panels, then I stamped my flower from the Mixed Bunch stamp set on whisper white card stock using my Strawberry Slush Classic Stampin’ Pad and cut it out using the Blossom Punch.  For the center of my flower, I stamped a small medallion from the stamp set with the same ink on Strawberry Slush card stock.  The medallion was punched using the 7/8″ scalloped circle punch and layered on top of the flower using Stampin’ Dimensionals and finished with a Basic Pearl Jewel Accent.  I used my Banner Punch (Sale-a-bration item available FREE with a $50 purchase until March 31st) to cut out two small banners and used Stampin’ Dimensionals to adhere them to the card behind the flower.

Beautifully Baroque Mixed Bunch6

I finished my card by stamping the “Happy Birthday Wishes” greeting from the Simply Sketched stamp set (Hostess Reward Item) in the bottom corner of the card.  I used my Stamp-a-ma-jig to make sure I got the placement just right.  I just love that tool!  

As you can see, this card was very simple to make, but elegant none-the-less.  If you enjoyed my post, please pin it to Pinterest for me.  I am working on building up my blog following and could use your help in getting the word out!  If you scroll to the bottom of the post, you will find a “pin it” button just below my supply list for the project… and, don’t forget to leave me a comment for your chance to win a handcrafted card in the mail!

If you would like to order the Beautifully Baroque embossing folder or the Mixed Bunch  stamp set or any of the other beautiful products featured in this card, please click here to shop in my online store.  Remember you can earn the Banner Punch
 for FREE (Sale-a-bration item) with a $50 purchase.

You can find a complete list of supplies, including card stock cuts, and the very bottom of this post.

____________________________________________________________

Weekly Deals from Stampin’ Up! February 25 – March 3

Here are the new Weekly Deals from Stampin’ Up!:

Click here to see the Weekly Deals from Stampin’ Up! in my online store.  The Weekly Deals are only while supplies last and only available at these great prices through March 3.

____________________________________________________________

If you need any stamping supplies, I’d be very happy to be your Demonstrator.  Just click on Order Stampin’ Up! Online Now in the main menu or in the sidebar to go directly to my online store or drop me an email if you have any questions.

Happy Stamping!

Heather

  • It’s Sale-a-bration time!!  You’ll get a free item from Stampin’ Up! for every $50 that you purchase between now and March 31!  Click on my Stampin’ Up! Promotions page for more information!
  • Visit my online store here.
  • Shop the Clearance Rack here.

____________________________________________________________

Stampin’ Up! items used to create this project:

Stamp Sets: Mixed Bunch (125537); Simply Sketched (Hostess Item – 129672)

Dies, Punches, & Embossing Folders: Beautifully Baroque Embossing Folder (130917); Blossom Punch (125603); 7/8″ Scalloped Circle Punch (129404); Banner Punch (Sale-a-bration item)

Embellishments: Basic Pearls Jewel Accents (119247); Strawberry Slush Ruffle Stretch Trim (130023)

Card Stock:  Whisper White (100730) card base – 5-1/2″ x 8-1/2″, 3-3/4″ x 4″ panel (cut into thirds), 1/4″ x 4″ strip (to adhere ribbon), one flower (blossom punch); Strawberry Slush (131295) – small round medallion (7/8″ scalloped circle punch), two banners (banner punch)

Markers & Ink:  Strawberry Slush Classic Stampin’ Pad (131178)

Tools:  Big Shot (113439); Stamp-a-ma-jig (101049)

Adhesive: SNAIL (104332); Stampin’ Dimensionals (104430)


Sweet Sorbet and Chalk Talk Card – Stampin’ Up!

Today I have created a lovely card for you featuring the Chalk Talk stamp set (wood mount and clear mount) and Sweet Sorbet Designer Series Paper (Sale-a-bration item available FREE with a $50 purchase through March 31st!).  I wanted to create a beautiful card that would be quick and easy to put together.  If you enjoy this card, please leave me a comment.  I would love to hear what you think.  On March 31st, I will do a drawing and one lucky person who left me a comment will receive this beautiful card in the mail!  Also, if you enjoy reading my posts, why not have them delivered to your inbox automatically.  Just click on the “follow” button in the sidebar.

Chalk Talk & Sweet Sorbet15

I started my creation by cutting panels of Basic Black card stock, Sweet Sorbet Designer Series Paper, and Whisper White card stock.  I adhered the black and Sweet Sorbet panels together with SNAIL adhesive.  Then I used my Stamp-a-ma-jig to stamp the Chalk Talk stamp on the Whisper White panel using my Pool Party Classic Stampin’ Pad.  I added a strip of Coastal Cabana Stretch Ruffle Trim and adhered the white panel to the top of the Sweet Sorbet panel.   Then I adhered my layered panels to a Soft Sky card base.

Chalk Talk & Sweet Sorbet13

Next, I used my Basic Black Stampin’ Write Marker to color in a portion of the Chalk Talk stamp I used on the front of my card.  I used my Stamp-a-ma-jig to place it where I wanted it above and below my layered panels, recoloring the stamp before stamping it again.

Chalk Talk & Sweet Sorbet19

Finally, I used the Decorative Label Punch to create a background for my greeting with Pool Party card stock.  I stamped the “I’m So Grateful There’s You” sentiment from the Chalk Talk stamp set on Whisper White card stock using my Basic Black Classic Stampin’ Pad.  I layered those on the front of the card using Stampin’ Dimensionals, then I added a Basic Rhinestones Jewel Accent to each of the scrollwork details at the top and bottom of the card.

Chalk Talk & Sweet Sorbet7

I finished the inside of my card by layering a panel of Whisper White card stock on top of a Basic Black one.  I colored the Chalk Talk  stamp again with my Basic Black Stampin’ Write Marker and used my Stamp-a-ma-jig to center it at the bottom of the card.

This card was fun to create, and I hope that you have enjoyed reading about it.  If you did, please pin it to Pinterest for me.  I am new to blogging and I would love your help in developing a blog following.  If you scroll to the bottom of the post, you will find a “pin it” button just below my supply list for the project… and, don’t forget to leave me a comment for your chance to win today’s card!

If you would like to order the Chalk Talk stamp set or any of the other beautiful products featured in this card, please click here to shop in my online store.  Remember you can earn the Sweet Sorbet Designer Series Paper for FREE (Sale-a-bration item) with a $50 purchase.

You can find a complete list of supplies, including card stock cuts, and the very bottom of this post.

____________________________________________________________

Weekly Deals from Stampin’ Up! February 25 – March 3

Here are the new Weekly Deals from Stampin’ Up!:

Backyard Basics Framelits Dies Item # 129380 Regular Price: $24.95 Discounted Price: $18.71
Gold Metallic Encore Pad Item # 132141 Regular Price: $9.95 Discounted Price: $7.46
Basics Glimmer Brads Item # 121003 Regular Price: $4.95 Discounted Price: $3.71
Paper Doily Sizzlits Die Item # 125592 Regular Price: $21.95 Discounted Price: $16.46
Primrose Petals 3/8″ Stitched Satin Ribbon Item # 126844 Regular Price: $8.95 Discounted Price: $6.71
Summer Starfruit 3/8″ Stitched Satin Ribbon Item # 126846 Regular Price: $8.95 Discounted Price: $6.71
Season By Season Kit – Digital Download Item # 130060 Regular Price: $9.95 Discounted Price: $5.97

Click here to see the Weekly Deals from Stampin’ Up! in my online store.  The Weekly Deals are only while supplies last and only available at these great prices through February 17.


____________________________________________________________

If you need any stamping supplies, I’d be very happy to be your Demonstrator.  Just click on Order Stampin’ Up! Online Now in the main menu or in the sidebar to go directly to my online store or drop me an email if you have any questions.

Happy Stamping!

Heather

  • It’s Sale-a-bration time!!  You’ll get a free item from Stampin’ Up! for every $50 that you purchase between now and March 31!  Click on my Stampin’ Up! Promotions page for more information!
  • Visit my online store here.
  • Shop the Clearance Rack here.

____________________________________________________________

Stampin’ Up! items used to create this project:

Stamp Sets: Chalk Talk (130634)

Dies, Punches, & Embossing Folders: Decorative Label Punch (120907)

Embellishments: Basic Rhinestone Jewel Accents (119246); Coastal Cabana Ruffle Stretch Trim (130024)

Card Stock:  Soft Sky (131203) card base – 5-1/2″ x 8-1/2″; Basic Black (121045) – 3-3/4″ x 3-3/4″ panel, 3-3/4″ x 5″ panel (inside of card); Whisper White (100730) – 3″ x 3″ panel, 3-1/2″ x 4-3/4″ panel (inside of card), one sentiment (oval); Sweet Sorbet Designer Series Paper (Sale-a-bration item) – 3-1/2″ x 3-1/2″ panel; Pool Party (122924) – one decorative label punch

Markers & Ink:  Basic Black Classic Stampin’ Pad (126980); Pool Party Classic Stampin’ Pad (126982); Basic Black Stampin’ Write Marker (100082)

Tools:  Stamp-a-ma-jig (101049)

Adhesive: SNAIL (104332); Stampin’ Dimensionals (104430)

A “See Ya Later” Birthday Sale-A-Bration – Stampin’ Up!

Today’s share was created using the See Ya Later stamp set and Decorative Dots (Sale-a-bration items) embossing folder from Stampin’ Up! Both of these items are available FREE with a $50 purchase through March 31st!  I just love this card!  I can’t wait to send it to someone special.

See Ya Later Birthday SAB7

I wish I could take full credit for this cute design, but I actually got the idea from a similar card I saw on Pinterest, created by Selene Kempton.  I changed it up a little bit to make it my own, but I want to be sure to give credit where credit is due.

See Ya Later Birthday SAB9

I started by cutting panels of Coastal Cabana and Pink Pirouette card stock.  Next, I dry embossed the pink panel using the Decorative Dots embossing folder and my Big Shot Die-Cut Machine.

See Ya Later Birthday SAB11

I used the three largest Banner Framelits Dies to cut banners from the Birthday Basics Designer Series Paper.  I wanted my banners to be different lengths, but they were too wide for my project, so I trimmed each of them to be 1-1/4 inches wide. Then I adhered them to the Pink Pirouette panel using SNAIL adhesive.

See Ya Later Birthday SAB12

I wrapped my pink panel with Coastal Cabana Stretch Ruffle Trim and tied it in a knot. Then I adhered the two panels together and placed them on a Whisper White card base using SNAIL.

See Ya Later Birthday SAB8

I used stampin’ write markers (So Saffron, Wild Wasabi, Strawberry Slush, & Coastal Cabana) to color the birthday sentiment from the See Ya Later stamp set.  Then I used the Labels Collection Framelits to cut it out.

Next I used a sponge dauber to color the edges of the sentiment using my Strawberry Slush Classic Stampin’ Pad and adhered the final product to the card front using Stampin’ Dimensionals.

See Ya Later Birthday SAB3

Finally, I completed the front of the card by adding three small Basic Rhinestones Jewel Accents in the bottom right hand corner.

See Ya Later Birthday SAB4

I finished the inside of my card by adding a strip of Coastal Cabana card stock along the bottom.  Then I used the banner punch (Sale-a-bration item) to create three small banners using the same Birthday Basics Designer Series Paper which was used on the front of the card.

I hope you have enjoyed my share today.  I certainly enjoyed creating it.  If you would like to place an order and earn the See Ya Later stamp set, Decorative Dots embossing folder, or the banner punch for FREE (Sale-a-bration items), please click here to shop in my online store.

You can find a complete list of supplies, including card stock cuts, and the very bottom of this post.

____________________________________________________________

Weekly Deals from Stampin’ Up! February 18-24

Here are the Weekly Deals from Stampin’ Up!:

Click here to see the Weekly Deals from Stampin’ Up! in my online store.  The Weekly Deals are only while supplies last and only available at these great prices through February 17.

____________________________________________________________

Clearance Rack Updated!

Screen Shot 2014-02-18 at 6.30.12 AM

Stampin’ Up! has updated the Clearance Rack in the online store!  I saw some punches, dies, card stock, DSP and embellishments at great deals.  And Clearance Rack items count toward your merchandise total for Sale-a-bration items!!  So click here to head over and start shopping now!  Clearance Rack deals are only available while supplies last.

____________________________________________________________

If you need any stamping supplies, I’d be very happy to be your Demonstrator.  Just click on Order Stampin’ Up! Online Now in the main menu or in the sidebar to go directly to my online store or drop me an email if you have any questions.

Happy Stamping!

Heather

  • It’s Sale-a-bration time!!  You’ll get a free item from Stampin’ Up! for every $50 that you purchase between now and March 31!  Click on my Stampin’ Up! Promotions page for more information!
  • Visit my online store here.
  • Shop the Clearance Rack here.

____________________________________________________________

Stampin’ Up! items used to create this project:

Stamp Sets: See Ya Later (Sale-A-Bration item available FREE with $50 purchase until March 31, 2014)

Dies, Punches, & Embossing Folders: Banner Framelits Dies (132173); Labels Collection Framelits (125598); Decorative Dots Embossing Folder & Banner Punch (Sale-A-Bration Free items with $50 purchase)

Embellishments: Basic Rhinestone Jewel Accents (119246)

Card Stock:  Whisper White (100730) – 4-14″ x 11″ card base, one sentiment label (Labels Collection Framelits); Coastal Cabana (130024) – 4″ x 5-1/4″ panel, and 1/4″ x 4-1/4″ strip for inside of card; Pink Pirouette (111351) – 3-3/4″ x 5″ panel.

Designer Series Paper: Birthday Basics (130145) – 3 large banners (Banners Framelits Dies) and 3 small banners (Banner Punch)

Markers & Ink:  Strawberry Slush Classic Stampin’ Pad (131178); So Saffron & Wild Wasabi Stampin Write Markers – Subtles Collection (131263); Coastal Cabana and Strawberry Slush Stampin’ Write Markers – In Color 2013-2015 Collection (131260)

Tools:  Big Shot Die-Cutting Machine (113439); Sponge Daubers (102892)

Adhesive: SNAIL (104332); Stampin’ Dimensionals (104430)