Today’s card features the Secret Garden stamp set (wood mount and clear mount) from Stampin’ Up! The inspiration for this card came from the Mojo Monday sketch challenge #335 and the Splitcoast Stampers Color Challenge #468. (The challenge calls for Raspberry Ripple, but I didn’t have that so I substituted Rose Red.) At first I was a little stuck with my design, but I am really pleased with the end result. I would love to hear what you think too! On March 31st I will do a drawing and one lucky person who leaves me a comment will win a handcrafted card in the mail! Also, if you enjoy reading my posts, why not have them delivered to your inbox automatically. Just click on the “follow” button in the sidebar.


I didn’t have any designer series paper in the challenge colors, so I decided to create my own! I randomly stamped a piece of Very Vanilla card stock with the Secret Garden stamp set in Rose Red, Island Indigo, and Old Olive. I didn’t want my stamped images to be too bold and overwhelming, so I stamped the Island Indigo and Old Olive stamps on a scrap sheet of paper before stamping them on my card stock. This gave the colors a bit of a softer effect. I wanted to tie in the black from my card base, so I chose a stamp from the Petite Petals stamp set (wood mount and clear mount) and used my Staz On Black ink to add it to my design. I was trying to highlight the colors of the challenge without having too many big blocks of solid color or a pattern that was so bold it became distracting. I think my floral stamped paper did just the trick!

Once my stamping was done, I cut the panels for my card. I placed a panel of Island Indigo side by side with a panel of my stamped design and adhered them to a Basic Black card base using SNAIL Adhesive. Then I cut a panel of Basic Black and embossed it using the Lacy Brocade embossing folder and my Big Shot. I cut two small squares of card stock; one in Island Indigo and and the other from my stamped paper. I used SNAIL to attach the Island Indigo and Black pieces to the card front. Then I used Stampin’ Dimensionals to attach my stamped square.

Next, I added a banner cut from Rose Red card stock. I cut a 1/2″ strip of card stock and then used the Banner Punch (Sale-a-bration item) to shape the end of the banner. Then I stamped a flower from the Secret Garden stamp set using my Island Indigo Classic Stampin’ Pad. I used the Secret Garden Framelits to cut out my flower and some leaves from Old Olive card stock. I used mini glue dots to adhere the leaves and then used Stampin’ Dimensionals to add my flower. I chose the “You make me smile” greeting from the A Round Array stamp set (wood mount and clear mount), which I stamped in Rose Red ink on Very Vanilla card stock and cut out using the 7/8″ Scalloped Circle Punch. The sentiment was also adhered using Stampin’ Dimensionals. Finally, I added some Basic Pearl Jewel Accents to the center of my flower and the bottom left corner of my card for a finishing touch.

Of course, you may have noticed that I always like to finish the inside of my card with a coordinating accent. I used the Secret Garden and Petite Petals stamp sets to mirror the design from the front of my card on a panel of Very Vanilla and adhered it to the inside of the card using SNAIL.
I hope you have enjoyed today’s creation. It was a great creative challenge for me and I really enjoyed putting it together. If you liked my post today, I would appreciate it if you could help me out by pinning it to Pinterest. I am still working on building up my blog following and I need all the help I can get to spread the word! If you scroll to the bottom of the post, you will find a “pin it” button just below my supply list for the project… and, don’t forget to leave me a comment for your chance to win a handcrafted card in the mail!
If you would like to order the Secret Garden stamp set or any of the other beautiful products featured in this card, please click here to shop in my online store. I would love to help you in your creative journey by becoming your personal Stampin’ Up! Demonstrator. Remember it’s Sale-a-bration with Stampin’ Up! Choose from a wide variety of FREE items with any $50 purchase until March 31, 2014.
You can find a complete list of supplies, including card stock cuts at the very bottom of this post.
____________________________________________________________
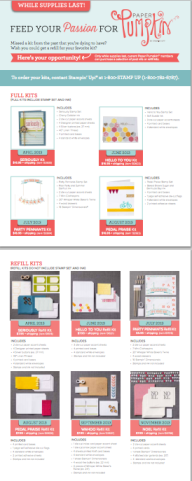
Weekly Deals from Stampin’ Up! March 4 – 10
Here are the new Weekly Deals from Stampin’ Up!:
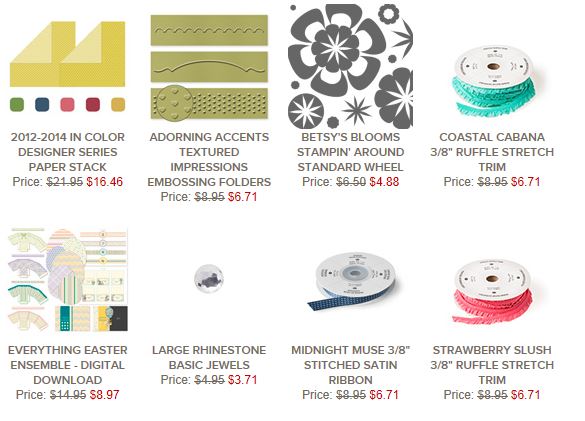
Click here to see the Weekly Deals from Stampin’ Up! in my online store. The Weekly Deals are only while supplies last and only available at these great prices through March 10.
____________________________________________________________
If you need any stamping supplies, I’d be very happy to be your Demonstrator. Just click on Order Stampin’ Up! Online Now in the main menu or in the sidebar to go directly to my online store or drop me an email if you have any questions.
Happy Stamping!
Heather
- It’s Sale-a-bration time!! You’ll get a free item from Stampin’ Up! for every $50 that you purchase between now and March 31! Click on my Stampin’ Up! Promotions page for more information!
- Visit my online store here.
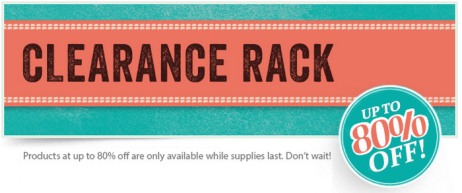
- Shop the Clearance Rack here.
____________________________________________________________
Stampin’ Up! items used to create this project:
Stamp Sets: A Round Array (129090); Secret Garden (129144); Petite Petals (133155)
Dies, Punches, & Embossing Folders: Secret Garden Framelits Dies (129372); Lacy Brocade Textured Impressions Embossing Folder (127819); 7/8″ Scallop Circle Punch (129404); Banner Punch (Sale-a-bration item)
Embellishments: Basic Pearls Jewel Accents (119247)
Card Stock: Basic Black (121045) – card base 4-1/4″ x 11″, 3-1/4″ x 3-1/2″ panel; Island Indigo (122923) – 1-3/4″ x 5-1/4″ panel, 2-1/4″ x 2-1/4″ square; Very Vanilla (101650) – 2-1/2″ x 5-1/4″ panel (stamped), 2″ x 2″ square (stamped), 4″ x 5-1/4″ panel (inside), one flower die cut, one 7/8″ scalloped circle punch (sentiment); Old Olive (100702) – one leaf die cut (Secret Garden Framelits); Rose Red (102544) – one banner.
Markers & Ink: Rose Red Classic Stampin’ Pad (126954); Island Indigo Classic Stampin’ Pad (126986); Old Olive Classic Stampin’ Pad (126953); Stazon Black (101406)
Tools: Big Shot (113439)
Adhesive: SNAIL (104332); Stampin’ Dimensionals (104430); Mini Glue Dots (103683)