World of Dreams Notepad – Stampin’ Up!

Hello Stampers!  Today’s project is a notepad featuring the World of Dreams stamp set from Stampin’ Up!  As soon as I saw this stamp set in the catalog I knew it was one I just had to have!  I love a stamp set with beautiful silhouetted images!

World of Dreams Notepad (3 of 4)

For instructions about how to create your own beautiful notepads with the perfect measurements, please see my previous post here.

World of Dreams Notepad (1 of 4)

I love these notepads.  They are perfect for brightening up the corner of your desk and they make awesome gifts!  In this case, I made a whole set of them and gave them as favors at my sister’s bridal shower.  I thought that the sentiment was lovely for commemorating the beginning of my sister’s new life with her husband.  You can also add magnets to the back of these pads and keep them on the refrigerator.  You can purchase business card magnets with adhesive on them from most office supply stores.  They are perfect because they are strong enough to hold the pad in place on the fridge.

World of Dreams Notepad (4 of 4)

I love Pinterest, don’t you?  Please pin this project if you love it as much as I do.  You will find a “pin it” button at the bottom of this post below the supply list and card stock cuts.  Also, please subscribe to my blog via email by clicking on the “follow” button if you are a fan of my work.

I hope you will consider selecting me as your demonstrator for your stamping needs.  I also offer free catalogs to all of my customers.  If you are my customer or want to be my customer, please email me your name and mailing address.  I’ll be more than happy to send you the gorgeous book.  You can email me at handcraftingheather@icloud.com.

If you need any supplies you can shop now in my online store!  Feel free to drop me an email if you have any questions or if you would like a catalog.  I’m here to help!

Happy Stamping!

Heather

  • Visit my online store here.
  • Shop the Clearance Rack here.

WEEKLY DEALS for July 15-21

Screen Shot 2014-07-15 at 8.30.45 AM

Click here to see the Weekly Deals from Stampin’ Up! in my online store.  The Weekly Deals are only while supplies last and only available at these great prices through July 21.


Stampin’ Up! items used to create today’s project:

If you would like to order any of the products featured in today’s project, click the images below to order from my online store.


Project Dimensions

Notepad: 4″ x 6″ (3/8″ thick)

Notepad Cover: Wild Wasabi – 4″ x 8″ (Scored at 6-1/8″ and 6-1/2″)

Art Piece:  Soft Suede (mat) – 3-1/8″ x 4-1/8″; Crumb Cake – 3″ x 4″ panel

Choose Happiness Notepads – Stampin’ Up!

Today’s project is one that brings a smile to my face.  I just love these adorable notepads featuring the Choose Happiness and Everything Eleanor stamp sets from Stampin’ Up!  I have a secret obsession with stationery and notepads of all kinds… no wonder I made my way into the art of making cards, lol!  I love having cute little notepads all over the place to jot down a quick note, or make a list.  (For those of you who saw my craft room post, you might have noticed that I’m also obsessed with organization, so lists make me happy too.)

Choose Happiness Pads (6 of 6)

These adorable notepads are so easy to make, and can be altered for any color scheme or stamped design.  They would make great gifts too!  I purchased some small notepads from Staples and Amazon.com for this project today, but you could really make them in any size.  I prefer to use “Gum-Top” notepads, which means they are glued along the top edge, rather than having cardboard wrapped around the top and secured with staples.  However, either type of pad can be used for this project.

Choose Happiness Pads (2 of 6)

The process I use for making these pads is the same, regardless of the dimensions.  For this post, I am going to tell you how to measure your notepad to make a cover with a perfect fit, rather than focusing on the dimensions of this specific project.

Begin by measuring the height and width of the front of your notepad.  I like to add 1/8″ to the height, so that the cover extends beyond the bottom of the pad by just a little bit when it is closed.  This makes it easier to open the pad.  Next, measure the depth of the notepad and add that measurement to the height.  Finally, add 1-1/2″ to those two measurements to account for the part that will wrap around the back.  Cut a rectangle out of card stock that is equal to:

width measurement x (height + depth + 1-1/2″)

For example, if your notepad measures 3″ x 5″ and is 1/4″ deep then you would cut your card stock to 3″ x 6-3/4″ then you would score it at 1-1/2″ and 1-3/4″.  Of course, where you score your card will depend on the dimensions of your notepad.  The first score mark will always be 1-1/2″, but the second score mark will depend on the depth of your notepad.  To determine the second score mark, add 1-1/2″ to the depth of the notepad.

Once you have scored your card stock, wrap it around the front of the notepad and secure it on the back of the notepad with a strong adhesive, such as sticky strip, Fuse Adhesive, or Multipurpose Liquid Glue.  Be sure that you don’t glue along the top edge of the notepad, just on the back.

Choose Happiness Pads (4 of 6)

Once the cover is in place, you can really decorate it any way you want.  For this set, I created notepads in Blackberry Bliss, Crisp Cantaloupe, and Cherry Cobbler.  I used coordinating DSP from the Background Designer Series Paper stacks and added a beautiful art piece featuring several stamp sets from Stampin’ Up! I began by stamping the Dictionary background stamp in Baked Brown sugar on a panel of Very Vanilla card stock.  Next, I stamped the flourish image from Everything Eleanor in the same shade, and I added some ink splotches from Gorgeous Grunge too.  Then I used Mossy Meadow ink, and the leaf image from Kinda Eclectic to add some foliage.  Next, I sponged the background with Baked Brown Sugar ink.  Finally, I added some Venetian Crochet Trim and Linen Thread to the panel.

Choose Happiness Pads (1 of 6)

I stamped the flower image from Choose Happiness in the same color card stock as I used for the cover of each notepad.  For the Blackberry Bliss and Cherry Cobbler pads, I used the coordinating ink color and sponged around the edges with it too.  For the Crisp Cataloupe pads, I wanted a little more contrast for the flower, so I used Calypso Coral ink.  Finally, I added the flower to the background with Stampin’ Dimensionals and mounted the entire piece on a Baked Brown Sugar mat.

Choose Happiness Pads (3 of 6)

For one of the pads, I stamped the “Choose Happiness” sentiment in Early Espresso ink to finish it off.  For the others, I colored three large pearls with my Bronze Stampin’ Blendabilities Marker (from the Skintone set).  Then I added them to the top right corner of the art piece for a finishing touch.

Choose Happiness Pads (6 of 6)

These notepads are the perfect size to slip into your purse or keep on the corner of a desk.  I just adore them!  If you love them too, today is your lucky day.  Leave me a comment about this post, and I will draw one lucky winner to receive one in the mail!  I will announce the winner in my post on Tuesday, July 1st.  (Which also happens to be the day that several Blendabilties Marker sets will be available to the public!  Are you getting excited yet?)

I know you are going to want to save this idea for later, so you should definitely pin it to Pinterest.  You can find a “pin it” button at the very bottom of this post.  To subscribe to my blog via email, just click on the “follow” button in the sidebar near the top.

I hope you will consider selecting me as your demonstrator for your stamping needs.  I offer free catalogs to all of my customers.  If you are my customer or want to be my customer, please email me your name and mailing address.  I’ll be more than happy to send you the gorgeous 2014 Annual Catalog.  You can email me at handcraftingheather@icloud.com.

Also, it is not too late to sign up for my one-to-one card swap.  Cards are due to me by July 10, which is a little less than two weeks from now.  The details and registration link are below.  I hope that you will join in the fun!

If you need any supplies you can shop now in my online store!  Feel free to drop me an email if you have any questions or if you would like a catalog.  I’m here to help!

Happy Stamping!

Heather

  • Visit my online store here.
  • Shop the Clearance Rack here.

Tomorrow is the Last Day to Sign Up for Only $50!

Tomorrow is the last day to take advantage of the $50 sign up special from Stampin’ Up!  If you have at least $50 worth of products you would like to purchase from the new annual catalog you should really consider joining.  There are many benefits of becoming a demonstrator including a great discount and access to advanced products.  Did you know you could order several of the Stampin’ Blendabilities marker sets now if you were a Stampin’ Up! Demonstrator?

Now is a great time to join my team!  I welcome Hobbyist Demonstrators, and during the month of June, new recruits can join Stampin’ Up! at one of two great prices. Stampin’ Up! will continue to offer their traditional starter kit priced at $99 ($125 product value + FREE Shipping), but only during the month of June they will also be offering a reduced priced starter kit at the low price of $50 ($55 product value + FREE Shipping).  Drop me a note at handcraftingheather@icloud.com if you have any questions or if you’d like additional details.  I’d love to have you on my team!  You can read more information about the benefits of being a Demonstrator here.


2014 Annual Catalog One-to-One Swap

Just a reminder about my one-to-one swap.  I hope you will join in the fun!  It is so great when I get to actually connect with all of you and this is a wonderful way for us to share our inspiration and creativity with each other.  To participate, you will send me one card created with current Stampin’ Up! products (no retired items please) and a self-addressed stamped envelope.  Once all the swaps have arrived, I will send you someone else’s card in the mail.  It’s that easy!  If you have questions, please feel free to contact me at handcraftingheather@icloud.com.

To participate, please register for the event by clicking on the button below.   Once registration is complete, you will receive an email with specific instructions (including the address for where to send your swaps).  Projects are due in hand by July 10, 2014.  I can’t wait to see what you create!  Happy Stamping!

Eventbrite - 2014 Annual Catalog One-to-One Swap


WEEKLY DEALS for June 24-30

Screen Shot 2014-06-24 at 6.01.06 AM

Click here to see the Weekly Deals from Stampin’ Up! in my online store.  The Weekly Deals are only while supplies last and only available at these great prices through June 30.


Stampin’ Up! items used to create today’s project:

If you would like to order any of the products featured in today’s project, click the images below to order from my online store.

Chalk Talk “Something Special” Gift Tag – Stampin’ Up!

Last Friday was my son Carter’s last day at his current daycare.  I’m truly excited about him going to a new school, but we will miss his caregiver, Astride, dearly!  He has been with her since he was 4 months old, and she feels like a part of our family.  I felt it appropriate to give her a nice thank you gift as a going away present.  Of course, no gift would be complete without an adorable Stampin’ Up! gift tag.

Chalk Talk Gift Tag (3 of 13)

Today’s project features the Chalk Talk stamp set from Stampin’ Up!  It turned out super cute, and it was really QUICK and easy to make.

Chalk Talk Gift Tag (13 of 13)I started by stamping the “A Little Something Special for a Very Special Somone” tag on Whisper White in Coastal Cabana ink to match the stripes of the bag I got from thirty-one (if you’ve never checked out their site, they have the most adorable bags!).  Then I used my framelits die to cut out my tag and mounted it on a panel of Strawberry Slush card stock, which I trimmed to fit my tag.

Chalk Talk Gift Tag (4 of 13)

Next, I cut 1/4″ strips of DSP from the 2013-2015 In Color Backgrounds Designer Series Paper Stack in Coastal Cabana and Strawberry Slush.  I used my bone folder to curl the paper to make it look like ribbon.  Then I fastened it to my tag with a brad.  I punched a hole in the tag and added some Strawberry Slush stretch ruffle trim (retired product).  I tied that in a knot and added a second piece to tie around the handle of the thirty-one bag.

Chalk Talk Gift Tag (6 of 13)

This project only took a few minutes to complete, but I love the way it turned out.  Astride loved receiving her gift.  In fact, she cried when I gave it to her.  I think that was mostly because she was saying goodbye to my precious little boy, but the gift tag could have had something to do with it too. LOL.  I would appreciate it if you would pin this project to Pinterest if you like it as much as I do.  You will find a “pin it” button at the very bottom of this post below the supply list and cards stock cuts.  Also, if you like my work, why not subscribe to my blog via email.  All you have to do is click on “follow” in the sidebar.

Chalk Talk Gift Tag (10 of 13)

If you haven’t gotten your very own copy of the 2014 Annual Catalog yet, now is a great time.  I’ve got a stack of them hot off the presses waiting for you. I offer free catalogs to all of my customers.  If you are my customer or want to be my customer, please email me your name and mailing address.  I’ll be more than happy to send you the gorgeous book.  You can email me at handcraftingheather@icloud.com.

I hope you will consider selecting me as your demonstrator for your stamping needs.  If you need any supplies, you can shop now in my online store!  Feel free to drop me an email if you have any questions or if you would like a catalog.  I’m here to help!

Happy Stamping!

Heather

  • Visit my online store here.
  • Shop the Clearance Rack here.

Today is the Final Day for Ordering Retiring Products!

Screen Shot 2014-05-22 at 6.26.15 AM

Stampin’ Up! is offering a 25%-50% discount on many of the retiring products, but you have to act fast, as this special offer is only available until June 4, 2014 and only available while supplies last.  If you missed out on a product the first time, this is your last chance to get it before it’s gone for good!  Click here to go to my online store to start shopping!

Retiring Stamps (Available April 21-June 4, 2014, or while supplies last)

Retiring Accessories (Available April 21-June 4, 2014, or while supplies last)

If you need any stamping supplies, I’d be very happy to be your Demonstrator.  Just click on Order Stampin’ Up! Online Now in the main menu or in the sidebar to go directly to my online store or drop me an email if you have any questions.


Demonstrator Sign Up Special Available through June 30th!


Have you been considering joining Stampin’ Up! as a Demonstrator?  If so, now is a great time to join.  Between now and June 30, new recruits can join Stampin’ Up! at one of two great prices. Stampin’ Up! will continue to offer their traditional starter kit priced at $99 ($125 product value), but for the month of June only they will also be offering a reduced priced starter kit at the low price of $50 ($55 product value).  Drop me a note at handcraftingheather@icloud.com if you have any questions or if you’d like additional details.  I’d love to have you on my team!  You can read more information about the benefits of being a Demonstrator here.


WEEKLY DEALS for June 3 – 9

Screen Shot 2014-06-03 at 7.51.44 AM

Click here to see the Weekly Deals from Stampin’ Up! in my online store.  The Weekly Deals are only while supplies last and only available at these great prices through June 9.


Stampin’ Up! items used to create today’s project:

If you would like to order any of the products featured in today’s project, click the images below to order from my online store.

Gorgeous Grunge and Petite Petals Boxed Card Set – Stampin’ Up!

I have been having so much fun with boxed card sets lately, that I decided to create another one featuring the Gorgeous Grunge and Petite Petals stamp sets from Stampin’ Up!  The cards in this set are a total CASE from a Stampin’ Up! Demonstrator in the UK, Sam Donald from Pootles Papercraft.  Her You Tube channel is one of my favorites.  Ironically, she rarely posts videos of cards, favoring 3-D projects instead.  However, this time she posted a card, and then I turned it into a box!  Thanks for the inspiration Sam!  The only thing I changed was the color scheme. 🙂

Gorgeous Grunge & Petite Petals (1 of 18)

I would love to hear your thoughts about this project.  Today is the last day to leave me a comment for your chance to win one of the Retro Fresh Boxed Card Sets featured in my posts earlier this week.  Tomorrow, I will do the drawing and the winner will be announced on my Tuesday Updates post.


Creating the Cards

If you would like additional information about how to create design on the front of these beautiful cards, please watch Sam’s video tutorial linked above.  She does a fabulous job explaining everything step by step, and she creates gorgeous designs.  In fact, I loved this one so much that it prompted me to purchase the Gorgeous Grunge stamp set.  I had been on the fence about that one for a while, but  I had to have it once I saw this card.  Now that I’ve got it, I really like it.  I think you will be seeing more “splotchy” cards coming from me soon. LOL.

Gorgeous Grunge & Petite Petals (7 of 18)

As I said before, I loved her design so much, the only thing I changed was the color scheme.  In celebration of the new catalog launch tomorrow, I decided to feature the new 2014-2016 In Colors in my card set today.  I created the card in four different color schemes:

Gorgeous Grunge & Petite Petals (12 of 18)


Blackberry Bliss/Basic Gray/Smoky Slate

Blackberry Bliss, Basic Gray, & Smoky Slate


Lost Lagoon & Island Indigo

Lost Lagoon & Island Indigo


Mossy Meadow & Pistachio Pudding

Mossy Meadow & Pistachio Pudding


Tangelo Twist & Hello Honey

Tangelo Twist & Hello Honey

For the inside of my card, I chose to incorporate some of the same elements from the front.

Gorgeous Grunge & Petite Petals (10 of 18)

Gorgeous Grunge & Petite Petals (11 of 18)


Creating the Box

Gorgeous Grunge & Petite Petals (2 of 18)

I followed the same technique featured in Friday’s video tutorial for this box, but I adjusted the dimensions.  If you missed my post on Friday, you can view my tutorial hereTo create this box, I used a full sheet of 8-1/2″ x 11″ card stock, and scored it as follows:

With the 8-1/2″ side at the top of my Stampin’ Trimmer, I scored at:

  • 1/2″
  • 1-3/8″
  • 7-1/8″
  • 8″

Next, with the 11″ side at the top of the trimmer, score at:

  • 2-3/8″
  • 3-1/4″
  • 7-3/4″
  • 8-5/8″

The measurements for the panels on the flap are:

  • Basic Gray – 5-1/2″ x 2-1/4″ punched on two corners with the Envelope Punch Board
  • Very Vanilla – 5-1/4″ x 2-1/8″ punched on two corners with the Envelope Punch Board

Gorgeous Grunge & Petite Petals (3 of 18)

For this box, since I was using a full sheet of card stock to accommodate a 4-1/4″ x 5-1/5″ card, I did not have enough overlap to do a Velcro closure.  Instead, I created this tie closure with the gorgeous new In Color ribbon.  To create the closure, I punched two small holes close together.  I threaded the ribbon from the top of the flap through to the inside and then back up again.  I wrapped the ribbon around the box and tied it closed.  Then I hid my holes by embellishing with flowers on top.

Gorgeous Grunge & Petite Petals (1 of 18)

I am so thrilled with how this project turned out.  I think Sam’s design is beautiful with the new In Colors, and it makes a gorgeous boxed set.  I know anyone would be delighted to receive this as a gift!  Please pin this project to Pinterest if you like it as much as I do.  You will find a “pin it” button at the very bottom of this post below the supply list and cards stock cuts.  Also, if you like my work, why not subscribe to my blog via email.  All you have to do is click on “follow” in the sidebar.

The new catalog goes live tomorrow!  I know you are probably chomping at the bit to get your hands on some of the fantastic new products from Stampin’ Up! just like I am.  If you haven’t gotten your very own copy of the 2014 Annual Catalog yet, now is a great time.  I’ve got a stack of them hot off the presses waiting for you. I offer free catalogs to all of my customers.  If you are my customer or want to be my customer, please email me your name and mailing address.  I’ll be more than happy to send you the gorgeous book.  You can email me at handcraftingheather@icloud.com.

I hope you will consider selecting me as your demonstrator for your stamping needs.  If you need any supplies or want to grab some retiring products before they are gone, you can shop now in my online store!  Remember, the Stampin’ Up! Retiring Products are 20%-50% off while supplies last!  There are only a few more days left to order, so act now!  Feel free to drop me an email if you have any questions or if you would like a catalog.  I’m here to help!

Happy Stamping!

Heather

  • Visit my online store here.
  • Shop the Clearance Rack here.

Demonstrator Sign Up Special Available through June 30th!


Have you been considering joining Stampin’ Up! as a Demonstrator?  If so, now is a great time to join.  Between now and June 30, new recruits can join Stampin’ Up! at one of two great prices. Stampin’ Up! will continue to offer their traditional starter kit priced at $99 ($125 product value), but for four weeks only they will also be offering a reduced priced starter kit at the low price of $50 ($55 product value).  Drop me a note at handcraftingheather@icloud.com if you have any questions or if you’d like additional details.  I’d love to have you on my team!  You can read more information about the benefits of being a Demonstrator here.


Retiring Products – Only a few days left!

Screen Shot 2014-05-22 at 6.26.15 AM

Stampin’ Up! is offering a 25%-50% discount on many of the retiring products, but you have to act fast, as this special offer is only available until June 4, 2014 and only available while supplies last.  If you missed out on a product the first time, this is your last chance to get it before it’s gone for good!  Click here to go to my online store to start shopping!

Retiring Stamps (Available April 21-June 4, 2014, or while supplies last)

Retiring Accessories (Available April 21-June 4, 2014, or while supplies last)

If you need any stamping supplies, I’d be very happy to be your Demonstrator.  Just click on Order Stampin’ Up! Online Now in the main menu or in the sidebar to go directly to my online store or drop me an email if you have any questions.


 WEEKLY DEALS for May 27 – June 2

Screen Shot 2014-05-27 at 9.28.04 AM

Click here to see the Weekly Deals from Stampin’ Up! in my online store.  The Weekly Deals are only while supplies last and only available at these great prices through June 2.


Stampin’ Up! items used to create today’s project:

If you would like to order any of the products featured in today’s project, click the images below to order from my online store.


Card Stock Cuts (Cards)

Card Bases: Blackberry Bliss, Lost Lagoon, Mossy Meadow, & Tangelo Twist – 4-1/4″ x 11″

Panels: Basic Gray, Island Indigo, Pistachio Pudding, & Hello Honey – 4″ x 5-1/4″; Very Vanilla – 3-3/4″ x 5″ (front of card), 4″ x 5-1/4″ (inside of card).


Retro Fresh Boxed Card Set (Part 2) – Stampin’ Up!

On Wednesday, I shared with you how to make these adorable cards and envelopes using the Retro Fresh DSP set from Stampin’ Up!  If you missed that post, please click here to see all the details.

Retro Fresh DSP (6 of 13)

Today, I am going to share with you how you can make the cute box to finish off this great gift set.  And don’t forget, if you leave me a comment about this project, you could win one of these boxed card sets!  On Monday, June 2nd, I will do a drawing to see who will get to have one of these adorable card boxes of their very own!

Retro Fresh DSP (11 of 13)

This project is a great one to store away for future reference.  With a few math calculations, the dimensions can be adjusted to fit a wide variety of card sizes.  These boxed card sets make wonderful gifts for any occasion.  With a few tweaks, you could change them to match any season or purpose.  They are quick and easy to create using any color combination.  On Sunday, I will share another project I made by adjusting the size of this box so you can see exactly what I mean.  If you are a fan of this project, please pin it to Pinterest.  You will find a “pin it” button at the very bottom of this post below the supply list and cards stock cuts.  Also, if you like my work, why not subscribe to my blog via email.  All you have to do is click on “follow” in the sidebar.

Retro Fresh DSP (10 of 13)

With the new catalog launch on Monday, you will have access to tons of great new paper designs from Stampin’ Up!  I hope you will give this project a try with one of the new designs and send me a picture of your project!  If you haven’t gotten your very own copy of the 2014 Annual Catalog yet, now is a great time.  I’ve got a stack of them hot off the presses waiting for you. I offer free catalogs to all of my customers.  If you are my customer or want to be my customer, please email me your name and mailing address.  I’ll be more than happy to send you the gorgeous book.  You can email me at handcraftingheather@icloud.com.

I hope you will consider selecting me as your demonstrator for your stamping needs.  If you need any supplies or want to grab some retiring products before they are gone, you can shop now in my online store!  Remember, the Stampin’ Up! Retiring Products are 20%-50% off while supplies last!  There are only a few days left to order from the current catalogs.  Feel free to drop me an email if you have any questions or if you would like a catalog.  I’m here to help!

Happy Stamping!

Heather

  • Visit my online store here.
  • Shop the Clearance Rack here.

Demonstrator Sign Up Special Available through June 30th!


Have you been considering joining Stampin’ Up! as a Demonstrator?  If so, now is a great time to join.  Between now and June 30, new recruits can join Stampin’ Up! at one of two great prices. Stampin’ Up! will continue to offer their traditional starter kit priced at $99 ($125 product value), but for four weeks only they will also be offering a reduced priced starter kit at the low price of $50 ($55 product value).  Drop me a note at handcraftingheather@icloud.com if you have any questions or if you’d like additional details.  I’d love to have you on my team!  You can read more information about the benefits of being a Demonstrator here.


Retiring Products – Only a few days left!

Screen Shot 2014-05-22 at 6.26.15 AM

Stampin’ Up! is offering a 25%-50% discount on many of the retiring products, but you have to act fast, as this special offer is only available until June 4, 2014 and only available while supplies last.  If you missed out on a product the first time, this is your last chance to get it before it’s gone for good!  Click here to go to my online store to start shopping!

Retiring Stamps (Available April 21-June 4, 2014, or while supplies last)

Retiring Accessories (Available April 21-June 4, 2014, or while supplies last)

If you need any stamping supplies, I’d be very happy to be your Demonstrator.  Just click on Order Stampin’ Up! Online Now in the main menu or in the sidebar to go directly to my online store or drop me an email if you have any questions.


 WEEKLY DEALS for May 27 – June 2

Screen Shot 2014-05-27 at 9.28.04 AM

Click here to see the Weekly Deals from Stampin’ Up! in my online store.  The Weekly Deals are only while supplies last and only available at these great prices through June 2.


Stampin’ Up! items used to create today’s project:

If you would like to order any of the products featured in today’s project, click the images below to order from my online store.


Card Stock Cuts (Card Box only)

Card Base: So Saffron, Coastal Cabana, or Baked Brown Sugar – 9-1/4″ x 7-7/8″

Score lines: 

With 7-7/8″ side at top, score at:  1″, 1-5/8″, 6-1/4″, and 6-7/8″

With 9-1/4″ side at top, score at:  2-3/8″, 3-1/8″, 6-3/8″, and 7″


Retro Fresh Boxed Card Set (Part 1) – Stampin’ Up!

I have a really cute project to share with you today.  I have been on a  mission to use up all my leftover designer series paper.  I absolutely adore the designs in the Retro Fresh DSP set from Stampin’ Up! and I hate for anything to go to waste.  This project makes a great gift idea for any occasion, and people love receiving these cute little card sets.  What’s even better is that they are super simple to make!

Retro Fresh DSP (4 of 13)

I was inspired to make these sets after seeing a blog post by another Stampin’ Up! Demonstrator, Dawn Griffith.  She created some cute little card sets that were the size of the small box in the picture above (Coastal Cabana), and the card on the left in the picture below.  Those cards are pretty tiny, and would be perfect for putting on top of a gift with a brief greeting, or for giving someone cash as a gift.  However, I decided that I would like to design similar project with slightly larger dimensions, which is what I’m going to tell you about today. The finished size of these cards is 4-1/4″ x 2-3/4″.  They are smaller than a standard card, but a nice size for dropping someone a quick note.

Retro Fresh DSP (7 of 13)

For today’s post, I will be giving the details for how to create the cards and envelopes for this project.  Stay tuned on Friday, and I will give you a video tutorial for creating the box.  Also, it is time for some new blog candy!  Leave me a comment about this project for your chance to win one of these cute card sets.  On Monday, June 2nd, I will do a drawing to see who will get to have one of these adorable sets for their very own!

Retro Fresh DSP (1 of 13)

For this project, I used Coastal Cabana, So Saffron, and Baked Brown Sugar card stock for my card bases and boxes.  You will need one 8-1/2″ x 11″ sheet of card stock to make a set of 4 cards, and another one for the box.  I started by cutting a sheet of card stock into four panels measuring 4-1/4″ x 5-1/2″.  Then I used my Envelope Punch Board to round the corners and folded each card in half, for a finished dimension of 4-1/4″ x 2-3/4″.

Retro Fresh DSP (8 of 13)

Next, I cut a panel of Retro Fresh DSP, rounded two corners and added some Coastal Cabana Stretch Ruffle Trim using SNAIL adhesive.  I adhered the panel to the front of the card, and that was it!  I repeated that process for all four cards… couldn’t be simpler.

Retro Fresh DSP (2 of 13)

For my envelopes, I used one sheet of 12″ x 12″ designer series paper from the Retro Fresh set.  I cut the paper into 6″ x 6″ squares and made my first score line at 3-1/2″ using my Envelope Punch Board.  If you haven’t used the envelope punch board, it is really easy to use.  Here is a video that shows you how it works.

One little note, I don’t really like the pointed part sticking up from the bottom flap of the envelope, so I just cut that part off.  I find it gives the envelope a more finished look.

Retro Fresh DSP (13 of 13)

These sets are wonderful because they are very versatile.  You can create them using any color combination or variety of designer series paper.  You can add a sentiment for a specific occasion, or leave them blank as I have done.  These would make fabulous teacher gifts (Trust me… I’m also a teacher.  We eat this stuff up!) What’s wonderful is you can make several sets in a couple of hours for very little money!  If you are a fan of this project, please pin it to Pinterest.  You will find a “pin it” button at the very bottom of this post below the supply list and cards stock cuts.  Also, if you like my work, why not subscribe to my blog via email.  All you have to do is click on “follow” in the sidebar.

To see my post about how to create the box featured in this project click here.

Although, I’m sad to see the Retro Fresh DSP being retired, I’m excited about all the new designs that will be available with the new catalog on Monday!   We only have a few more days to wait!  If you haven’t gotten your very own copy of the 2014 Annual Catalog yet, now is a great time.  I’ve got a stack of them hot off the presses waiting for you. I offer free catalogs to all of my customers.  If you are my customer or want to be my customer, please email me your name and mailing address.  I’ll be more than happy to send you the gorgeous book.  You can email me at handcraftingheather@icloud.com.

I hope you will consider selecting me as your demonstrator for your stamping needs.  If you need any supplies or want to grab some retiring products before they are gone, you can shop now in my online store!  Remember, the Stampin’ Up! Retiring Products are 20%-50% off while supplies last!  Feel free to drop me an email if you have any questions or if you would like a catalog.  I’m here to help!

Happy Stamping!

Heather

  • Visit my online store here.
  • Shop the Clearance Rack here.

Demonstrator Sign Up Special Available through June 30th!


Have you been considering joining Stampin’ Up! as a Demonstrator?  If so, now is a great time to join.  Between now and June 30, new recruits can join Stampin’ Up! at one of two great prices. Stampin’ Up! will continue to offer their traditional starter kit priced at $99 ($125 product value), but for four weeks only they will also be offering a reduced priced starter kit at the low price of $50 ($55 product value).  Drop me a note at handcraftingheather@icloud.com if you have any questions or if you’d like additional details.  I’d love to have you on my team!  You can read more information about the benefits of being a Demonstrator here.


Retiring Products – Only a few days left!

Screen Shot 2014-05-22 at 6.26.15 AM

Stampin’ Up! is offering a 25%-50% discount on many of the retiring products, but you have to act fast, as this special offer is only available until June 4, 2014 and only available while supplies last.  If you missed out on a product the first time, this is your last chance to get it before it’s gone for good!  Click here to go to my online store to start shopping!

Retiring Stamps (Available April 21-June 4, 2014, or while supplies last)

Retiring Accessories (Available April 21-June 4, 2014, or while supplies last)

If you need any stamping supplies, I’d be very happy to be your Demonstrator.  Just click on Order Stampin’ Up! Online Now in the main menu or in the sidebar to go directly to my online store or drop me an email if you have any questions.


 WEEKLY DEALS for May 27 – June 2

Screen Shot 2014-05-27 at 9.28.04 AM

Click here to see the Weekly Deals from Stampin’ Up! in my online store.  The Weekly Deals are only while supplies last and only available at these great prices through June 2.


Stampin’ Up! items used to create today’s project:

If you would like to order any of the products featured in today’s project, click the images below to order from my online store.


Card Stock Cuts (Cards and Envelopes only)

Card Base: So Saffron or Baked Brown Sugar – 4-1/4″ x 5-1/2″

Panels: Retro Fresh DSP – 4″ x 2-1/2″ panel

Envelopes:  Retro Fresh DSP – 6″ x 6″ (first score at 3-1/2″ using the envelope punch board)


Retro Fresh Graduation Gift Card Holder – Stampin’ Up!

My cousin is graduating from high school next week, and I am so proud of her!  I created this super cute gift card holder featuring Retro Fresh Designer Series Paper and the Pure Gumption stamp set from Stampin’ Up!  I think it will be the perfect thing to help her celebrate her big accomplishment.  I hope she has lots of fun shopping!

Pure Gumption Graduation (1 of 7)

Isn’t this adorable?  And you won’t believe how quick and easy it was to create!  What’s more, the stamp set could be changed to match any occasion!

Pure Gumption Graduation (2 of 7)

I began with a 4-1/4″ x 11″ Coastal Cabana card base.  I scored it parallel to the short edge at 3″ and 7″ and parallel to the long edge at 3″.  With the long edge at the bottom, I cut out the two bottom left sections (1-1/4″ x 7″).  I saved that strip to use for the belly band later.  The tab that was created by cutting out those two sections will be folded up later to create the pocket for the gift card.

Pure Gumption Graduation (7 of 7)

I used multipurpose liquid glue to adhere panels of Retro Fresh DSP to all the sections of the front and back of the card base.  I layered a Very Vanilla panel in the center section on the inside of the card so I would have a place to write my message.

Pure Gumption Graduation (3 of 7)

Next, I rounded the corner of the tab and used liquid glue to attach the right edge to the inside of the card.  This creates the pocket for the gift card.  Finally, I used the stamps from Pure Gumption to decorate the front and inside of the gift card holder.

Pure Gumption Graduation (5 of 7)

I used the 1-1/4″ x 7″ piece of Coastal Cabana card stock that I trimmed away earlier and a strip of Retro Fresh DSP to create a belly band for the card.  I embellished the band with Coastal Cabana stretch ruffle trim.  Be careful not to make the belly band too tight, or it won’t slide on and off easily when the gift card is inside.  I used sticky strip create the band, so that it would have a very strong bond and withstand being slid on and off repeatedly.

Pure Gumption Graduation (6 of 7)

For the envelope, I selected a sheet of Coastal Cabana DSP from the Retro Fresh pack.  I used my envelope punch board to create a custom envelope and stamped it with the graduation cap image from the Pure Gumption stamp set.

Pure Gumption Graduation (1 of 7)

This gift card holder was so easy to create, and it couldn’t be cuter!  I am going to make a few of these to have on hand for the next time I need to give someone a gift card.  I know that my cousin will love getting this adorable card in the mail.  You should definitely pin this project to Pinterest for future reference!   You will find a “pin it” button at the very bottom of this post below the supply list and cards stock cuts.  Also, if you like my work, why not subscribe to my blog via email.  All you have to do is click on “follow” in the sidebar.

I hope you will consider selecting me as your demonstrator for your stamping needs.  If you haven’t gotten your very own copy of the new catalog yet, now is a great time.  I’ve got a stack of them hot off the presses waiting for you. I offer free catalogs to all of my customers.  If you want to be my customer, please email me your name and mailing address.  I’ll be more than happy to send you the gorgeous book.  You can email me at handcraftingheather@icloud.com.

If you need any supplies or want to grab some retiring products before they are gone, you can shop now in my online store!  Remember, the Stampin’ Up! Retiring Products are 20%-50% off while supplies last!  Feel free to drop me an email if you have any questions or if you would like a catalog.  I’m here to help!

Happy Stamping!

Heather

  • Visit my online store here.
  • Shop the Clearance Rack here.

WEEKLY DEALS for May 20-26

Screen Shot 2014-05-20 at 6.06.42 AM

Click here to see the Weekly Deals from Stampin’ Up! in my online store.  The Weekly Deals are only while supplies last and only available at these great prices through May 26.


Stampin’ Up! items used to create today’s project:

If you would like to order any of the products featured in today’s project, click the images below to order from my online store.

Note:  The Pure Gumption stamp set and Coastal Cabana Stretch Ruffle Trim used in this product are on the retiring list and have already sold out.

Card Base: Coastal Cabana – 4-1/4″ x 11″ – with short edge at the top of the trimmer, score at 3″ parallel to the long edge; with long edge at the top of the trimmer, score at 3″ and 7″ parallel to the short edge.

Panels: Retro Fresh DSP – two panels 2-3/4″ x 2-3/4″, one panel 1″ x 7-1/4″; four panels 2-3/4″ x 3-3/4″; Very Vanilla – 2-1/2″ x 3-1/2″

Envelope: (finished dimension 3-1/2″ x 4-1/2″) Retro Fresh DSP – 6-3/4″ x 6-3/4″ square scored at 3″ using envelope punch board.


Work of Art Gift Bag… A Sneak Preview from Stampin’ Up!

On Wednesday, I shared with you the lovely coasters that I made for my mom for mother’s day.  Today, I’m going to show you how I used the fabulous Work of Art stamp set form Stampin’ Up! to create a super cute gift bag to put them in.  This stamp set is one of the brand new sets that will be available with the release of the new annual catalog on June 1st.  I just received my catalogs in the mail yesterday and I will be sending out complimentary copies to my customers!  If you place a $25 order with me during the month of May you will receive a copy of the new catalog in the mail for your reading enjoyment!  Just one more reason to go ahead and order those items from the Spring occasions catalog and the retiring list before they are gone!  Happy shopping! (I will also be launching a new customer loyalty program soon.  Every $25 purchase will earn creativity credits that can be used for free stuff.  More details will follow, but all orders placed during the month of May will qualify.)

Work of Art (2 of 7)-Edit

Isn’t that just adorable?  I know my mom will love it, and it was really quick and easy too!  If you are a fan of this project, I would love to hear your thoughts.  Also, if you find inspiration from my work, why not have my posts delivered to your inbox automatically.  Just click the “follow” button in the sidebar to subscribe.  Please help me get to 200 followers by telling your friends who love crafting about my blog!

Work of Art (7 of 7)-Edit

I started my project by cutting a banner in Whisper White card stock using the second largest Banner Framelits Die.  Then I trimmed the banner to be 2″ wide and punched the top using my Scalloped Tag Topper Punch.   Next, I stamped the “paint stroke” stamps from Work of Art in Coastal Cabana, Strawberry Slush, and Crisp Cantaloupe ink.  Then I stamped my sentiment on top using Stazon Black ink.

Work of Art (4 of 7)-Edit

For a layered effect, I cut strips of Designer Series Paper (from the In Color DSP stack) in Coastal Cabana and Crisp Cantaloupe.  I used my hexagon punch to create the banner end at the bottom.  Then I adhered the layers together with Stampin’ Dimensionals and tied a length of Strawberry Slush Stretch Ruffle Trim around them.

Work of Art (3 of 7)-Edit

Next, I used my Stamp-a-ma-jig to stamp the chevron image across the bottom of a white gift bag in Coastal Cabana ink.  I stamped the circle image in Strawberry Slush above the chevrons to get a polkadot effect.  To add a little dimension, I stamped off for some of the circles and stamped others full strength.

Work of Art (6 of 7)-Edit

I think the packaging of this gift is almost as great as what is inside.  I can’t wait to give them to my mom!  I hope you will give this a try too.  Be sure to pin this project to Pinterest for future inspiration!  If you scroll to the bottom of this post, you will find a complete list of supplies used to make today’s project.  Below the supply list, you will find a “pin it” button.  I would appreciate your help in spreading the word about my work.

If you find inspiration from this blog, one way you can show your support is by selecting me as your personal Stampin’ Up! Demonstrator.  One great thing about being a demonstrator is getting to preview some of the new products before they are available to the general public!  But don’t worry, you will be able to purchase the Work of Art stamp set from Stampin’ Up! in just a few short weeks.  In the meantime, if you need any stamping supplies you can shop now in my online store!  I would love to help you out.  Feel free to drop me an email if you have any questions.  I’m here to help!

Happy Stamping!

Heather

  • Visit my online store here.
  • Shop the Clearance Rack here.

WEEKLY DEALS for May 5 – 12

 weekly deals 5-6

Click here to see the Weekly Deals from Stampin’ Up! in my online store.  The Weekly Deals are only while supplies last and only available at these great prices through May 12.


Stampin’ Up! items used to create today’s project:

If you would like to order any of the products featured in today’s project, click the images below to order from my online store.


Home Decor… Stampin’ Up! Style!

With Mother’s Day right around the corner, I decided to show you a really simple, yet fabulous home decor project I created using Stampin’ Up! products.  I wanted elegant, but bold stamps, so I chose the following sets for my project today:  Summer Silhouettes, Fabulous Florets (retiring stamp set), Serene Silhouettes, Blooming with Kindness, and for my background En Francais (retiring stamp).

Stampin' Up! Coasters (1 of 10)

These coasters are so easy to make, and they are the perfect gift!  I made a set for mother’s day, and I also made a set for my son’s daycare provider for teacher appreciation week.  Not only are these coasters beautiful, but they are also extremely affordable (i.e. “dirt cheap”)!  I would love to hear what you think of my project today.  Please leave me a comment.  Also, if you like my work, why not have my posts delivered to your inbox automatically?  Just click on the “follow” button in the sidebar to subscribe now.

Stampin' Up! Coasters (6 of 10)

I used Stazon Black Ink for my project today because it is permanent.  I began by stamping each coaster with the En Francais background stamp.  (This stamp is retiring, but as of the time I am writing this, it is still available in clear mount.)  Then I stamped the four different coaster designs using a combination of stamp sets.  I found that stamps with a lot of solid surface area worked well for this project.  I just love the black silhouettes against the scripted font of the background.

Coaster #1: Serene Silhouettes

Stampin' Up! Coasters (5 of 10)

Coaster #2: Blooming with Kindness & Summer Silhouettes

Stampin' Up! Coasters (2 of 10)

Coaster #3: Fabulous Florets

Stampin' Up! Coasters (4 of 10)

Coaster #4:  Fabulous Florets & Summer Silhouettes

Stampin' Up! Coasters (3 of 10)

Once the coasters were stamped, I put them on a cookie sheet in a cold oven and brought the temperature up to 375 degrees.  Then I baked them for 30 minutes and let them cool in the oven.  Once everything was completely cooled, I used Minwax Paste Finishing Wax to seal in my designs.  Finally, I added felt pads to the corners on the bottom of the coaster to protect the table from scratching.

Stampin' Up! Coasters (10 of 10)

My mom is just finishing up a big renovation at her house and she is sprucing everything up.  I know she is going to love these coasters!  If you love them too, you should pin them to Pinterest!  At the bottom of this post you will find a complete list of supplies used in this project. Just below the supply list is a “pin it” button.

Stampin' Up! Coasters (9 of 10)

If you need any stamping supplies, including any of the fabulous stamp sets used in this project, I would love to help you out.  Click here to shop online now!  If you find inspiration from my blog, one way you can show your support is by selecting me as your personal Stampin’ Up! Demonstrator.  Feel free to email me if you have any questions.  I’m here to help!

Happy Stamping!

Heather


Weekly Deals from Stampin’ Up! – May 6-12

weekly deals 5-6

Click here to see the Weekly Deals from Stampin’ Up! in my online store.  The Weekly Deals are only while supplies last and only available at these great prices through May 12.


Retiring Stampin’ Up! Products – Available while supplies last until June 4, 2014

Many of the retiring products from Stampin’ Up! have already sold out!  Be sure to check out the links below to check to see which items are still available.  Stampin’ Up! is updating these lists daily to tell us which items are gone.  The last column has a little “x” next to the products that are no longer available.  If you want any of the products on the retiring list, be sure to order soon, so you don’t miss out!

  • Retiring Stamps (Available April 21-June 4, 2014, or while supplies last)
  • Retiring Accessories (Available April 21-June 4, 2014, or while supplies last)

If you need any stamping supplies, I’d be very happy to be your Demonstrator.  Just click on Order Stampin’ Up! Online Now in the main menu or in the sidebar to go directly to my online store or drop me an email if you have any questions.


Stampin’ Up! items used to create today’s project:

If you would like to order any of the products featured in today’s project, click the images below to order from my online store.


A Sketched Birthday for Carter – Stampin’ Up!

In honor of my son Carter’s third birthday today, I have some party favors embellished using the Sketched Birthday stamp set from Stampin’ Up! (wood mount and clear mount).  We are having a small birthday party at the Build-a-Bear Workshop followed by a teddy bear picnic.  I bought a red and white checked table cloth, and I wanted to brighten up the table and make it festive with some Stampin’ Up! magic!

Sketched Birthday (1 of 6)

Next time you entertain, you should definitely consider adding some stamped details to your table.  Your guests will be very impressed.  If you enjoy today’s project, I would love to hear from you.  Please leave me a comment and I will enter you into my drawing.  During the month of April, I will be doing a drawing each Sunday.  One lucky winner will receive one of the featured products from Sale-a-bration.  So, if you missed out on the free items during the sale, now is your chance to win one!  Also, if you enjoy reading my posts, why not have them delivered to your inbox automatically.  Just click on the “follow” button in the sidebar.

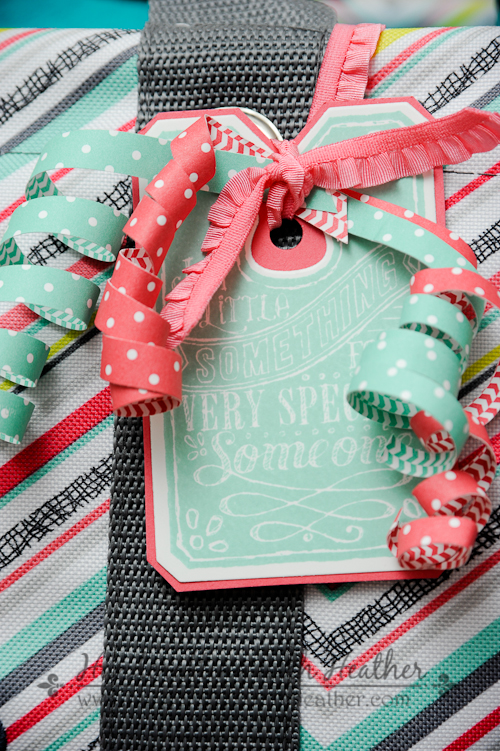
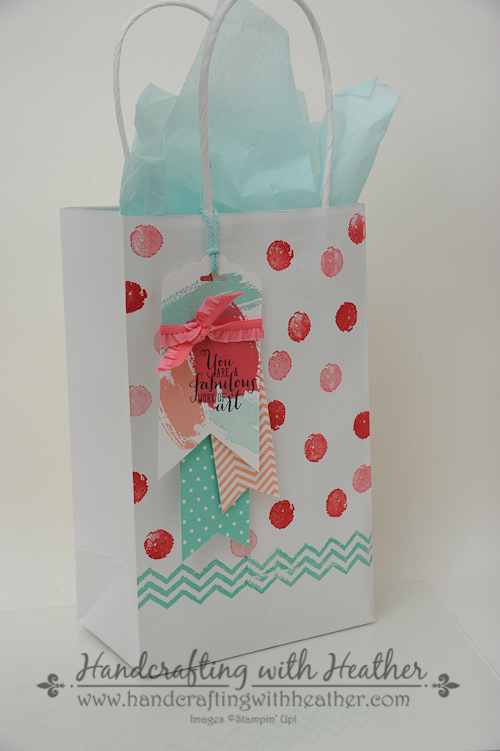
Teddy Bear Picnic Gift Bag featuring Label Love

I found this tiny teddy bear punch in the back of a drawer (I have no idea when/where I got it from), and I decided it would be a perfect way to embellish the favor bags for the party.  A little DSP and the Label Love stamp set… and “voila” you have a cute gift bag for the guests in a matter of minutes!

Sketched Birthday (2 of 6)

Stampin’ Up! items used to create gift bag:

Stamp Sets: Label Love (130622); Sketched Birthday (130426)

Dies, Punches, & Embossing Folders: Artisan Label Punch (1309210); Scalloped Tag Topper Punch (133324); 1-3/8″ Circle Punch (119860)

Card Stock & DSP:  Real Red DSP from the Brights Collection Designer Series Paper Stack (130134) – 2″ x 4″ strip for scalloped tag at top of bag, 1-1/2″ x 5″ strip for teddy bear decoration; Daffodil Delight (119683) – one circle punch; Whisper White (100730) – one artisan label punch

Markers & Ink:  Real Red Classic Stampin’ Pad (126949)

Adhesive: Stampin’ Dimensionals (104430); SNAIL Adhesive (104332)

Non-Stampin’ Up!: Small teddy bear punch, yellow ribbon, white paper bag

Sketched Birthday Treat Bag

You can’t have a teddy bear picnic without gummy bears, so I decided to use the cute cellophane bags from the Twisty Treats Kit (Sale-a-Bration item), my Scalloped Tag Topper Punch, and the birthday cake stamp from Sketched Birthday to dress them up.

Sketched Birthday (6 of 6)

Stampin’ Up! items used to create treat bag:

Stamp Sets: Sketched Birthday (130426)

Dies, Punches, & Embossing Folders: Scalloped Tag Topper Punch (133324)

Card Stock & DSP:  Real Red DSP from the Brights Collection Designer Series Paper Stack (130134) – 2″ x 3″ strip; Daffodil Delight (119683) – 1-3/4″ x  1-7/8″ rectangle; Whisper White (100730) – 1-5/8″ x 1-3/4″ rectangle, one birthday cake stamp.

Markers & Ink:  Brights Collection Stampin’ Write Markers (131259) – Daffodil Delight, Real Red, Tempting Turquoise; Neutrals Stampin’ Write Markers (131261) – Chocolate Chip; Stazon Black Ink (101406)

Miscellaneous: Twisty Treats Kit (133513) – one cello bag

Tools:  Envelope Punch Board (133774) – to round the corners of the tag.

Adhesive: Stampin’ Dimensionals (104430); SNAIL Adhesive (104332)

Non-Stampin’ Up!:  white ribbon

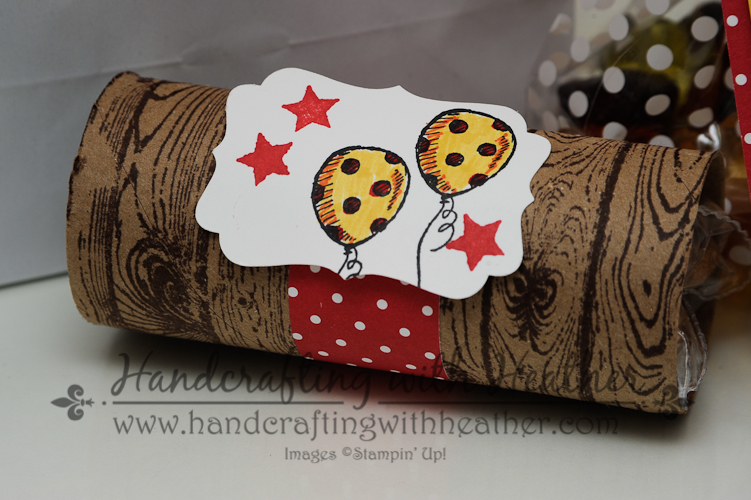
Sketched Birthday “Log” Treat Holder

For this treat holder, I inked up my hardwood stamp with Chocolate Chip ink and rolled a cardboard tube from a toilet paper roll across it.  Then I embellished the roll using Real Red Designer Series Paper and the cute balloon stamp from the Sketched Birthday stamp set.  Finally, I put some Teddy Grahams in a plastic baggie and placed them inside my “log” decoration.

Sketched Birthday (4 of 6)

Stampin’ Up! items used to create “Log” Treat Holder

Stamp Sets: Sketched Birthday (130426); Banner Blast (Sale-a-Bration) – Star; Hardwood (133035)

Dies, Punches, & Embossing Folders: Decorative Label Punch (120907)

Card Stock & DSP:  Real Red DSP from the Brights Collection Designer Series Paper Stack (130134) – 1″ x 5-1/2″ strip; Whisper White (100730) – one decorative label punch

Markers & Ink:  Brights Collection Stampin’ Write Markers (131259) – Daffodil Delight, Real Red, Pumpkin Pie; Real Red Classic Stampin’ Pad (126949); Stazon Black Ink (101406); Chocolate Chip Classic Stampin’ Pad (126979)

Adhesive: Mini Glue Dots (103683)

If you enjoyed my post today, please pin it to Pinterest for me.  You will find a “pin it” button at the very bottom of the post.  Also, don’t forget to leave me a comment for your chance to win a free stamp set from Sale-a-bration!

If you are interested in purchasing the Sketched Birthday stamp set from Stampin’ Up! or if you need any other stamping supplies, I would love to be your personal demonstrator.  Of course, you can always shop now in my online store!

____________________________________________________________

WEEKLY DEALS for April 8 – 14

 Screen Shot 2014-04-08 at 6.44.39 AM

Click here to see the Weekly Deals from Stampin’ Up! in my online store.  The Weekly Deals are only while supplies last and only available at these great prices through April 14.

______________________________________________________________________________________

If you need any stamping supplies, I’d be very happy to be your Demonstrator.  Just click on Order Stampin’ Up! Online Now in the main menu or in the sidebar to go directly to my online store or drop me an email if you have any questions.

Happy Stamping!

Heather

  • Visit my online store here.
  • Shop the Clearance Rack here.