Finish My Card Collaboration… We’re “In This Together” – Stampin’ Up!

Finish My Card Collaboration – Part 1

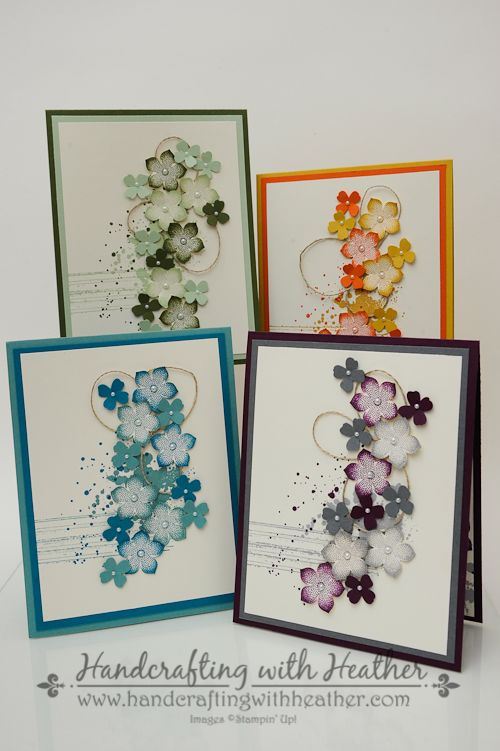
My friend and fellow Stampin’ Up! Demonstrator, Amy Koenders, helped me to create a fun collaborative project for you today.  Each one of us created an art piece and sentiment for a card.  I chose to use the new In This Together stamp set from Stampin’ Up! for my piece. Once our focal points were finished, we traded and finished each other’s card.  For my post today, I will be showing you my art piece, but you will have to link over to Amy’s blog, Stamp with Amy K, to see the finished product.  Part 2 of this collaboration will be coming soon, so you can see what I created using Amy’ art piece as my focal point.

In This Together (6 of 7)

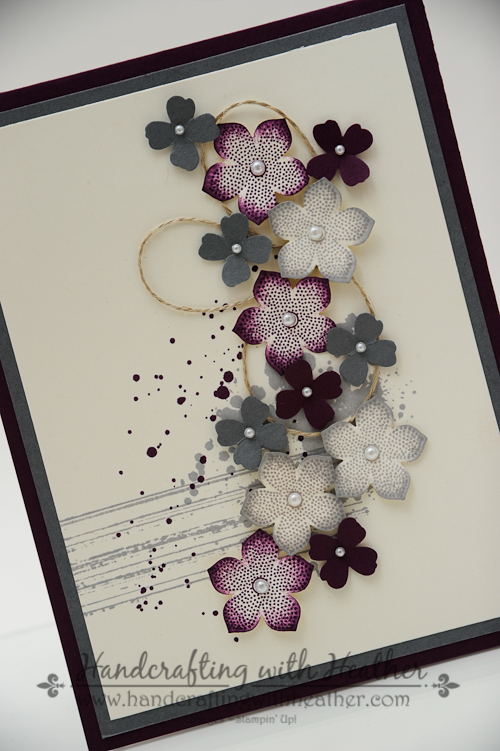
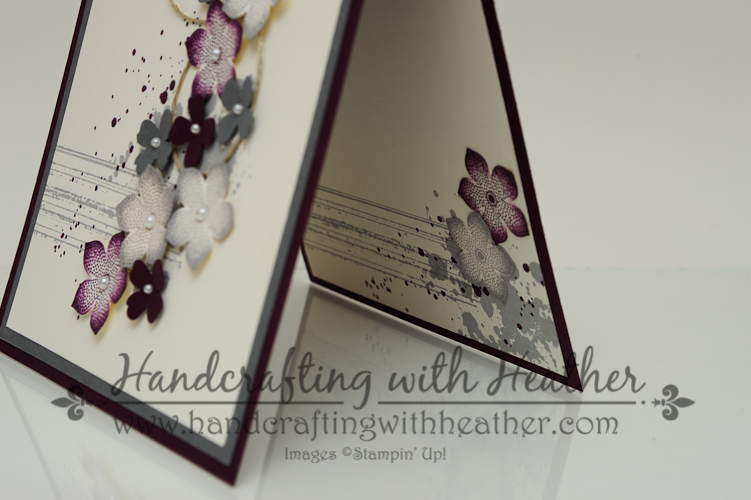
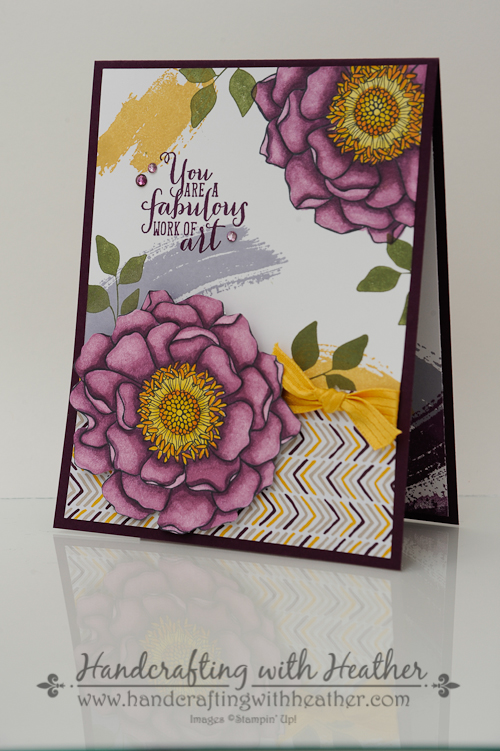
I love the scenes of girlfriends from the In This Together stamp set from Stampin’ Up! However, I’m not a fan of the sentiments.  For my project today I chose the darling image of the girl with a cocktail and I masked over the sentiment with a post-it note when I inked it up.  I used memento ink because I wanted to color my image with Stampin’ Blendabilities alcohol markers (available soon).

In This Together (7 of 7)

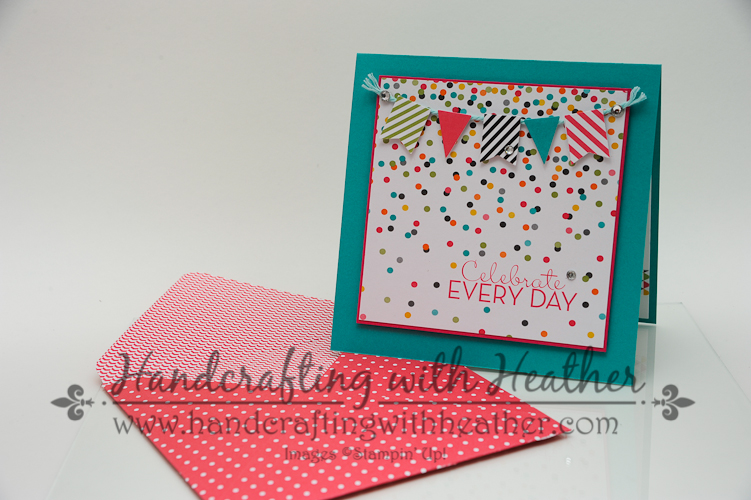
I decided to create my own sentiment using the Endless Birthday Wishes photopolymer stamp set.  I love this set.  It is so versatile; and because the photopolymer stamps are completely clear, it makes it easy to combine the images to create your own custom sentiments.  As a finishing touch, I added some rhinestones around the sentiment, which I colored with my Blendabilities markers.  Finally, I inked around the edges of my Whisper White panel with Baked Brown Sugar ink and a stamping sponge.

Note:  I just learned that the Endless Birthday Wishes stamp set has sold out and is temporarily unavailable.  If you missed out on this wonderful set, don’t worry, it will be back soon.  In the meantime, there are lots of other stamp sets that would make nice substitutions.  The Sumthin’ Sumthin’ stamp set or Remembering Your Birthday set are a couple of options you might consider.  I particularly like the “Let’s Celebrate” sentiment from the Sumthin’ Sumthin’ stamp set, which is brand new with the 2014 Annual Catalog that went live just this week!

In This Together (6 of 7)
This collaborative project was really fun to do.  To see the finished card, click here to go to Amy’ blog.

If you are a fan of this project, please pin it to Pinterest and leave me a comment.  You will find a “pin it” button at the very bottom of this post below the supply list.  Also, if you like my work, why not subscribe to my blog via email.  All you have to do is click on “follow” in the sidebar.

The new catalog is finally live!  If you haven’t gotten your very own copy of the new catalog yet, now is the perfect time.  There are so many great new items available for purchase.  I offer free catalogs to all of my customers.  If you are my customer or want to be my customer, please email me your name and mailing address.  I’ll be more than happy to send you the gorgeous book.  You can email me at handcraftingheather@icloud.com.

I hope you will consider selecting me as your demonstrator for your stamping needs.  If you need any supplies you can shop now in my online store!  Feel free to drop me an email if you have any questions or if you would like a catalog.  I’m here to help!

Happy Stamping!

Heather

  • Visit my online store here.
  • Shop the Clearance Rack here.

WEEKLY DEALS for June 3 – 9

Screen Shot 2014-06-03 at 7.51.44 AM

Click here to see the Weekly Deals from Stampin’ Up! in my online store.  The Weekly Deals are only while supplies last and only available at these great prices through June 9.


Stampin’ Up! items used to create today’s project:

If you would like to order any of the products featured in today’s project, click the images below to order from my online store.

Project Life Quick Card – Stampin’ Up!

Today I have an exciting project to share with you that features the Project Life line of products from Stampin’ Up!

Project Life Quick Card (7 of 16)

Originally Project Life was developed to help scrapbookers document their memories in a way that was not only cute, but also time efficient. However, scrapbooking is not all you can do with Project Life products. They are also great for creating quick and fabulous cards!

Project Life Quick Card (4 of 16)

Recently, Stampin’ Up! and Project Life joined forces to create a line of products that combine the visions of the two companies. Now you can get Project Life items that coordinate with all the Stampin’ Up! colors and products that you know and love.  Today’s project is a super quick card that I created using Project Life items.

I’ll be honest, when I first heard about this joint venture and the new line of products, I wasn’t sure they were for me.  I like to do digital scrapbooking for my memories, so I didn’t think I would use this line of products much.  However, today’s card was so fast and easy, that I think I may have persuaded myself otherwise… when I need to create a really cute card in a hurry, I’m reaching for a Project Life card collection!

Project Life Quick Card (13 of 16)

Project Life Quick Card (14 of 16)

Project Life Quick Card (10 of 16)

Click here to check out what the very talented Amy Koenders, of Stamp with Amy K, has created using Project Life today!

I hope you have enjoyed today’s project.  I would appreciate it if you would pin this project to Pinterest if you like it as much as I do.  You will find a “pin it” button at the very bottom of this post below the supply list and cards stock cuts.  Also, if you like my work, why not subscribe to my blog via email.  All you have to do is click on “follow” in the sidebar.

If you haven’t gotten your very own copy of the 2014 Annual Catalog yet, now is a great time.  I’ve got a stack of them hot off the presses waiting for you. I offer free catalogs to all of my customers.  If you are my customer or want to be my customer, please email me your name and mailing address.  I’ll be more than happy to send you the gorgeous book.  You can email me at handcraftingheather@icloud.com.

I hope you will consider selecting me as your demonstrator for your stamping needs.  If you need any supplies, you can shop now in my online store!  Feel free to drop me an email if you have any questions or if you would like a catalog.  I’m here to help!

Happy Stamping!

Heather

  • Visit my online store here.
  • Shop the Clearance Rack here.

Demonstrator Sign Up Special Available through June 30th!


Have you been considering joining Stampin’ Up! as a Demonstrator?  If so, now is a great time to join.  Between now and June 30, new recruits can join Stampin’ Up! at one of two great prices. Stampin’ Up! will continue to offer their traditional starter kit priced at $99 ($125 product value), but for the month of June only they will also be offering a reduced priced starter kit at the low price of $50 ($55 product value).  Drop me a note at handcraftingheather@icloud.com if you have any questions or if you’d like additional details.  I’d love to have you on my team!  You can read more information about the benefits of being a Demonstrator here.


WEEKLY DEALS for June 3 – 9

Screen Shot 2014-06-03 at 7.51.44 AM

Click here to see the Weekly Deals from Stampin’ Up! in my online store.  The Weekly Deals are only while supplies last and only available at these great prices through June 9.


Stampin’ Up! items used to create today’s project:

If you would like to order any of the products featured in today’s project, click the images below to order from my online store.

Card Stock Cuts

Card Base: Bermuda Bay – 5″ x 10″

Panels: Melon Mambo – 4-1/8″ x 4-1/8″ panel; Whisper White – 4-3/4″ x 4-3/4″

Envelope: Strawberry Slush DSP (In Color DSP Stack) – 8-1/8″ x 8-1/8″ scored at 4-1/8″ with envelope punch board.


Chalk Talk “Something Special” Gift Tag – Stampin’ Up!

Last Friday was my son Carter’s last day at his current daycare.  I’m truly excited about him going to a new school, but we will miss his caregiver, Astride, dearly!  He has been with her since he was 4 months old, and she feels like a part of our family.  I felt it appropriate to give her a nice thank you gift as a going away present.  Of course, no gift would be complete without an adorable Stampin’ Up! gift tag.

Chalk Talk Gift Tag (3 of 13)

Today’s project features the Chalk Talk stamp set from Stampin’ Up!  It turned out super cute, and it was really QUICK and easy to make.

Chalk Talk Gift Tag (13 of 13)I started by stamping the “A Little Something Special for a Very Special Somone” tag on Whisper White in Coastal Cabana ink to match the stripes of the bag I got from thirty-one (if you’ve never checked out their site, they have the most adorable bags!).  Then I used my framelits die to cut out my tag and mounted it on a panel of Strawberry Slush card stock, which I trimmed to fit my tag.

Chalk Talk Gift Tag (4 of 13)

Next, I cut 1/4″ strips of DSP from the 2013-2015 In Color Backgrounds Designer Series Paper Stack in Coastal Cabana and Strawberry Slush.  I used my bone folder to curl the paper to make it look like ribbon.  Then I fastened it to my tag with a brad.  I punched a hole in the tag and added some Strawberry Slush stretch ruffle trim (retired product).  I tied that in a knot and added a second piece to tie around the handle of the thirty-one bag.

Chalk Talk Gift Tag (6 of 13)

This project only took a few minutes to complete, but I love the way it turned out.  Astride loved receiving her gift.  In fact, she cried when I gave it to her.  I think that was mostly because she was saying goodbye to my precious little boy, but the gift tag could have had something to do with it too. LOL.  I would appreciate it if you would pin this project to Pinterest if you like it as much as I do.  You will find a “pin it” button at the very bottom of this post below the supply list and cards stock cuts.  Also, if you like my work, why not subscribe to my blog via email.  All you have to do is click on “follow” in the sidebar.

Chalk Talk Gift Tag (10 of 13)

If you haven’t gotten your very own copy of the 2014 Annual Catalog yet, now is a great time.  I’ve got a stack of them hot off the presses waiting for you. I offer free catalogs to all of my customers.  If you are my customer or want to be my customer, please email me your name and mailing address.  I’ll be more than happy to send you the gorgeous book.  You can email me at handcraftingheather@icloud.com.

I hope you will consider selecting me as your demonstrator for your stamping needs.  If you need any supplies, you can shop now in my online store!  Feel free to drop me an email if you have any questions or if you would like a catalog.  I’m here to help!

Happy Stamping!

Heather

  • Visit my online store here.
  • Shop the Clearance Rack here.

Today is the Final Day for Ordering Retiring Products!

Screen Shot 2014-05-22 at 6.26.15 AM

Stampin’ Up! is offering a 25%-50% discount on many of the retiring products, but you have to act fast, as this special offer is only available until June 4, 2014 and only available while supplies last.  If you missed out on a product the first time, this is your last chance to get it before it’s gone for good!  Click here to go to my online store to start shopping!

Retiring Stamps (Available April 21-June 4, 2014, or while supplies last)

Retiring Accessories (Available April 21-June 4, 2014, or while supplies last)

If you need any stamping supplies, I’d be very happy to be your Demonstrator.  Just click on Order Stampin’ Up! Online Now in the main menu or in the sidebar to go directly to my online store or drop me an email if you have any questions.


Demonstrator Sign Up Special Available through June 30th!


Have you been considering joining Stampin’ Up! as a Demonstrator?  If so, now is a great time to join.  Between now and June 30, new recruits can join Stampin’ Up! at one of two great prices. Stampin’ Up! will continue to offer their traditional starter kit priced at $99 ($125 product value), but for the month of June only they will also be offering a reduced priced starter kit at the low price of $50 ($55 product value).  Drop me a note at handcraftingheather@icloud.com if you have any questions or if you’d like additional details.  I’d love to have you on my team!  You can read more information about the benefits of being a Demonstrator here.


WEEKLY DEALS for June 3 – 9

Screen Shot 2014-06-03 at 7.51.44 AM

Click here to see the Weekly Deals from Stampin’ Up! in my online store.  The Weekly Deals are only while supplies last and only available at these great prices through June 9.


Stampin’ Up! items used to create today’s project:

If you would like to order any of the products featured in today’s project, click the images below to order from my online store.

Gorgeous Grunge and Petite Petals Boxed Card Set – Stampin’ Up!

I have been having so much fun with boxed card sets lately, that I decided to create another one featuring the Gorgeous Grunge and Petite Petals stamp sets from Stampin’ Up!  The cards in this set are a total CASE from a Stampin’ Up! Demonstrator in the UK, Sam Donald from Pootles Papercraft.  Her You Tube channel is one of my favorites.  Ironically, she rarely posts videos of cards, favoring 3-D projects instead.  However, this time she posted a card, and then I turned it into a box!  Thanks for the inspiration Sam!  The only thing I changed was the color scheme. 🙂

Gorgeous Grunge & Petite Petals (1 of 18)

I would love to hear your thoughts about this project.  Today is the last day to leave me a comment for your chance to win one of the Retro Fresh Boxed Card Sets featured in my posts earlier this week.  Tomorrow, I will do the drawing and the winner will be announced on my Tuesday Updates post.


Creating the Cards

If you would like additional information about how to create design on the front of these beautiful cards, please watch Sam’s video tutorial linked above.  She does a fabulous job explaining everything step by step, and she creates gorgeous designs.  In fact, I loved this one so much that it prompted me to purchase the Gorgeous Grunge stamp set.  I had been on the fence about that one for a while, but  I had to have it once I saw this card.  Now that I’ve got it, I really like it.  I think you will be seeing more “splotchy” cards coming from me soon. LOL.

Gorgeous Grunge & Petite Petals (7 of 18)

As I said before, I loved her design so much, the only thing I changed was the color scheme.  In celebration of the new catalog launch tomorrow, I decided to feature the new 2014-2016 In Colors in my card set today.  I created the card in four different color schemes:

Gorgeous Grunge & Petite Petals (12 of 18)


Blackberry Bliss/Basic Gray/Smoky Slate

Blackberry Bliss, Basic Gray, & Smoky Slate


Lost Lagoon & Island Indigo

Lost Lagoon & Island Indigo


Mossy Meadow & Pistachio Pudding

Mossy Meadow & Pistachio Pudding


Tangelo Twist & Hello Honey

Tangelo Twist & Hello Honey

For the inside of my card, I chose to incorporate some of the same elements from the front.

Gorgeous Grunge & Petite Petals (10 of 18)

Gorgeous Grunge & Petite Petals (11 of 18)


Creating the Box

Gorgeous Grunge & Petite Petals (2 of 18)

I followed the same technique featured in Friday’s video tutorial for this box, but I adjusted the dimensions.  If you missed my post on Friday, you can view my tutorial hereTo create this box, I used a full sheet of 8-1/2″ x 11″ card stock, and scored it as follows:

With the 8-1/2″ side at the top of my Stampin’ Trimmer, I scored at:

  • 1/2″
  • 1-3/8″
  • 7-1/8″
  • 8″

Next, with the 11″ side at the top of the trimmer, score at:

  • 2-3/8″
  • 3-1/4″
  • 7-3/4″
  • 8-5/8″

The measurements for the panels on the flap are:

  • Basic Gray – 5-1/2″ x 2-1/4″ punched on two corners with the Envelope Punch Board
  • Very Vanilla – 5-1/4″ x 2-1/8″ punched on two corners with the Envelope Punch Board

Gorgeous Grunge & Petite Petals (3 of 18)

For this box, since I was using a full sheet of card stock to accommodate a 4-1/4″ x 5-1/5″ card, I did not have enough overlap to do a Velcro closure.  Instead, I created this tie closure with the gorgeous new In Color ribbon.  To create the closure, I punched two small holes close together.  I threaded the ribbon from the top of the flap through to the inside and then back up again.  I wrapped the ribbon around the box and tied it closed.  Then I hid my holes by embellishing with flowers on top.

Gorgeous Grunge & Petite Petals (1 of 18)

I am so thrilled with how this project turned out.  I think Sam’s design is beautiful with the new In Colors, and it makes a gorgeous boxed set.  I know anyone would be delighted to receive this as a gift!  Please pin this project to Pinterest if you like it as much as I do.  You will find a “pin it” button at the very bottom of this post below the supply list and cards stock cuts.  Also, if you like my work, why not subscribe to my blog via email.  All you have to do is click on “follow” in the sidebar.

The new catalog goes live tomorrow!  I know you are probably chomping at the bit to get your hands on some of the fantastic new products from Stampin’ Up! just like I am.  If you haven’t gotten your very own copy of the 2014 Annual Catalog yet, now is a great time.  I’ve got a stack of them hot off the presses waiting for you. I offer free catalogs to all of my customers.  If you are my customer or want to be my customer, please email me your name and mailing address.  I’ll be more than happy to send you the gorgeous book.  You can email me at handcraftingheather@icloud.com.

I hope you will consider selecting me as your demonstrator for your stamping needs.  If you need any supplies or want to grab some retiring products before they are gone, you can shop now in my online store!  Remember, the Stampin’ Up! Retiring Products are 20%-50% off while supplies last!  There are only a few more days left to order, so act now!  Feel free to drop me an email if you have any questions or if you would like a catalog.  I’m here to help!

Happy Stamping!

Heather

  • Visit my online store here.
  • Shop the Clearance Rack here.

Demonstrator Sign Up Special Available through June 30th!


Have you been considering joining Stampin’ Up! as a Demonstrator?  If so, now is a great time to join.  Between now and June 30, new recruits can join Stampin’ Up! at one of two great prices. Stampin’ Up! will continue to offer their traditional starter kit priced at $99 ($125 product value), but for four weeks only they will also be offering a reduced priced starter kit at the low price of $50 ($55 product value).  Drop me a note at handcraftingheather@icloud.com if you have any questions or if you’d like additional details.  I’d love to have you on my team!  You can read more information about the benefits of being a Demonstrator here.


Retiring Products – Only a few days left!

Screen Shot 2014-05-22 at 6.26.15 AM

Stampin’ Up! is offering a 25%-50% discount on many of the retiring products, but you have to act fast, as this special offer is only available until June 4, 2014 and only available while supplies last.  If you missed out on a product the first time, this is your last chance to get it before it’s gone for good!  Click here to go to my online store to start shopping!

Retiring Stamps (Available April 21-June 4, 2014, or while supplies last)

Retiring Accessories (Available April 21-June 4, 2014, or while supplies last)

If you need any stamping supplies, I’d be very happy to be your Demonstrator.  Just click on Order Stampin’ Up! Online Now in the main menu or in the sidebar to go directly to my online store or drop me an email if you have any questions.


 WEEKLY DEALS for May 27 – June 2

Screen Shot 2014-05-27 at 9.28.04 AM

Click here to see the Weekly Deals from Stampin’ Up! in my online store.  The Weekly Deals are only while supplies last and only available at these great prices through June 2.


Stampin’ Up! items used to create today’s project:

If you would like to order any of the products featured in today’s project, click the images below to order from my online store.


Card Stock Cuts (Cards)

Card Bases: Blackberry Bliss, Lost Lagoon, Mossy Meadow, & Tangelo Twist – 4-1/4″ x 11″

Panels: Basic Gray, Island Indigo, Pistachio Pudding, & Hello Honey – 4″ x 5-1/4″; Very Vanilla – 3-3/4″ x 5″ (front of card), 4″ x 5-1/4″ (inside of card).


Retro Fresh Boxed Card Set (Part 2) – Stampin’ Up!

On Wednesday, I shared with you how to make these adorable cards and envelopes using the Retro Fresh DSP set from Stampin’ Up!  If you missed that post, please click here to see all the details.

Retro Fresh DSP (6 of 13)

Today, I am going to share with you how you can make the cute box to finish off this great gift set.  And don’t forget, if you leave me a comment about this project, you could win one of these boxed card sets!  On Monday, June 2nd, I will do a drawing to see who will get to have one of these adorable card boxes of their very own!

Retro Fresh DSP (11 of 13)

This project is a great one to store away for future reference.  With a few math calculations, the dimensions can be adjusted to fit a wide variety of card sizes.  These boxed card sets make wonderful gifts for any occasion.  With a few tweaks, you could change them to match any season or purpose.  They are quick and easy to create using any color combination.  On Sunday, I will share another project I made by adjusting the size of this box so you can see exactly what I mean.  If you are a fan of this project, please pin it to Pinterest.  You will find a “pin it” button at the very bottom of this post below the supply list and cards stock cuts.  Also, if you like my work, why not subscribe to my blog via email.  All you have to do is click on “follow” in the sidebar.

Retro Fresh DSP (10 of 13)

With the new catalog launch on Monday, you will have access to tons of great new paper designs from Stampin’ Up!  I hope you will give this project a try with one of the new designs and send me a picture of your project!  If you haven’t gotten your very own copy of the 2014 Annual Catalog yet, now is a great time.  I’ve got a stack of them hot off the presses waiting for you. I offer free catalogs to all of my customers.  If you are my customer or want to be my customer, please email me your name and mailing address.  I’ll be more than happy to send you the gorgeous book.  You can email me at handcraftingheather@icloud.com.

I hope you will consider selecting me as your demonstrator for your stamping needs.  If you need any supplies or want to grab some retiring products before they are gone, you can shop now in my online store!  Remember, the Stampin’ Up! Retiring Products are 20%-50% off while supplies last!  There are only a few days left to order from the current catalogs.  Feel free to drop me an email if you have any questions or if you would like a catalog.  I’m here to help!

Happy Stamping!

Heather

  • Visit my online store here.
  • Shop the Clearance Rack here.

Demonstrator Sign Up Special Available through June 30th!


Have you been considering joining Stampin’ Up! as a Demonstrator?  If so, now is a great time to join.  Between now and June 30, new recruits can join Stampin’ Up! at one of two great prices. Stampin’ Up! will continue to offer their traditional starter kit priced at $99 ($125 product value), but for four weeks only they will also be offering a reduced priced starter kit at the low price of $50 ($55 product value).  Drop me a note at handcraftingheather@icloud.com if you have any questions or if you’d like additional details.  I’d love to have you on my team!  You can read more information about the benefits of being a Demonstrator here.


Retiring Products – Only a few days left!

Screen Shot 2014-05-22 at 6.26.15 AM

Stampin’ Up! is offering a 25%-50% discount on many of the retiring products, but you have to act fast, as this special offer is only available until June 4, 2014 and only available while supplies last.  If you missed out on a product the first time, this is your last chance to get it before it’s gone for good!  Click here to go to my online store to start shopping!

Retiring Stamps (Available April 21-June 4, 2014, or while supplies last)

Retiring Accessories (Available April 21-June 4, 2014, or while supplies last)

If you need any stamping supplies, I’d be very happy to be your Demonstrator.  Just click on Order Stampin’ Up! Online Now in the main menu or in the sidebar to go directly to my online store or drop me an email if you have any questions.


 WEEKLY DEALS for May 27 – June 2

Screen Shot 2014-05-27 at 9.28.04 AM

Click here to see the Weekly Deals from Stampin’ Up! in my online store.  The Weekly Deals are only while supplies last and only available at these great prices through June 2.


Stampin’ Up! items used to create today’s project:

If you would like to order any of the products featured in today’s project, click the images below to order from my online store.


Card Stock Cuts (Card Box only)

Card Base: So Saffron, Coastal Cabana, or Baked Brown Sugar – 9-1/4″ x 7-7/8″

Score lines: 

With 7-7/8″ side at top, score at:  1″, 1-5/8″, 6-1/4″, and 6-7/8″

With 9-1/4″ side at top, score at:  2-3/8″, 3-1/8″, 6-3/8″, and 7″


Retro Fresh Boxed Card Set (Part 1) – Stampin’ Up!

I have a really cute project to share with you today.  I have been on a  mission to use up all my leftover designer series paper.  I absolutely adore the designs in the Retro Fresh DSP set from Stampin’ Up! and I hate for anything to go to waste.  This project makes a great gift idea for any occasion, and people love receiving these cute little card sets.  What’s even better is that they are super simple to make!

Retro Fresh DSP (4 of 13)

I was inspired to make these sets after seeing a blog post by another Stampin’ Up! Demonstrator, Dawn Griffith.  She created some cute little card sets that were the size of the small box in the picture above (Coastal Cabana), and the card on the left in the picture below.  Those cards are pretty tiny, and would be perfect for putting on top of a gift with a brief greeting, or for giving someone cash as a gift.  However, I decided that I would like to design similar project with slightly larger dimensions, which is what I’m going to tell you about today. The finished size of these cards is 4-1/4″ x 2-3/4″.  They are smaller than a standard card, but a nice size for dropping someone a quick note.

Retro Fresh DSP (7 of 13)

For today’s post, I will be giving the details for how to create the cards and envelopes for this project.  Stay tuned on Friday, and I will give you a video tutorial for creating the box.  Also, it is time for some new blog candy!  Leave me a comment about this project for your chance to win one of these cute card sets.  On Monday, June 2nd, I will do a drawing to see who will get to have one of these adorable sets for their very own!

Retro Fresh DSP (1 of 13)

For this project, I used Coastal Cabana, So Saffron, and Baked Brown Sugar card stock for my card bases and boxes.  You will need one 8-1/2″ x 11″ sheet of card stock to make a set of 4 cards, and another one for the box.  I started by cutting a sheet of card stock into four panels measuring 4-1/4″ x 5-1/2″.  Then I used my Envelope Punch Board to round the corners and folded each card in half, for a finished dimension of 4-1/4″ x 2-3/4″.

Retro Fresh DSP (8 of 13)

Next, I cut a panel of Retro Fresh DSP, rounded two corners and added some Coastal Cabana Stretch Ruffle Trim using SNAIL adhesive.  I adhered the panel to the front of the card, and that was it!  I repeated that process for all four cards… couldn’t be simpler.

Retro Fresh DSP (2 of 13)

For my envelopes, I used one sheet of 12″ x 12″ designer series paper from the Retro Fresh set.  I cut the paper into 6″ x 6″ squares and made my first score line at 3-1/2″ using my Envelope Punch Board.  If you haven’t used the envelope punch board, it is really easy to use.  Here is a video that shows you how it works.

One little note, I don’t really like the pointed part sticking up from the bottom flap of the envelope, so I just cut that part off.  I find it gives the envelope a more finished look.

Retro Fresh DSP (13 of 13)

These sets are wonderful because they are very versatile.  You can create them using any color combination or variety of designer series paper.  You can add a sentiment for a specific occasion, or leave them blank as I have done.  These would make fabulous teacher gifts (Trust me… I’m also a teacher.  We eat this stuff up!) What’s wonderful is you can make several sets in a couple of hours for very little money!  If you are a fan of this project, please pin it to Pinterest.  You will find a “pin it” button at the very bottom of this post below the supply list and cards stock cuts.  Also, if you like my work, why not subscribe to my blog via email.  All you have to do is click on “follow” in the sidebar.

To see my post about how to create the box featured in this project click here.

Although, I’m sad to see the Retro Fresh DSP being retired, I’m excited about all the new designs that will be available with the new catalog on Monday!   We only have a few more days to wait!  If you haven’t gotten your very own copy of the 2014 Annual Catalog yet, now is a great time.  I’ve got a stack of them hot off the presses waiting for you. I offer free catalogs to all of my customers.  If you are my customer or want to be my customer, please email me your name and mailing address.  I’ll be more than happy to send you the gorgeous book.  You can email me at handcraftingheather@icloud.com.

I hope you will consider selecting me as your demonstrator for your stamping needs.  If you need any supplies or want to grab some retiring products before they are gone, you can shop now in my online store!  Remember, the Stampin’ Up! Retiring Products are 20%-50% off while supplies last!  Feel free to drop me an email if you have any questions or if you would like a catalog.  I’m here to help!

Happy Stamping!

Heather

  • Visit my online store here.
  • Shop the Clearance Rack here.

Demonstrator Sign Up Special Available through June 30th!


Have you been considering joining Stampin’ Up! as a Demonstrator?  If so, now is a great time to join.  Between now and June 30, new recruits can join Stampin’ Up! at one of two great prices. Stampin’ Up! will continue to offer their traditional starter kit priced at $99 ($125 product value), but for four weeks only they will also be offering a reduced priced starter kit at the low price of $50 ($55 product value).  Drop me a note at handcraftingheather@icloud.com if you have any questions or if you’d like additional details.  I’d love to have you on my team!  You can read more information about the benefits of being a Demonstrator here.


Retiring Products – Only a few days left!

Screen Shot 2014-05-22 at 6.26.15 AM

Stampin’ Up! is offering a 25%-50% discount on many of the retiring products, but you have to act fast, as this special offer is only available until June 4, 2014 and only available while supplies last.  If you missed out on a product the first time, this is your last chance to get it before it’s gone for good!  Click here to go to my online store to start shopping!

Retiring Stamps (Available April 21-June 4, 2014, or while supplies last)

Retiring Accessories (Available April 21-June 4, 2014, or while supplies last)

If you need any stamping supplies, I’d be very happy to be your Demonstrator.  Just click on Order Stampin’ Up! Online Now in the main menu or in the sidebar to go directly to my online store or drop me an email if you have any questions.


 WEEKLY DEALS for May 27 – June 2

Screen Shot 2014-05-27 at 9.28.04 AM

Click here to see the Weekly Deals from Stampin’ Up! in my online store.  The Weekly Deals are only while supplies last and only available at these great prices through June 2.


Stampin’ Up! items used to create today’s project:

If you would like to order any of the products featured in today’s project, click the images below to order from my online store.


Card Stock Cuts (Cards and Envelopes only)

Card Base: So Saffron or Baked Brown Sugar – 4-1/4″ x 5-1/2″

Panels: Retro Fresh DSP – 4″ x 2-1/2″ panel

Envelopes:  Retro Fresh DSP – 6″ x 6″ (first score at 3-1/2″ using the envelope punch board)


Watercolor Wonder Good Thoughts – Stampin’ Up!

I recently learned that a former co-worker of mine has been diagnosed with breast cancer.  I made this get well card featuring a sentiment from Perfect Pennants and the beautiful flowers from the Watercolor Wonder Designer Series Paper pack for her in an attempt to lift her spirits.  It is never fun to have the occasion to make this type of card, but I hope that it will brighten her day a little to know that she is not alone and that I am sending good thoughts her way!

Watercolor Wonder & Perfect Pennants (1 of 9)

This card was pretty quick and very simple to create.  I started with a Whisper White card base and layered on two different panels from Watercolor Wonder.  I inked around the edges of the panels with Tangerine Tango ink to add a little definition to the layers.

Watercolor Wonder & Perfect Pennants (3 of 9)

Next, I stamped the leaf image from Summer Silhouettes three times in Old Olive on the yellow and orange watercolor wash design from the DSP pack.  I cut out three flowers from a sheet of the rose design paper in the Watercolor Wonder pack and added them to the front of my card using Stampin’ Dimensionals.

Watercolor Wonder & Perfect Pennants (6 of 9)

Finally, I stamped the “Sending Good Thoughts Your Way” greeting on to a piece of polka-dot DSP and cut it out using my banner framelits dies.  I inked around the edges of the banner with Tangerine Tango ink.

Watercolor Wonder & Perfect Pennants (4 of 9)

I finished the inside of my card with the leaf motif and another rose from the Watercolor Wonder DSP.

Watercolor Wonder & Perfect Pennants (8 of 9)

Watercolor Wonder & Perfect Pennants (7 of 9)

I hope that this card is able to lift my friend’s spirits.  If you are a fan of this card, please pin this project to Pinterest and leave me a comment.  You will find a “pin it” button at the very bottom of this post below the supply list and cards stock cuts.  Also, if you like my work, why not subscribe to my blog via email.  All you have to do is click on “follow” in the sidebar.

Although, I’m sad to see this beautiful paper being retired, I’m excited about all the new designs that will be available with the new catalog on June 2nd.  If you haven’t gotten your very own copy of the new catalog yet, now is a great time.  I’ve got a stack of them hot off the presses waiting for you. I offer free catalogs to all of my customers.  If you are my customer or want to be my customer, please email me your name and mailing address.  I’ll be more than happy to send you the gorgeous book.  You can email me at handcraftingheather@icloud.com.

I hope you will consider selecting me as your demonstrator for your stamping needs.  If you need any supplies or want to grab some retiring products before they are gone, you can shop now in my online store!  Remember, the Stampin’ Up! Retiring Products are 20%-50% off while supplies last!  Feel free to drop me an email if you have any questions or if you would like a catalog.  I’m here to help!

Happy Stamping!

Heather

  • Visit my online store here.
  • Shop the Clearance Rack here.

WEEKLY DEALS for May 20-26

Screen Shot 2014-05-20 at 6.06.42 AM

Click here to see the Weekly Deals from Stampin’ Up! in my online store.  The Weekly Deals are only while supplies last and only available at these great prices through May 26.


Stampin’ Up! items used to create today’s project:

If you would like to order any of the products featured in today’s project, click the images below to order from my online store.

Card Stock Cuts

Card Base: Whisper White – 5-1/2″ x 8-1/2″

Panels: Watercolor Wonder – (front of card) two panels 5-3/8″ x 4-1/8″ and 5″ x 3-3/4″

Sentiment & Die Cuts: Watercolor Wonder DSP – 1 banner


Retro Fresh Graduation Gift Card Holder – Stampin’ Up!

My cousin is graduating from high school next week, and I am so proud of her!  I created this super cute gift card holder featuring Retro Fresh Designer Series Paper and the Pure Gumption stamp set from Stampin’ Up!  I think it will be the perfect thing to help her celebrate her big accomplishment.  I hope she has lots of fun shopping!

Pure Gumption Graduation (1 of 7)

Isn’t this adorable?  And you won’t believe how quick and easy it was to create!  What’s more, the stamp set could be changed to match any occasion!

Pure Gumption Graduation (2 of 7)

I began with a 4-1/4″ x 11″ Coastal Cabana card base.  I scored it parallel to the short edge at 3″ and 7″ and parallel to the long edge at 3″.  With the long edge at the bottom, I cut out the two bottom left sections (1-1/4″ x 7″).  I saved that strip to use for the belly band later.  The tab that was created by cutting out those two sections will be folded up later to create the pocket for the gift card.

Pure Gumption Graduation (7 of 7)

I used multipurpose liquid glue to adhere panels of Retro Fresh DSP to all the sections of the front and back of the card base.  I layered a Very Vanilla panel in the center section on the inside of the card so I would have a place to write my message.

Pure Gumption Graduation (3 of 7)

Next, I rounded the corner of the tab and used liquid glue to attach the right edge to the inside of the card.  This creates the pocket for the gift card.  Finally, I used the stamps from Pure Gumption to decorate the front and inside of the gift card holder.

Pure Gumption Graduation (5 of 7)

I used the 1-1/4″ x 7″ piece of Coastal Cabana card stock that I trimmed away earlier and a strip of Retro Fresh DSP to create a belly band for the card.  I embellished the band with Coastal Cabana stretch ruffle trim.  Be careful not to make the belly band too tight, or it won’t slide on and off easily when the gift card is inside.  I used sticky strip create the band, so that it would have a very strong bond and withstand being slid on and off repeatedly.

Pure Gumption Graduation (6 of 7)

For the envelope, I selected a sheet of Coastal Cabana DSP from the Retro Fresh pack.  I used my envelope punch board to create a custom envelope and stamped it with the graduation cap image from the Pure Gumption stamp set.

Pure Gumption Graduation (1 of 7)

This gift card holder was so easy to create, and it couldn’t be cuter!  I am going to make a few of these to have on hand for the next time I need to give someone a gift card.  I know that my cousin will love getting this adorable card in the mail.  You should definitely pin this project to Pinterest for future reference!   You will find a “pin it” button at the very bottom of this post below the supply list and cards stock cuts.  Also, if you like my work, why not subscribe to my blog via email.  All you have to do is click on “follow” in the sidebar.

I hope you will consider selecting me as your demonstrator for your stamping needs.  If you haven’t gotten your very own copy of the new catalog yet, now is a great time.  I’ve got a stack of them hot off the presses waiting for you. I offer free catalogs to all of my customers.  If you want to be my customer, please email me your name and mailing address.  I’ll be more than happy to send you the gorgeous book.  You can email me at handcraftingheather@icloud.com.

If you need any supplies or want to grab some retiring products before they are gone, you can shop now in my online store!  Remember, the Stampin’ Up! Retiring Products are 20%-50% off while supplies last!  Feel free to drop me an email if you have any questions or if you would like a catalog.  I’m here to help!

Happy Stamping!

Heather

  • Visit my online store here.
  • Shop the Clearance Rack here.

WEEKLY DEALS for May 20-26

Screen Shot 2014-05-20 at 6.06.42 AM

Click here to see the Weekly Deals from Stampin’ Up! in my online store.  The Weekly Deals are only while supplies last and only available at these great prices through May 26.


Stampin’ Up! items used to create today’s project:

If you would like to order any of the products featured in today’s project, click the images below to order from my online store.

Note:  The Pure Gumption stamp set and Coastal Cabana Stretch Ruffle Trim used in this product are on the retiring list and have already sold out.

Card Base: Coastal Cabana – 4-1/4″ x 11″ – with short edge at the top of the trimmer, score at 3″ parallel to the long edge; with long edge at the top of the trimmer, score at 3″ and 7″ parallel to the short edge.

Panels: Retro Fresh DSP – two panels 2-3/4″ x 2-3/4″, one panel 1″ x 7-1/4″; four panels 2-3/4″ x 3-3/4″; Very Vanilla – 2-1/2″ x 3-1/2″

Envelope: (finished dimension 3-1/2″ x 4-1/2″) Retro Fresh DSP – 6-3/4″ x 6-3/4″ square scored at 3″ using envelope punch board.


Watercolor Wonder Tri-fold Banner Card – Stampin’ Up!

I absolutely adore the patterns in the Watercolor Wonder Designer Series Paper pack.  I am bound and determined not to let this gorgeous paper go to waste, so you will probably see lots of it in the next couple of weeks (along with the Retro Fresh DSP).  Remember, there is only a short time left to order your retiring products, so act now!

Watercolor Wonder dozen thoughts (1 of 8)

Although, I’m sad to see this beautiful paper being retired, I’m excited about all the new designs that will be available with the new catalog on June 2nd.  If you haven’t gotten your very own copy of the new catalog yet, now is a great time.  I offer free catalogs to all of my customers.  If you are my customer or want to be my customer, please email me your name and mailing address.  I’ll be more than happy to send you the gorgeous book.  You can email me at handcraftingheather@icloud.com.

Watercolor Wonder dozen thoughts (2 of 8)

I had a great time playing around with all the different patterns from Watercolor Wonder for these cards.  I began with card bases in Island Indigo and Tangelo Twist.  I scored these to create a tri-fold effect.  Then I added panels of Watercolor Wonder DSP to the front flaps.  I used my Banner Framelits Dies to cut three banners from Wild Wasabi and Daffodil Delight card stock for each card.  For these banners, I wanted them to be narrower than the die, so I cut strips of card stock 1-1/4″ wide and then centered the die over my strips.  This allowed me to have a perfect angle on the banner to mat my smaller banner, without the mat being too big.  Next, I cut banners from my DSP using the 2nd die from the center.  I glued my banner layers together with multipurpose liquid adhesive and then added them to the front of the card.  I put two banners on the right flap, and the banner in the center on the left flap.  This creates a cool “interlocking” closure effect, which adds a lot of interest to the card design.

Watercolor Wonder dozen thoughts (6 of 8)

Next, I stamped three flowers from the Petite Petals stamp set in Island Indigo and Tangelo Twist ink.  I used a sponge to ink around the edges of the flower, which really made them pop.  Then I colored a pearl using my Stampin’ Blendabilities markers in Coastal Cabana and Daffodil delight and placed it in the center of each flower.  I popped up the petals of the flowers and added them to the banners using mini glue dots.

Watercolor Wonder dozen thoughts (4 of 8)

For my sentiment, I chose the “Just Because” stamp from A Dozen Thoughts.  I love the curly script of this greeting.  I stamped the greeting in Island Indigo and Tangelo Twist, using my stamp-a-ma-jig for perfect placement.  Then I embellished with some more pearls.

Watercolor Wonder dozen thoughts (8 of 8)

I played around with different combinations of the DSP for my panels to create slightly different versions of my card.  As you can see, the possibilities for this design are endless!

Watercolor Wonder dozen thoughts (5 of 8)

I finished off the inside of my card by adding panels of Watercolor Wonder DSP on the inside.  I inked around the edges of the top layer to give some added contrast with the mat.

Watercolor Wonder dozen thoughts (3 of 8)

I love the cheerful colors of these cards.  I also like the contrast between the soft florals and the geometric design of the banners.  I am looking forward to sending these out when those “just because” moments arise in life.  I hope you have enjoyed today’s project as well.  As always, if you find inspiration from my work, please pin this project to Pinterest and leave me a comment.  You will find a “pin it” button at the very bottom of this post below the supply list and cards stock cuts.  Also, if you like my work, why not subscribe to my blog via email.  All you have to do is click on “follow” in the sidebar.

I hope you will consider selecting me as your demonstrator for your stamping needs.  If you need any supplies or want to grab some retiring products before they are gone, you can shop now in my online store!  Also, remember that I’ve got a stack of brand new catalogs hot off the presses waiting for you.  Feel free to drop me an email if you have any questions or if you would like a catalog.  I’m here to help!

Happy Stamping!

Heather

  • Visit my online store here.
  • Shop the Clearance Rack here.

WEEKLY DEALS for May 20-26

Screen Shot 2014-05-20 at 6.06.42 AM

Click here to see the Weekly Deals from Stampin’ Up! in my online store.  The Weekly Deals are only while supplies last and only available at these great prices through May 26.


Stampin’ Up! items used to create today’s project:

If you would like to order any of the products featured in today’s project, click the images below to order from my online store. (Keep in mind that some sneak peek items will not be available for purchase until June 2, 2014.)

Card Base: Island Indigo and Tangelo Twist – 5-1/2″ x 8-1/2″ scored at 2-1/2″ and 6-3/4″

Panels: Watercolor Wonder – (front of card) two panels 2-1/4″ x 5-1/4″ and 1-1/2″ x 5-1/4″; (inside of card) two panels 4″ x 5-1/4″ and 3-3/4″ x 5-1/4″

Sentiment & Die Cuts: Whisper White – 3 petite petals punches; Watercolor Wonder DSP – 3 small banners per card; Wild Wasabi and Daffodil Delight – 3 banners per card.


Blended Bloom Meets Work of Art – Stampin’ Up!

When I first saw the Work of Art stamp set at the Stampin’ Up! 2014 Annual Catalog Premiere, I’ll be honest, I wasn’t sure about it.  But, I love a free gift, so I was excited to try it out when we received it at the end of the night.  Boy, was my first impression wrong!  I have really enjoyed working with that set!  And, the Blended Bloom stamp is quickly becoming a favorite!  I think it is going to give my Blooming with Kindness stamp set a run for its money when it comes to “ink time.”  If you are a regular reader of my blog, you know I love that Blooming with Kindness flower! LOL.

Blended Bloom & Work of Art (2 of 9)

It has been so much fun playing with all my new items from the 2014 annual catalog pre-order.  If you haven’t seen the new catalog yet, now is a great time to get your hands on one so you can get your wish list ready for the official launch on June 2nd.  I will be mailing out complimentary copies to all my customers who place an order of $25 or more during the month of May.

Blended Bloom & Work of Art (5 of 9)I chose a Blackberry Bliss card base for my project today.  It is one of the new In Colors, and I am totally in love with this dark, regal shade of purple.  Next, I stamped the Blended Bloom stamp in the corner of a panel of Whisper Whisper white card stock using Memento Tuxedo Black Ink.  While I was at it, I also stamped a second flower on another sheet of card stock.  Blended Bloom & Work of Art (3 of 9)

Next,  I stamped the leaf image from the Summer Silhouettes stamp set along the edges of my Whisper White panel using Mossy Meadow ink (another new In Color).  For some of the images, I stamped off then stamped on the card, to give greater range of color in my card design.  Then, I stamped the paint splotches (yes, that is a technical term) in Wisteria Wonder and Hello Honey.  For the Hello Honey “paint” I stamped off once before stamping on my card to give the color a little softer effect.

Blended Bloom & Work of Art (9 of 9)

I just love the “You are a Fabulous Work of Art” sentiment from the Work of Art stamp set. The font is whimsical, and I adore the affirming message.  I used Blackberry Bliss ink and my stamp-a-ma-jig to make sure I got the placement just perfect.  Then it was time for some coloring!

Blended Bloom & Work of Art (6 of 9)

I used my new Stampin’ Blendabilities markers (release date TBD) in Rich Razzleberry, Daffodil Delight, and Pumpkin Pie to color in my flower images.  I used the “dark to light” method (click here to see my video tutorial) to achieve the beautifully blended contrast and shading.  Once my flowers were both colored, I cut out the second flower I had stamped and set it aside until my card front was finished.

Blended Bloom & Work of Art (5 of 9)

I added a panel of Designer Series Paper from the Moonlight Paper Stack to the bottom of my stamped panel using SNAIL.  I ran SNAIL adhesive across the place where my two panels joined on the front of the card, leaving a 1″ gap where I wanted to put my knot.   Then I added a length of Hello Honey 3/8″ Stiched Satin Ribbon to my combined panel and anchored it on the back with SNAIL.  I slid a shorter piece of the ribbon under that one (where I had left a space in my adhesive) and tied it in a knot.  I have found that this method saves on materials, because  you don’t have to wrap the ribbon all the way around the panel.

Blended Bloom & Work of Art (9 of 9)

Finally, I added my flower to the bottom of the card using Stampin’ Dimensionals, and added some rhinestones that I colored using the Stampin’ Blendabilties.  For the inside of my card, I created an abstract design using the paint splotches from Work of Art.

Blended Bloom & Work of Art (8 of 9)

Blended Bloom & Work of Art (7 of 9)

I am really happy with how this card turned out.  I hope you like it too.  As always, if you are a fan, please pin this project to Pinterest and leave me a comment.  You will find a “pin it” button at the very bottom of this post below the supply list and cards stock cuts.  Also, if you like my work, why not subscribe to my blog via email.  All you have to do is click on “follow” in the sidebar.

I hope you will consider selecting me as your demonstrator for your purchases of these great new products and all your other stamping supplies.  If you need any stamping supplies you can shop now in my online store!  Also, remember that I’ve got a stack of brand new catalogs hot off the presses waiting for you.  If you place an order of $25 or more during the month of May, I will send you your very own copy free of charge!  Feel free to drop me an email if you have any questions.  I’m here to help!

Happy Stamping!

Heather

  • Visit my online store here.
  • Shop the Clearance Rack here.

WEEKLY DEALS for May 13-19

weekly deals 5-13

Click here to see the Weekly Deals from Stampin’ Up! in my online store.  The Weekly Deals are only while supplies last and only available at these great prices through May 19.


Stampin’ Up! items used to create today’s project:

If you would like to order any of the products featured in today’s project, click the images below to order from my online store. (Keep in mind that some sneak peek items will not be available for purchase until June 2, 2014.)

Card Base: Blackberry Bliss – 4-1/4″ x 11″

Panels: Whisper White – 4″ x 3-1/2″ panel (front), 4″ x 5-1/4″ panel (inside); Moonlight DSP – 4″ x 1-3/4″ panel