Blooming with Kindness Tag Topper Birthday Card – Stampin’ Up!

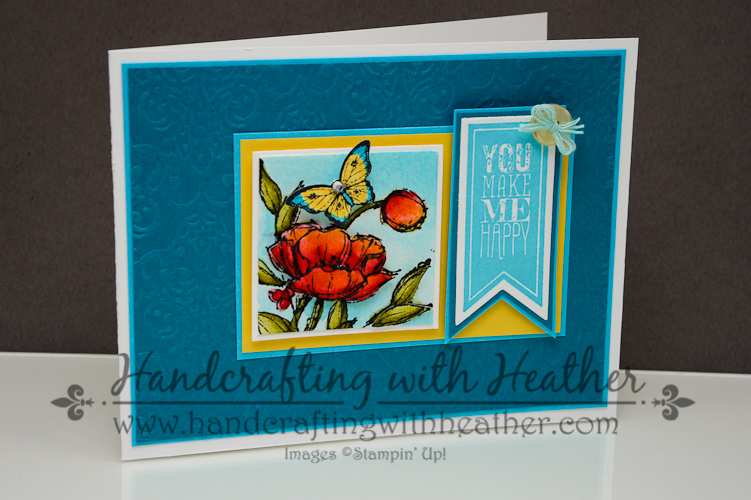
Happy Easter everyone!  I hope that you have a wonderful day relaxing with friends and family today.  This holiday snuck up on me, so I don’t have an Easter card to share today.  However, I do have another birthday card for you featuring the Blooming with Kindness stamp set from Stampin’ Up!  If you follow my blog, you will know that it is one of my favorite stamps!

Blooming With Kindness Tag Topper (5 of 8)

This elegant card includes a cute closure created using the Scalloped Tag Topper Punch.  I just love the special element the ribbon and closure create.  Opening the card is like opening a beautifully wrapped gift.  Please leave me a comment to tell me what you think about it.  During the month of April, I will be doing a drawing each Sunday.  One lucky winner will receive one of the featured products from Sale-a-bration.  So, if you missed out on the free items during the sale, now is your chance to win one!  Also, if you enjoy reading my posts, why not have them delivered to your inbox automatically.  Just click on the “follow” button in the sidebar.

Blooming With Kindness Tag Topper (7 of 8)

I began my card with a Pool Party card base.  To create the card closure, I bent the card in half (without creasing it) and punched through both layers along the short end of the card with the tag topper punch.  Then I cut off the excess left by the tag topper punch.  Next, I scored the card so that the inside measured 4-1/4″ x 5-1/5″.

Blooming With Kindness Tag Topper (1 of 8)

Next I cut panels of Island Indigo and Whisper White for the front and inside of my card.  I inked up the En Francais background stamp in Pool Party ink.  I stamped off on a scrap of paper before stamping my white panel.  Then I stamped the flower from Blooming with Kindness on the front panel using Island Indigo ink.  For the top bloom, I applied the ink directly, but for the bottom one, I stamped off first and then stamped again on my panel.  Next, I stamped my sentiment from the Petite Pairs stamp set onto a scrap of whisper white using Island Indigo ink.  I punched it out using the Large Oval Punch and layered it onto a Scalloped Oval in Island Indigo using Stampin’ Dimensionals.  Then, I stamped two butterflies on Pool Party card stock using the Papillon Potpourri stamp set with pool party ink.  Finally, I applied a small pearl for the head of the butterfly.  The butterflies were attached using mini glue dots.

Blooming With Kindness Tag Topper (8 of 8)

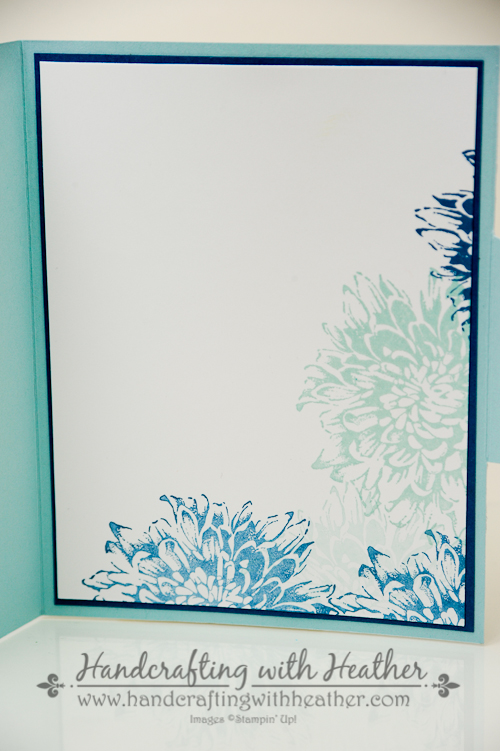
To finish off my card, I stamped the flower from Blooming with Kindness several times using Island Indigo and Pool Party ink.  For some of the blooms I stamped off on a scrap of paper first to give the image greater depth.  Once the inside of my card was finished, I tied it closed with some white ribbon to create an elegant bow.  Finally, I stamped the envelope to match.

Blooming With Kindness Tag Topper (3 of 8)

I hope you have enjoyed today’s project.  If so, I hope you will pin it to Pinterest for me.  If you scroll to the bottom of this post, you will find a complete list of supplies used to make today’s project, including the dimensions for the card stock cuts.  Below the supply list, you will find a “pin it” button.  I would appreciate your help in spreading the word about my work.  Also, don’t forget to leave me a comment for your chance to win a free stamp set from Sale-a-bration!

If you find inspiration from this blog, one way you can show your support is by selecting me as your personal Stampin’ Up! Demonstrator.  If you are interested in purchasing the Blooming with Kindness stamp set or any of the other wonderful products from Stampin’ Up! you can shop now in my online store!  If you need any stamping supplies or have any questions, I would love to help you out.  Just click on Order Stampin’ Up! Online Now in the main menu or in the sidebar to go directly to my online store.  Feel free to drop me an email if you have any questions.  I’m here to help!

Happy Stamping!

Heather

  • Visit my online store here.
  • Shop the Clearance Rack here.

WEEKLY DEALS for April 15-21

 Weekly Deals

Click here to see the Weekly Deals from Stampin’ Up! in my online store.  The Weekly Deals are only while supplies last and only available at these great prices through April 21.


Stampin’ Up! items used to create today’s project:

If you would like to order any of the products featured in today’s project, click the images below to order from my online store.


Card Stock Cuts

Card Base:  Pool Party – 5-1/2″ x 8-1/2″

Panels:  Island Indigo – 4″ x 5-1/4″ panel, 2-1/4″ x 5-1/4″ panel; Whisper White – 3-7/8″ x 5-1/8″ panel, 2-1/8″ x 5-1/8″ panel

Sentiment/Die Cuts:  Island indigo – one scalloped oval; Whisper White – One large oval, Pool Party – two bitty butterflies.

Non-Stampin’ Up Products:  White Chiffon Ribbon.  Substitute with 5/8″ Whisper White Organza Ribbon (114319).

Advertisement

Serene Silhouettes Stamp-a-Stack – Stampin’ Up!

On Friday, I shared an elegant card featuring the Serene Silhouettes stamp set (wood mount and clear mount) from Stampin’ Up!  I liked the card so much, that I decided to create a stamp-a-stack collection around it.  If you live in the Atlanta area and would be interested in making this gorgeous card set , please contact me to sign up for my Stamp-a-Stack class on Saturday, May 3rd from 7:00-9:00 p.m.  We will create this set and another one (I’ll post about that one soon).  The cost of the class is $15 and includes all consumable materials, use of my stamping supplies, and I will do all the prep work… you can’t beat that!  I would love to connect with some of you face to face for an opportunity to truly create together!

serene silhouettes (28 of 28)

If you like this project as much as I do, I would love to hear from you.  Please leave me a comment and I will enter you into my drawing.  During the month of April, I will be doing a drawing each Sunday.  One lucky winner will receive one of the featured products from Sale-a-bration.  So, if you missed out on the free items during the sale, now is your chance to win one!  Also, if you enjoy reading my posts, why not have them delivered to your inbox automatically.  Just click on the “follow” button in the sidebar.

All of the cards in this set were inspired by the Splitcoast Stampers CAS266 card challenge, which was to create a clean and simple card using three of the following colors:

I maintained the same design elements for all four cards of this set.  For details about the techniques used in this project, please click here.  Below, you will find card recipes for the specific supplies and dimensions for each card.

Serene Silhouettes Birthday Wishes (Card #1)

Serene Silhouettes (12 of 14)

Card #1 was inspired by three different challenges:  Retro Sketches #108, Splitcoast Stampers CAS266, and The Card Concept #7.

Challenge Images

Stampin’ Up! items used to create card #1:

Stamp Sets: Four You (130538); Serene Silhouettes (127324); Papillon Potpourri (123759)

Dies, Punches, & Embossing Folders: Beautifully Baroque Textured Impressions Embossing Folder (130917); Fancy Fan TIEF (127751); Bitty Butterfly Punch (129406); Hexagon Punch (130919); Scallop Trim Border Punch (118402)

Card Stock & DSP:  Whisper White (100730) – 4-1/4″ x 11″ card base; 2″ x 3-3/4″ panel; Marina Mist (119682) – 1-1/4″ x 4-1/2″ (2 panels); Soft Sky (131203) – 1-1/8″ x 4-3/8″ (2 panels), one butterfly punch; Smoky Slate (131202) – Banner for sentiment.

Markers & Ink:  Soft Sky Classic Stampin’ Pad (131181); Marina Mist Classic Stampin’ Pad (126962); Night of Navy Classic Stampin’ Pad (126970); Versamark Ink (102283)

Embellishments: White Stampin’ Emboss Powder (109132); Basic Pearls Jewel Accents (119247)

Tools:  sponge daubers (102892); Big Shot (113439); Heat Emboss Tool (129053); Embossing Buddy (103083)

Adhesive: Stampin’ Dimensionals (104430); Glue Dots (103683); Multipurpose liquid glue (110755)

Morning Meadow… “Hello” (Card #2)

serene silhouettes (16 of 28)

serene silhouettes (14 of 28)

I used Freshly Made Sketches Challenge #130 for my inspiration for card #2 of my stamp-a-stack set.  This set was created using the Morning Meadow stamp set (wood mount and clear mount) which is available as one the hostess rewards from Stampin’ Up!

Stampin’ Up! items used to create card #2:

Stamp Sets: Morning Meadow (129678); Perfect Pennants (133230)

Dies, Punches, & Embossing Folders: Fancy Fan Textured Impressions Embossing Folder (127751); Pansy Punch (130698)

Card Stock & DSP:  Whisper White (100730) – 5-1/2″ x 8-1/2″ card base; 3-1/8″ x 2-13/16″ panel (mat for stamped image), 3″ x 2-3/4″ panel (for stamped image), one pansy punch; Marina Mist (119682) – 5-1/4″ x 4″ panel; Soft Sky (131203) – 3-7/8″ x 5-1/8″ panel; Marina Mist Designer Series Paper (130135) – 3-1/2″ x 3″; Smoky Slate (131202) – Banner for sentiment.

Markers & Ink:  Soft Sky Classic Stampin’ Pad (131181); Marina Mist Classic Stampin’ Pad (126962); Night of Navy Classic Stampin’ Pad (126970); Versamark Ink (102283)

Embellishments: White Stampin’ Emboss Powder (109132); Basic Pearls Jewel Accents (119247)

Tools:  sponge daubers (102892); Big Shot (113439); Heat Emboss Tool (129053); Embossing Buddy (103083)

Adhesive: Stampin’ Dimensionals (104430); Glue Dots (103683); Multipurpose liquid glue (110755)

Serene Silhouettes Just for You (Card #3)

serene silhouettes (9 of 28)

serene silhouettes (5 of 28)

Mojo Monday sketch challenge 339, provided the inspiration for card #3.  I like the variety provided by the tall and skinny design.  This card was created using the Serene Silhouettes stamp set (wood mount and clear mount), and A Round Array for the sentiment (wood mount and clear mount).

Stampin’ Up! items used to create card #3:

Stamp Sets: Serene Silhouettes (127324); A Round Array (129090)

Dies, Punches, & Embossing Folders: Beautifully Baroque Textured Impressions Embossing Folder (130917); Fancy Fan TIEF (127751); Ovals Collection Framelits Dies (129381); 7/8″ Scallop Circle Punch (129404); 1″ circle punch (119868)

Card Stock & DSP:  Whisper White (100730) – 3-1/2″ x 11″ card base; Oval framelits die cut (for stamped image), one 7-8″ scalloped circle punch; Marina Mist (119682) – 1-1/4″ x 4″ (2 panels), 3-1/4″ x 2-1/4″ panel; Soft Sky (131203) – 1-1/8″ x 3-7/8″ (2 panels); Soft Sky Designer Series Paper (130135) – 3-1/8″ x 2-1/8″; Smoky Slate (131202) – 1″ circle punch.

Markers & Ink:  Soft Sky Classic Stampin’ Pad (131181); Marina Mist Classic Stampin’ Pad (126962); Night of Navy Classic Stampin’ Pad (126970); Versamark Ink (102283)

Embellishments: White Stampin’ Emboss Powder (109132); Basic Pearls Jewel Accents (119247)

Tools:  sponge daubers (102892); Big Shot (113439); Heat Emboss Tool (129053); Embossing Buddy (103083)

Adhesive: Stampin’ Dimensionals (104430); Multipurpose liquid glue (110755)

Serene Silhouettes Thank You (Card #4)

serene silhouettes (17 of 28)

serene silhouettes (24 of 28)

The Paper Craft Crew, sketch challenge #87, provided the inspiration for card #4.  I like the variety provided by the tall and skinny design.  This card was created using the Serene Silhouettes stamp set (wood mount and clear mount), Petite Petals (wood mount and clear mount) and Teeny Tiny Wishes for the sentiment (wood mount and clear mount).

Stampin’ Up! items used to create card #4:

Stamp Sets: Serene Silhouettes (127324); Teeny Tiny Wishes (127802); Petite Petals (133155)

Dies, Punches, & Embossing Folders: Beautifully Baroque Textured Impressions Embossing Folder (130917); Fancy Fan TIEF (127751); Ovals Collection Framelits Dies (129381); Hexagon Punch (130919); Banner Punch (133519); Modern Label Punch (119849); Word Window Punch (119857); Petite Petals Punch (133322)

Card Stock & DSP:  Whisper White (100730) – 5-1/2 x 8-1/2″ card base; 1-1/8″ x 4-1/2″ (banner), one word window punch, 4 petite petals punches, Oval framelits die cut (for stamped image); Marina Mist (119682) – 4″ x 5-1/4″ panel; Soft Sky (131203) – 3-7/8″ x 5-1/8″ panel; Marina Mist Designer Series Paper (130135) – 1-1/2″ x 4-3/4″ (banner); Smoky Slate (131202) – one modern label punch.

Markers & Ink:  Soft Sky Classic Stampin’ Pad (131181); Marina Mist Classic Stampin’ Pad (126962); Night of Navy Classic Stampin’ Pad (126970); Versamark Ink (102283)

Embellishments: White Stampin’ Emboss Powder (109132); Basic Pearls Jewel Accents (119247)

Tools:  sponge daubers (102892); Big Shot (113439); Heat Emboss Tool (129053); Embossing Buddy (103083)

Adhesive: Stampin’ Dimensionals (104430); Multipurpose liquid glue (110755)

If you enjoyed my post today, please pin it to Pinterest for me.  You will find a “pin it” button at the very bottom of the post.  Also, don’t forget to leave me a comment for your chance to win a free stamp set from Sale-a-bration!

____________________________________________________________

WEEKLY DEALS from Stampin’ Up! April 1-7

Click here to see the Weekly Deals from Stampin’ Up! in my online store.  The Weekly Deals are only while supplies last and only available at these great prices through April 7.

Screen Shot 2014-04-01 at 9.41.23 PM

________________________________________________________________________________________

If you need any stamping supplies, I’d be very happy to be your Demonstrator.  Just click on Order Stampin’ Up! Online Now in the main menu or in the sidebar to go directly to my online store or drop me an email if you have any questions.

Happy Stamping!

Heather

  • Visit my online store here.
  • Shop the Clearance Rack here.


Serene Silhouettes Birthday Wishes Card – Stampin’ Up!

I have an elegant card for you today that features the Serene Silhouettes stamp set (wood mount and clear mount) from Stampin’ Up!  Recently I have seen several projects that used a resist technique with beautiful results, so I decided to try it out for myself.  I think the white embossing of the flower image is just lovely!  If you agree, I would love to hear from you.  Please leave me a comment and I will enter you into my drawing.  During the month of April, I will be doing a drawing each Sunday.  One lucky winner will receive one of the featured products from Sale-a-bration.  So, if you missed out on the free items during the sale, now is your chance to win one!  Also, if you enjoy reading my posts, why not have them delivered to your inbox automatically.  Just click on the “follow” button in the sidebar.

Serene Silhouettes (12 of 14)

Today’s project is inspired by three different challenges:  Retro Sketches #108, Splitcoast Stampers CAS266, and The Card Concept #7.

Challenge Images

I began my card with a Whisper White card base.  Then I cut panels of Marina Mist and Soft Sky.  I used my Big Shot to emboss the Soft Sky panels with the Beautifully Baroque and Fancy Fan embossing folders.  I layered the Soft Sky panels on the Marina Mist ones and adhered them to the card base using Multipurpose Liquid Glue.

Serene Silhouettes (3 of 14)

Next, it was time to turn my attention to my focal piece for the card.  I began by rubbing a panel of Whisper White card stock with my Embossing Buddy to ensure that I got a clean image without any extra embossing powder stuck on the card.  Then I inked up my stamp with Versamark Ink and coated the image with White Stampin’ Emboss Powder.  I used my Heat Emboss Tool to set the image.

Serene Silhouettes (1 of 14)

At this stage of the game, things were looking rather plain, but that was all about to change.  The next steps are where the magic happens.  I used a sponge dauber to add ink to the background of my image.  I began by adding Soft Sky ink to the entire background using a circular motion. Then I started from the bottom of the panel and added Marina Mist ink, blending it with the Soft Sky as I went.  I followed the same procedure with my Night of Navy Classic Stampin’ Pad next.  I kept layering and blending until I achieved the desired ombre effect.

Serene Silhouettes (2 of 14)

I finished my art piece by adding a butterfly from the Papillon Potpourri stamp set (wood mount and clear mount).  I stamped the image in Marina Mist ink on Soft Sky card stock and punched it out using the Bitty Butterfly Punch. I embellished the butterfly with a Basic Pearl Accent and attached it to the panel using a Mini Glue Dot.  Next, I punched the bottom of the panel using my Scallop Trim Border Punch and attached it to the front of the card with Stampin’ Dimensionals.

Serene Silhouettes (4 of 14)

For my greeting , I chose the “Birthday Wishes” sentiment from the  Four You stamp set (wood mount and clear mount).  I stamped it in Night of Navy ink on a scrap of Smoky Slate card stock.  Then I used my Hexagon Punch to create the ends of my banner.  Next, I used a sponge dauber to ink around the edges of the panel with Marina Mist ink.  I mounted my sentiment onto the front of the card using Stampin’ Dimensionals.  Finally, I added three pearls to the top right corner of the card.

Serene Silhouettes (9 of 14)

For the finishing touches on the inside of my card I stamped the floral image from the Serene Silhouettes stamp set in the corner using my Night of Navy Classic Stampin’ Pad.

Serene Silhouettes (13 of 14)

As a final detail, I stamped the images from the card on an envelope too.  I love the crisp look of the blue tones on the white card.  It just looks clean and elegant.  I would love to hear what you think about this project too.  Don’t forget to leave me a comment, for your chance to win a free stamp set!  Also, if you liked my post today, please pin it to Pinterest for me.  If you scroll to the bottom of the post, you will find a “pin it” button just below my supply list for the project.

If you would like to purchase the Serene Silhouettes stamp set you can shop in my online store now by clicking here.  If you need any stamping supplies, I hope you will consider contacting me to be your demonstrator.  I would love to create with you!

You can find a complete list of supplies used for this project at the very bottom of this post.

____________________________________________________________

WEEKLY DEALS from Stampin’ Up! April 1-7

Click here to see the Weekly Deals from Stampin’ Up! in my online store.  The Weekly Deals are only while supplies last and only available at these great prices through April 7.

Screen Shot 2014-04-01 at 9.41.23 PM

________________________________________________________________________________________

If you need any stamping supplies, I’d be very happy to be your Demonstrator.  Just click on Order Stampin’ Up! Online Now in the main menu or in the sidebar to go directly to my online store or drop me an email if you have any questions.

Happy Stamping!

Heather

  • Visit my online store here.
  • Shop the Clearance Rack here.

____________________________________________________________

Stampin’ Up! items used to create this project:

Stamp Sets: Four You (130538); Serene Silhouettes (127324); Papillon Potpourri (123759)

Dies, Punches, & Embossing Folders: Beautifully Baroque Textured Impressions Embossing Folder (130917); Fancy Fan TIEF (127751); Bitty Butterfly Punch (129406); Hexagon Punch (130919); Scallop Trim Border Punch (118402)

Card Stock & DSP:  Whisper White (100730) – 4-1/4″ x 11″ card base; 2″ x 3-3/4″ panel; Marina Mist (119682) – 1-1/4″ x 4-1/2″ (2 panels); Soft Sky (131203) – 1-1/8″ x 4-3/8″ (2 panels), one butterfly punch; Smoky Slate (131202) – Banner for sentiment.

Markers & Ink:  Soft Sky Classic Stampin’ Pad (131181); Marina Mist Classic Stampin’ Pad (126962); Night of Navy Classic Stampin’ Pad (126970); Versamark Ink (102283)

Embellishments: White Stampin’ Emboss Powder (109132); Basic Pearls Jewel Accents (119247)

Tools:  sponge daubers (102892); Big Shot (113439); Heat Emboss Tool (129053); Embossing Buddy (103083)

Adhesive: Stampin’ Dimensionals (104430); Glue Dots (103683); Multipurpose liquid glue (110755)

Simply Sketched, You Make Me Happy! – Stampin’ Up!

Today’s card features the Simply Sketched (wood mount and clear mount), Papillon Potpouri (wood mount and clear mount) and Perfect Pennants (wood mount and clear mount) stamp sets from Stampin’ Up!  The Simply Sketched stamp set is one of the lovely hostess items you can earn through the Stampin’ Rewards program.  I am in love with the flower in this set! This is the second card I’ve created with it this week.  I think you can see by the different colors I used how versatile that little flower can be.  (There’s a cute little bird in that set too.  I haven’t used that one yet, but I expect you will be seeing it here soon.)

If you like what I’ve created today, I would love it if you would leave me a comment.  On March 31st I will do a drawing and one lucky person who left me a comment will receive a handcrafted card in the mail!  Also, if you enjoy reading my posts, why not have them delivered to your inbox automatically.  Just click on the “follow” button in the sidebar.  I get super excited every time that I see someone else is following my blog.  It just makes my day to know you are following along with me as I create these posts!

Simply Sketched Perfect Pennants (5 of 6)

Today’s card was inspired by:

I began my card with a  Whisper White card base.  Then I added a panel of Tempting Turquoise card stock using SNAIL adhesive.  Next, I dry embossed a panel of Island Indigo card stock using the Lacy Brocade embossing folder and added that to the front of my card.  For my focal point, I layered panels of Tempting Turquoise and Daffodil Delight as the base for my three dimensional elements.

Simply Sketched Perfect Pennants (3 of 6)

Next, I used Staz-on Black ink and my Stamp-a-ma-jig to stamp the flower and leaf elements from the Simply Sketched stamp set onto a square of  watercolor paper. I also stamped an additional flower and leaf on another scrap of watercolor paper to add some dimension later.  I colored my stamped images using the Brights Collection Stampin’ Write Markers (Tempting Turquoise, Real Red, Pumpkin Pie, & Daffodil Delight) and a Blender Pen to give it a watercolor effect.  I cut out the extra flower and leaves using paper snips.  Then, I  attached the leaves to the foreground of my square with mini glue dots and used Stampin’ Dimensionals to add my flower on top of the one on the square of watercolor paper for some extra depth.  Then I stamped the butterfly from the Papillon Potpourri stamp set onto some Whisper White card stock using Staz-on Black and colored it with my markers.  Then I cut it out using the Bitty Butterflies Punch.  I added a Basic Rhinestones Jewel Accent to the butterfly and added it to my square using Stampin Dimensionals.  I adhered my watercolored panel to a square of Whisper White and added the finished piece to the front of the card using Stampin’ Dimensionals.

Simply Sketched Perfect Pennants (1 of 6)

Then I stamped the “You Make Me Happy” greeting from the Perfect Pennants stamp set on Whisper White card stock using my Tempting Turquoise Classic Stampin’ Pad.  I cut that out using the Banners Framelits Dies (2nd from the center).  I also cut a banners in Tempting Turquoise and Island Indigo (3rd from the center). (Remember, the Perfect Pennants stamp set and the Banners Framelits can be purchased as a bundle for 15% off, wood mount and clear mount.)  I layered my greeting onto the Island Indigo banner and trimmed it down. Then I repeated the process with the Tempting Turquoise banner.  Finally, I finished my design off with a button from the Designer Subtles Collection and some bakers twine from the Sweet Sorbet Accessory Pack (Sale-a-bration item).

Simply Sketched Perfect Pennants (4 of 6)

For my finishing touch, I stamped the leaves from Simply Sketched and the butterfly from Papillon Potpouri on the inside of my card and colored them to match the front of the card.

I love how my watercolored square turned out.  The colors just pop off the page, and the dimension added by the 3-D elements make it all really jump out at you.  If you liked my post today, please pin it to Pinterest for me.  I am new to blogging and I would love your help in developing a blog following.  If you scroll to the bottom of the post, you will find a “pin it” button just below my supply list for the project… and, don’t forget to leave me a comment for your chance to win a handcrafted card!

If you would like to purchase the earn the Simply Sketched stamp set as a hostess reward, I hope you will consider contacting me.  Of course, you can always shop in my online store for any of the great products featured in this project by clicking here.  Remember you can earn the Sweet Sorbet Accessory Pack for FREE (Sale-a-bration items) with a $50 purchase.

You can find a complete list of supplies used for this project at the very bottom of this post.

____________________________________________________________

Weekly Deals from Stampin’ Up! March 11 – 17

Here are the new Weekly Deals from Stampin’ Up!:Click here to see the Weekly Deals from Stampin’ Up! in my online store.  The Weekly Deals are only while supplies last and only available at these great prices through February 17.

Screen Shot 2014-03-12 at 8.34.27 PM

Click here to see the Weekly Deals from Stampin’ Up! in my online store.  The Weekly Deals are only while supplies last and only available at these great prices through March 17.

________________________________________________________________________________________

If you need any stamping supplies, I’d be very happy to be your Demonstrator.  Just click on Order Stampin’ Up! Online Now in the main menu or in the sidebar to go directly to my online store or drop me an email if you have any questions.

Happy Stamping!

Heather

  • It’s Sale-a-bration time!!  You’ll get a free item from Stampin’ Up! for every $50 that you purchase between now and March 31!  Click on my Stampin’ Up! Promotions page for more information!
  • Visit my online store here.
  • Shop the Clearance Rack here.

____________________________________________________________

Stampin’ Up! items used to create this project:

Stamp Sets: Simply Sketched (Hostess Reward – 129672); Perfect Pennants (133230); Papillon Potpourri (123759)

Dies, Punches, & Embossing Folders: Banners Collection Framelits (132173); Lacy Brocade Textured Impressions Embossing Folder (127819); Bitty Butterfly Punch (129406)

Card Stock & DSP:  Whisper White (100730) – 4-1/4″ x 11″ card base, 2″ x 2″ panel, one banner; Tempting Turquoise (102067) – 4″ x 5-1/4″ panel, 2-3/8″ x 3-5/8″ panel, one banner; Island Indigo (122923) – 3-7/8″ x 5-1/8″ panel, one banner; Daffodil Delight (119683) – 2-1/4″ x 3-1/2″ panel

Markers & Ink:  Tempting Turquoise Classic Stampin’ Pad (126952); Brights Collection Stampin’ Write Markers (131259), Staz-on Black (101406)

Embellishments: Basic Rhinestones Jewel Accents (119246); Buttons – Designer Subtles Collection (130030); Bakers Twine from the Sweet Sorbet Accessory Pack (Sale-a-bration item)

Tools:  Big Shot (113439); Stamp-a-ma-jig (101049)

Adhesive: SNAIL (104332); Stampin’ Dimensionals (104430); Mini Glue Dots (103683)