Blooming with Kindness Quick Thank You Card – Stampin’ Up!

Today’s card, featuring the Blooming with Kindness stamp set from Stampin’ Up! (wood mount and clear mount) is a super quick, clean and simple card for those occasions when you just don’t have much time.  That has definitely been the case around here this week as I prepared for Carter’s birthday party and also tried to make progress on the renovation of my home studio!

Blooming With Kindness Thank You (1 of 6)

It is always nice to have some quick card designs that you can go to in a pinch.  If you are a fan of this one, please leave me a comment and I will enter you in my reader appreciation drawing. During the month of April, I will be doing a drawing each Sunday.  One lucky winner will receive one of the featured products from Sale-a-bration.  So, if you missed out on the free items during the sale, now is your chance to win one!  Also, if you enjoy reading my posts, why not have them delivered to your inbox automatically.  Just click on the “follow” button in the sidebar.

Blooming With Kindness Thank You (4 of 6)

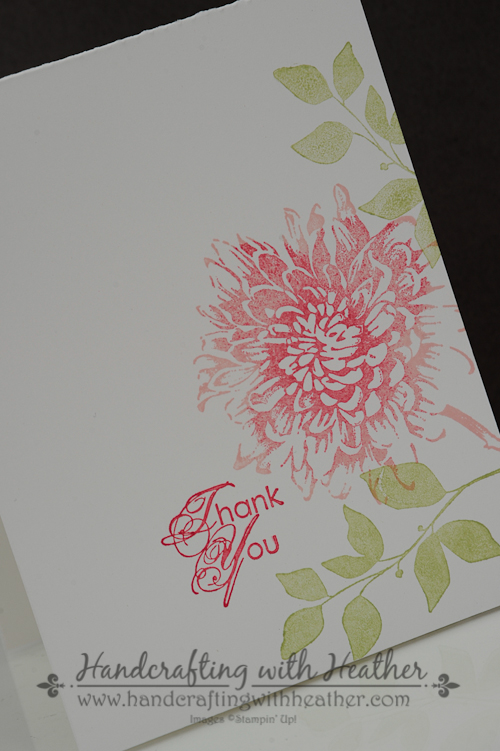
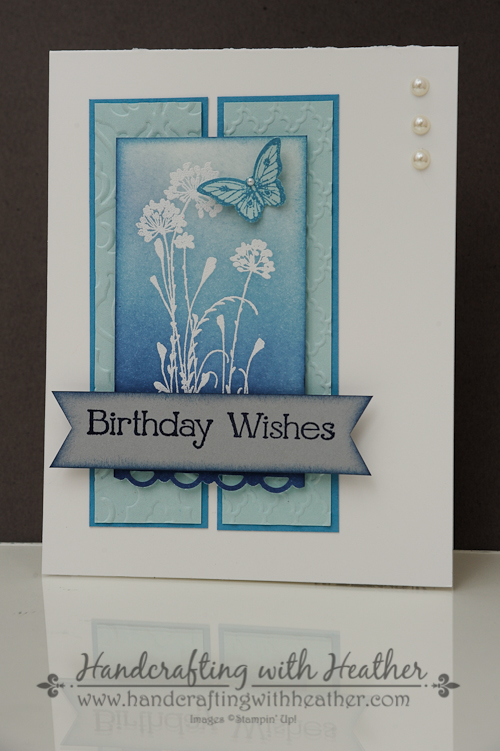
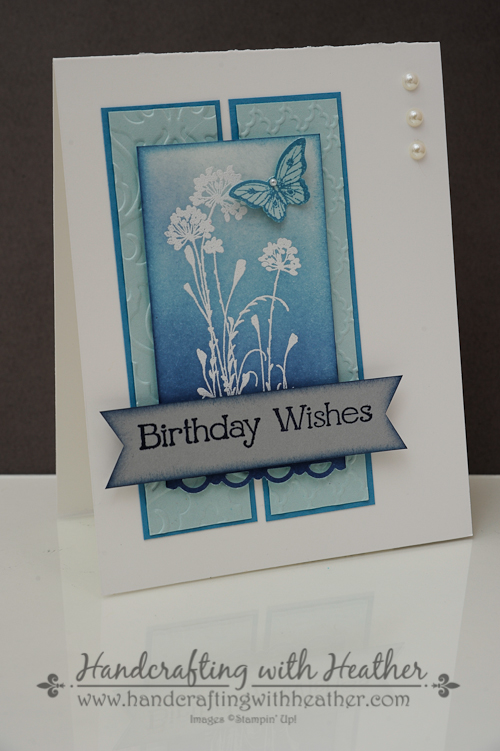
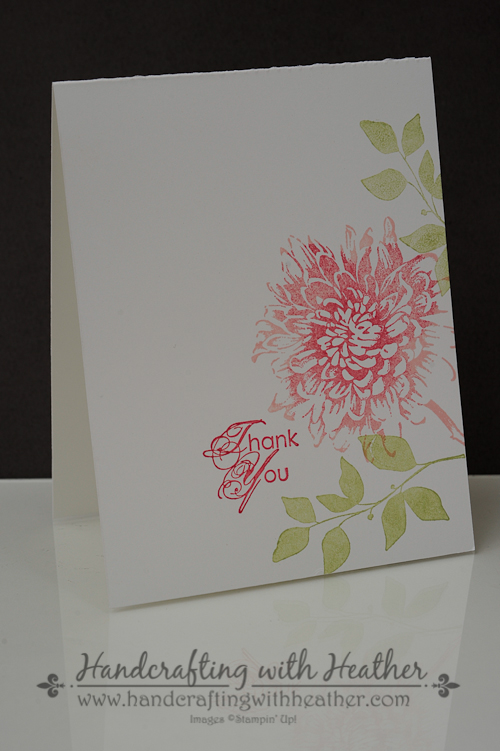
I began my card with a Whisper White card base.  First, I inked up the leaf image from the Summer Silhouettes stamp set (wood mount and clear mount) in Pear Pizzazz ink.  I stamped off on a scrap of paper, then I stamped the leaf image in the bottom right corner of the card.  I repeated that process again on the right side near the top of the card.  Then I inked up the flower from Blooming with Kindness in Blushing Bride ink.  I used a sponge dauber to add some Strawberry Slush ink to the center of the flower fading out toward the edges.  Then I stamped the image between the two sets of leaves on the front of the card.

Blooming With Kindness Thank You (3 of 6)

Next, I used my stamp-a-ma-jig to place the “Thank You” greeting from the Blooming with Kindness stamp set near the flower image.  I inked up the sentiment using Strawberry Slush ink, and stamped off on a scrap of paper before stamping the greeting on the front of the card.

Blooming With Kindness Thank You (5 of 6)

I finished off the inside of my card by stamping the leaf image from Summer Silhouettes twice.  I inked up my stamp in Pear Pizzazz and stamped in on the inside of the card.  Next, I inked up the stamp a second time to avoid any harsh lines where the stamp had gone off the page.  I stamped off on a scrap of paper and then stamped on the inside of the card again to give my image some added depth.

I was able to make a whole stack of these cards in about 15 minutes.  They are lovely, but also very fast and convenient.  You can find a complete supply list, including card stock cuts, at the very bottom of this post.  If you enjoyed my project today, please pin it to Pinterest for me.  You will find a “pin it” button at the very bottom of the post below the supply list.  Also, don’t forget to leave me a comment for your chance to win a free stamp set from Sale-a-bration!

If you are interested in purchasing the Blooming with Kindness or Summer Silhouettes stamp set from Stampin’ Up! you can always shop now in my online store!  If you need any stamping supplies, I would love to be your personal demonstrator.  Please do not hesitate to contact me if you have any questions.  I’m here to help!

________________________________________________________

WEEKLY DEALS for April 8 – 14

 Screen Shot 2014-04-08 at 6.44.39 AM

Click here to see the Weekly Deals from Stampin’ Up! in my online store.  The Weekly Deals are only while supplies last and only available at these great prices through April 14.

______________________________________________________________________________________

If you need any stamping supplies, I’d be very happy to be your Demonstrator.  Just click on Order Stampin’ Up! Online Now in the main menu or in the sidebar to go directly to my online store or drop me an email if you have any questions.

Happy Stamping!

Heather

  • Visit my online store here.
  • Shop the Clearance Rack here.

_____________________________________________________________________________________________

Stampin’ Up! items used to create today’s project:

Card Stock & DSP:  Whisper White (100730) – 4-1/4″ x 11″ card base

Stamp Sets: Blooming with Kindness (126422); Summer Silhouettes (126447)

Dies, Punches, & Embossing Folders: N/A

Embellishments:  N/A

Markers & Ink:  Pear Pizzazz Classic Stampin’ Pad (131180); Blushing Bride Classic Stampin’ Pad (131172); Strawberry Slush Classic Stampin’ Pad (131178)

Tools:  Stamp-a-ma-jig (101049); Sponge Dauber (102892)

Adhesive: N/A


A Sketched Birthday for Carter – Stampin’ Up!

In honor of my son Carter’s third birthday today, I have some party favors embellished using the Sketched Birthday stamp set from Stampin’ Up! (wood mount and clear mount).  We are having a small birthday party at the Build-a-Bear Workshop followed by a teddy bear picnic.  I bought a red and white checked table cloth, and I wanted to brighten up the table and make it festive with some Stampin’ Up! magic!

Sketched Birthday (1 of 6)

Next time you entertain, you should definitely consider adding some stamped details to your table.  Your guests will be very impressed.  If you enjoy today’s project, I would love to hear from you.  Please leave me a comment and I will enter you into my drawing.  During the month of April, I will be doing a drawing each Sunday.  One lucky winner will receive one of the featured products from Sale-a-bration.  So, if you missed out on the free items during the sale, now is your chance to win one!  Also, if you enjoy reading my posts, why not have them delivered to your inbox automatically.  Just click on the “follow” button in the sidebar.

Teddy Bear Picnic Gift Bag featuring Label Love

I found this tiny teddy bear punch in the back of a drawer (I have no idea when/where I got it from), and I decided it would be a perfect way to embellish the favor bags for the party.  A little DSP and the Label Love stamp set… and “voila” you have a cute gift bag for the guests in a matter of minutes!

Sketched Birthday (2 of 6)

Stampin’ Up! items used to create gift bag:

Stamp Sets: Label Love (130622); Sketched Birthday (130426)

Dies, Punches, & Embossing Folders: Artisan Label Punch (1309210); Scalloped Tag Topper Punch (133324); 1-3/8″ Circle Punch (119860)

Card Stock & DSP:  Real Red DSP from the Brights Collection Designer Series Paper Stack (130134) – 2″ x 4″ strip for scalloped tag at top of bag, 1-1/2″ x 5″ strip for teddy bear decoration; Daffodil Delight (119683) – one circle punch; Whisper White (100730) – one artisan label punch

Markers & Ink:  Real Red Classic Stampin’ Pad (126949)

Adhesive: Stampin’ Dimensionals (104430); SNAIL Adhesive (104332)

Non-Stampin’ Up!: Small teddy bear punch, yellow ribbon, white paper bag

Sketched Birthday Treat Bag

You can’t have a teddy bear picnic without gummy bears, so I decided to use the cute cellophane bags from the Twisty Treats Kit (Sale-a-Bration item), my Scalloped Tag Topper Punch, and the birthday cake stamp from Sketched Birthday to dress them up.

Sketched Birthday (6 of 6)

Stampin’ Up! items used to create treat bag:

Stamp Sets: Sketched Birthday (130426)

Dies, Punches, & Embossing Folders: Scalloped Tag Topper Punch (133324)

Card Stock & DSP:  Real Red DSP from the Brights Collection Designer Series Paper Stack (130134) – 2″ x 3″ strip; Daffodil Delight (119683) – 1-3/4″ x  1-7/8″ rectangle; Whisper White (100730) – 1-5/8″ x 1-3/4″ rectangle, one birthday cake stamp.

Markers & Ink:  Brights Collection Stampin’ Write Markers (131259) – Daffodil Delight, Real Red, Tempting Turquoise; Neutrals Stampin’ Write Markers (131261) – Chocolate Chip; Stazon Black Ink (101406)

Miscellaneous: Twisty Treats Kit (133513) – one cello bag

Tools:  Envelope Punch Board (133774) – to round the corners of the tag.

Adhesive: Stampin’ Dimensionals (104430); SNAIL Adhesive (104332)

Non-Stampin’ Up!:  white ribbon

Sketched Birthday “Log” Treat Holder

For this treat holder, I inked up my hardwood stamp with Chocolate Chip ink and rolled a cardboard tube from a toilet paper roll across it.  Then I embellished the roll using Real Red Designer Series Paper and the cute balloon stamp from the Sketched Birthday stamp set.  Finally, I put some Teddy Grahams in a plastic baggie and placed them inside my “log” decoration.

Sketched Birthday (4 of 6)

Stampin’ Up! items used to create “Log” Treat Holder

Stamp Sets: Sketched Birthday (130426); Banner Blast (Sale-a-Bration) – Star; Hardwood (133035)

Dies, Punches, & Embossing Folders: Decorative Label Punch (120907)

Card Stock & DSP:  Real Red DSP from the Brights Collection Designer Series Paper Stack (130134) – 1″ x 5-1/2″ strip; Whisper White (100730) – one decorative label punch

Markers & Ink:  Brights Collection Stampin’ Write Markers (131259) – Daffodil Delight, Real Red, Pumpkin Pie; Real Red Classic Stampin’ Pad (126949); Stazon Black Ink (101406); Chocolate Chip Classic Stampin’ Pad (126979)

Adhesive: Mini Glue Dots (103683)

If you enjoyed my post today, please pin it to Pinterest for me.  You will find a “pin it” button at the very bottom of the post.  Also, don’t forget to leave me a comment for your chance to win a free stamp set from Sale-a-bration!

If you are interested in purchasing the Sketched Birthday stamp set from Stampin’ Up! or if you need any other stamping supplies, I would love to be your personal demonstrator.  Of course, you can always shop now in my online store!

____________________________________________________________

WEEKLY DEALS for April 8 – 14

 Screen Shot 2014-04-08 at 6.44.39 AM

Click here to see the Weekly Deals from Stampin’ Up! in my online store.  The Weekly Deals are only while supplies last and only available at these great prices through April 14.

______________________________________________________________________________________

If you need any stamping supplies, I’d be very happy to be your Demonstrator.  Just click on Order Stampin’ Up! Online Now in the main menu or in the sidebar to go directly to my online store or drop me an email if you have any questions.

Happy Stamping!

Heather

  • Visit my online store here.
  • Shop the Clearance Rack here.


Sweet Sorbet Stamp-a-Stack – Stampin’ Up!

On Sunday, I shared an elegant Stamp-a-Stack featuring the Serene Silhouettes stamp set from Stampin’ Up! Today’s project is another set of cards; this one featuring the Sweet Sorbet Designer Series Paper from Sale-a-Bration.  When you sign up for my Stamp-a-Stack class on May 3rd from 7:00 – 9:00 p.m. you will get the opportunity to make both of these lovely card sets.  If you live in the Atlanta area and would be interested in attending my class, please contact me to sign up. The cost of the class is $15 and includes all consumable materials and use of my stamping supplies.  What’s even better is that I do all the prep work, so you can just come and enjoy the fun!  You can’t beat that!  I would love to connect with some of you face to face for an opportunity to truly create together!

Sweet Sorbet DSP (17 of 17)

If you like this project as much as I do, I would love to hear from you.  Please leave me a comment and I will enter you into my drawing.  During the month of April, I will be doing a drawing each Sunday.  One lucky winner will receive one of the featured products from Sale-a-bration.  So, if you missed out on the free items during the sale, now is your chance to win one!  Also, if you enjoy reading my posts, why not have them delivered to your inbox automatically.  Just click on the “follow” button in the sidebar.

Sweet Sorbet Birthday Card with Tag Topper Closure (Card #1)


Sweet Sorbet DSP (11 of 17)

Sweet Sorbet DSP (14 of 17)

Stampin’ Up! items used to create card #1:

Stamp Sets: Label Love (130622); Petal Parade (133602)

Dies, Punches, & Embossing Folders: Artisan Label Punch (1309210); Scalloped Tag Topper Punch (133324)

Card Stock & DSP:  Crumb Cake (120953) – 5-1/2″ x 8-1/2″ card base; Crisp Canteloupe DSP (from Sweet Sorbet Pack – Sale-a-Bration) – 2-1/4″ x 5-1/4″ panel; Floral Sweet Sorbet DSP (Sale-a-Bration) – 2″ x 5″ panel; Whisper White (100730) – 4″ x 5-1/4″ panel (inside of card), one artisan label punch; Pool Party (122924) – one artisan label punch

Markers & Ink:  Pool Party Classic Stampin’ Pad (126982); Crisp Canteloupe Classic Stampin’ Pad (131176); Pistachio Pudding Classic Stampin’ Pad (131177)

Embellishments: Pool Party twine (Sale-a-bration)

Tools:  N/A

Adhesive: Stampin’ Dimensionals (104430); SNAIL Adhesive (104332)

Sweet Sorbet Thank You Card (Card #2)

Sweet Sorbet DSP (10 of 17)

Sweet Sorbet DSP (8 of 17)

Stampin’ Up! items used to create card #2:

Stamp Sets: Label Love (130622); Petal Parade (133602); A Round Array (129090)

Dies, Punches, & Embossing Folders: Artisan Label Punch (1309210); 7/8″ Scalloped Circle Punch (129404)

Card Stock & DSP:  Crumb Cake (120953) – 4-1/4″ x 11″ card base; Crisp Canteloupe DSP (from Sweet Sorbet Pack – Sale-a-Bration) – 4-1/4″ x 3″ panel; Floral Sweet Sorbet DSP (Sale-a-Bration) – 4-1/4″ x 2-3/4″ panel; Whisper White (100730) – 4″ x 5-1/4″ panel (inside of card), one artisan label punch, one scalloped circle punch

Markers & Ink:  Pool Party Classic Stampin’ Pad (126982); Crisp Canteloupe Classic Stampin’ Pad (131176); Pistachio Pudding Classic Stampin’ Pad (131177)

Embellishments: Crisp Canteloupe Stretch Ruffle Trim (130021)

Tools:  N/A

Adhesive: Stampin’ Dimensionals (104430); SNAIL Adhesive (104332)

Sweet Sorbet For You (Card #3)

Sweet Sorbet DSP (5 of 17)

Stampin’ Up! items used to create card #3:

Stamp Sets: Label Love (130622); Petal Parade (133602); A Round Array (129090)

Dies, Punches, & Embossing Folders: Artisan Label Punch (1309210); 7/8″ Scalloped Circle Punch (129404)

Card Stock & DSP:  Crumb Cake (120953) – 5-1/2″ x 8-1/2″ card base; Crisp Canteloupe DSP (from Sweet Sorbet Pack – Sale-a-Bration) – 5-1/2″ x 2″ panel; Floral Sweet Sorbet DSP (Sale-a-Bration) – 5-1/2″ x 1-3/4″ panel; Whisper White (100730) – 4″ x 5-1/4″ panel (inside of card), one artisan label punch, one scalloped circle punch

Markers & Ink:  Pool Party Classic Stampin’ Pad (126982); Crisp Canteloupe Classic Stampin’ Pad (131176); Pistachio Pudding Classic Stampin’ Pad (131177)

Embellishments: Crisp Canteloupe Stretch Ruffle Trim (130021)

Tools:  N/A

Adhesive: Stampin’ Dimensionals (104430); SNAIL Adhesive (104332)

Sweet Sorbet & Label Love Just for You (Card #4)

Sweet Sorbet DSP (4 of 17)

Stampin’ Up! items used to create card #4:

Stamp Sets: Label Love (130622); Petal Parade (133602)

Dies, Punches, & Embossing Folders: Artisan Label Punch (1309210)

Card Stock & DSP:  Crumb Cake (120953) – 5-1/2″ x 8-1/2″ card base; Crisp Canteloupe DSP (from Sweet Sorbet Pack – Sale-a-Bration) – 5-1/4″ x 4″ panel; Floral Sweet Sorbet DSP (Sale-a-Bration) – 5″ x 3-3/4″ panel; Whisper White (100730) – 4″ x 5-1/4″ panel (inside of card), one artisan label punch

Markers & Ink:  Pool Party Classic Stampin’ Pad (126982); Crisp Canteloupe Classic Stampin’ Pad (131176); Pistachio Pudding Classic Stampin’ Pad (131177)

Embellishments: Crisp Canteloupe Stretch Ruffle Trim (130021)

Tools:  N/A

Adhesive: Stampin’ Dimensionals (104430); SNAIL Adhesive (104332)

If you enjoyed my post today, please pin it to Pinterest for me.  You will find a “pin it” button at the very bottom of the post.  Also, don’t forget to leave me a comment for your chance to win a free stamp set from Sale-a-bration!  And, most importantly, sign up for my Stamp-a-Stack class on May 3rd where we will make both of these beautiful card sets!  Space is limited, so be sure to reserve your spot today!

serene silhouettes (28 of 28)

Sweet Sorbet DSP (17 of 17)

____________________________________________________________

WEEKLY DEALS for April 8 – 14

 Screen Shot 2014-04-08 at 6.44.39 AM

Click here to see the Weekly Deals from Stampin’ Up! in my online store.  The Weekly Deals are only while supplies last and only available at these great prices through April 14.

______________________________________________________________________________________

If you need any stamping supplies, I’d be very happy to be your Demonstrator.  Just click on Order Stampin’ Up! Online Now in the main menu or in the sidebar to go directly to my online store or drop me an email if you have any questions.

Happy Stamping!

Heather

  • Visit my online store here.
  • Shop the Clearance Rack here.


We’ve got a Winner… & Weekly Updates – Stampin’ Up! April 8, 2014

Before I get to today’s updates from Stampin’ Up!, I would like to congratulate Kris K. for being the lucky winner of my drawing this week!  Kris will be receiving one of the stamp sets from Sale-a-bration in the mail very soon.  Thanks to everyone who left me comments.  It means so much to me to hear what you think.  It is hard to believe that I created my very first card in January and now, I’ve just hit my 125th blog follower!  I really appreciate everyone’s support and encouragement.

Don’t forget to keep those comments coming.  I will do another drawing on Sunday, and this time you could be the lucky winner!  Sale-a-bration is over, but it isn’t too late to get your hands on some of the great products featured during the promotion.

Now, onto this week’s updates… I love seeing what great deals Stampin’ Up! has for us each Tuesday!  Today there are several great products featured in the weekly deals, and you must check out those new digital downloads too!  Looks like I will be placing another order this week.  I need that punch pack… when I first looked at it, I didn’t think I would get much use out of it, but recently I’ve seen some really awesome projects created with that little set!  It has been on my wish list for a few weeks, so now seems like a great time to  pick it up.  I also could have used the gingham stamp roller to create my son’s birthday goody bags this week… wishing I had that one in my kit already!  It would be great for creating gift bags and wrap too!

If you need any stamping supplies, I’d be very happy to be your Demonstrator.  Just click on Order Stampin’ Up! Online Now in the main menu or in the sidebar to go directly to my online store or drop me an email if you have any questions.

Happy Stamping!

Heather

WEEKLY DEALS for April 8 – 14

 Screen Shot 2014-04-08 at 6.44.39 AM

Click here to see the Weekly Deals from Stampin’ Up! in my online store.  The Weekly Deals are only while supplies last and only available at these great prices through April 14.

NEW DOWNLOADS 04-08-2014

Click here to see the new digital downloads for the week of April 8:

Stampin’ Up! is committed to bringing you fresh, exciting digital content each and every week. Check out the latest downloads below. Click on the images to see them in my online store to get an even closer view.

Screen Shot 2014-04-08 at 6.54.06 AM

Endless Birthday Wishes Kit – Digital Download


Springtime Hello Stamp Brush Set - Digital Download

Springtime Hello Stamp Brush Set – Digital Download


Other Stampin’ Up! Links & Promotions

  • Visit my online store here.
  • Shop the Clearance Rack here.

Serene Silhouettes Stamp-a-Stack – Stampin’ Up!

On Friday, I shared an elegant card featuring the Serene Silhouettes stamp set (wood mount and clear mount) from Stampin’ Up!  I liked the card so much, that I decided to create a stamp-a-stack collection around it.  If you live in the Atlanta area and would be interested in making this gorgeous card set , please contact me to sign up for my Stamp-a-Stack class on Saturday, May 3rd from 7:00-9:00 p.m.  We will create this set and another one (I’ll post about that one soon).  The cost of the class is $15 and includes all consumable materials, use of my stamping supplies, and I will do all the prep work… you can’t beat that!  I would love to connect with some of you face to face for an opportunity to truly create together!

serene silhouettes (28 of 28)

If you like this project as much as I do, I would love to hear from you.  Please leave me a comment and I will enter you into my drawing.  During the month of April, I will be doing a drawing each Sunday.  One lucky winner will receive one of the featured products from Sale-a-bration.  So, if you missed out on the free items during the sale, now is your chance to win one!  Also, if you enjoy reading my posts, why not have them delivered to your inbox automatically.  Just click on the “follow” button in the sidebar.

All of the cards in this set were inspired by the Splitcoast Stampers CAS266 card challenge, which was to create a clean and simple card using three of the following colors:

I maintained the same design elements for all four cards of this set.  For details about the techniques used in this project, please click here.  Below, you will find card recipes for the specific supplies and dimensions for each card.

Serene Silhouettes Birthday Wishes (Card #1)

Serene Silhouettes (12 of 14)

Card #1 was inspired by three different challenges:  Retro Sketches #108, Splitcoast Stampers CAS266, and The Card Concept #7.

Challenge Images

Stampin’ Up! items used to create card #1:

Stamp Sets: Four You (130538); Serene Silhouettes (127324); Papillon Potpourri (123759)

Dies, Punches, & Embossing Folders: Beautifully Baroque Textured Impressions Embossing Folder (130917); Fancy Fan TIEF (127751); Bitty Butterfly Punch (129406); Hexagon Punch (130919); Scallop Trim Border Punch (118402)

Card Stock & DSP:  Whisper White (100730) – 4-1/4″ x 11″ card base; 2″ x 3-3/4″ panel; Marina Mist (119682) – 1-1/4″ x 4-1/2″ (2 panels); Soft Sky (131203) – 1-1/8″ x 4-3/8″ (2 panels), one butterfly punch; Smoky Slate (131202) – Banner for sentiment.

Markers & Ink:  Soft Sky Classic Stampin’ Pad (131181); Marina Mist Classic Stampin’ Pad (126962); Night of Navy Classic Stampin’ Pad (126970); Versamark Ink (102283)

Embellishments: White Stampin’ Emboss Powder (109132); Basic Pearls Jewel Accents (119247)

Tools:  sponge daubers (102892); Big Shot (113439); Heat Emboss Tool (129053); Embossing Buddy (103083)

Adhesive: Stampin’ Dimensionals (104430); Glue Dots (103683); Multipurpose liquid glue (110755)

Morning Meadow… “Hello” (Card #2)

serene silhouettes (16 of 28)

serene silhouettes (14 of 28)

I used Freshly Made Sketches Challenge #130 for my inspiration for card #2 of my stamp-a-stack set.  This set was created using the Morning Meadow stamp set (wood mount and clear mount) which is available as one the hostess rewards from Stampin’ Up!

Stampin’ Up! items used to create card #2:

Stamp Sets: Morning Meadow (129678); Perfect Pennants (133230)

Dies, Punches, & Embossing Folders: Fancy Fan Textured Impressions Embossing Folder (127751); Pansy Punch (130698)

Card Stock & DSP:  Whisper White (100730) – 5-1/2″ x 8-1/2″ card base; 3-1/8″ x 2-13/16″ panel (mat for stamped image), 3″ x 2-3/4″ panel (for stamped image), one pansy punch; Marina Mist (119682) – 5-1/4″ x 4″ panel; Soft Sky (131203) – 3-7/8″ x 5-1/8″ panel; Marina Mist Designer Series Paper (130135) – 3-1/2″ x 3″; Smoky Slate (131202) – Banner for sentiment.

Markers & Ink:  Soft Sky Classic Stampin’ Pad (131181); Marina Mist Classic Stampin’ Pad (126962); Night of Navy Classic Stampin’ Pad (126970); Versamark Ink (102283)

Embellishments: White Stampin’ Emboss Powder (109132); Basic Pearls Jewel Accents (119247)

Tools:  sponge daubers (102892); Big Shot (113439); Heat Emboss Tool (129053); Embossing Buddy (103083)

Adhesive: Stampin’ Dimensionals (104430); Glue Dots (103683); Multipurpose liquid glue (110755)

Serene Silhouettes Just for You (Card #3)

serene silhouettes (9 of 28)

serene silhouettes (5 of 28)

Mojo Monday sketch challenge 339, provided the inspiration for card #3.  I like the variety provided by the tall and skinny design.  This card was created using the Serene Silhouettes stamp set (wood mount and clear mount), and A Round Array for the sentiment (wood mount and clear mount).

Stampin’ Up! items used to create card #3:

Stamp Sets: Serene Silhouettes (127324); A Round Array (129090)

Dies, Punches, & Embossing Folders: Beautifully Baroque Textured Impressions Embossing Folder (130917); Fancy Fan TIEF (127751); Ovals Collection Framelits Dies (129381); 7/8″ Scallop Circle Punch (129404); 1″ circle punch (119868)

Card Stock & DSP:  Whisper White (100730) – 3-1/2″ x 11″ card base; Oval framelits die cut (for stamped image), one 7-8″ scalloped circle punch; Marina Mist (119682) – 1-1/4″ x 4″ (2 panels), 3-1/4″ x 2-1/4″ panel; Soft Sky (131203) – 1-1/8″ x 3-7/8″ (2 panels); Soft Sky Designer Series Paper (130135) – 3-1/8″ x 2-1/8″; Smoky Slate (131202) – 1″ circle punch.

Markers & Ink:  Soft Sky Classic Stampin’ Pad (131181); Marina Mist Classic Stampin’ Pad (126962); Night of Navy Classic Stampin’ Pad (126970); Versamark Ink (102283)

Embellishments: White Stampin’ Emboss Powder (109132); Basic Pearls Jewel Accents (119247)

Tools:  sponge daubers (102892); Big Shot (113439); Heat Emboss Tool (129053); Embossing Buddy (103083)

Adhesive: Stampin’ Dimensionals (104430); Multipurpose liquid glue (110755)

Serene Silhouettes Thank You (Card #4)

serene silhouettes (17 of 28)

serene silhouettes (24 of 28)

The Paper Craft Crew, sketch challenge #87, provided the inspiration for card #4.  I like the variety provided by the tall and skinny design.  This card was created using the Serene Silhouettes stamp set (wood mount and clear mount), Petite Petals (wood mount and clear mount) and Teeny Tiny Wishes for the sentiment (wood mount and clear mount).

Stampin’ Up! items used to create card #4:

Stamp Sets: Serene Silhouettes (127324); Teeny Tiny Wishes (127802); Petite Petals (133155)

Dies, Punches, & Embossing Folders: Beautifully Baroque Textured Impressions Embossing Folder (130917); Fancy Fan TIEF (127751); Ovals Collection Framelits Dies (129381); Hexagon Punch (130919); Banner Punch (133519); Modern Label Punch (119849); Word Window Punch (119857); Petite Petals Punch (133322)

Card Stock & DSP:  Whisper White (100730) – 5-1/2 x 8-1/2″ card base; 1-1/8″ x 4-1/2″ (banner), one word window punch, 4 petite petals punches, Oval framelits die cut (for stamped image); Marina Mist (119682) – 4″ x 5-1/4″ panel; Soft Sky (131203) – 3-7/8″ x 5-1/8″ panel; Marina Mist Designer Series Paper (130135) – 1-1/2″ x 4-3/4″ (banner); Smoky Slate (131202) – one modern label punch.

Markers & Ink:  Soft Sky Classic Stampin’ Pad (131181); Marina Mist Classic Stampin’ Pad (126962); Night of Navy Classic Stampin’ Pad (126970); Versamark Ink (102283)

Embellishments: White Stampin’ Emboss Powder (109132); Basic Pearls Jewel Accents (119247)

Tools:  sponge daubers (102892); Big Shot (113439); Heat Emboss Tool (129053); Embossing Buddy (103083)

Adhesive: Stampin’ Dimensionals (104430); Multipurpose liquid glue (110755)

If you enjoyed my post today, please pin it to Pinterest for me.  You will find a “pin it” button at the very bottom of the post.  Also, don’t forget to leave me a comment for your chance to win a free stamp set from Sale-a-bration!

____________________________________________________________

WEEKLY DEALS from Stampin’ Up! April 1-7

Click here to see the Weekly Deals from Stampin’ Up! in my online store.  The Weekly Deals are only while supplies last and only available at these great prices through April 7.

Screen Shot 2014-04-01 at 9.41.23 PM

________________________________________________________________________________________

If you need any stamping supplies, I’d be very happy to be your Demonstrator.  Just click on Order Stampin’ Up! Online Now in the main menu or in the sidebar to go directly to my online store or drop me an email if you have any questions.

Happy Stamping!

Heather

  • Visit my online store here.
  • Shop the Clearance Rack here.


Serene Silhouettes Birthday Wishes Card – Stampin’ Up!

I have an elegant card for you today that features the Serene Silhouettes stamp set (wood mount and clear mount) from Stampin’ Up!  Recently I have seen several projects that used a resist technique with beautiful results, so I decided to try it out for myself.  I think the white embossing of the flower image is just lovely!  If you agree, I would love to hear from you.  Please leave me a comment and I will enter you into my drawing.  During the month of April, I will be doing a drawing each Sunday.  One lucky winner will receive one of the featured products from Sale-a-bration.  So, if you missed out on the free items during the sale, now is your chance to win one!  Also, if you enjoy reading my posts, why not have them delivered to your inbox automatically.  Just click on the “follow” button in the sidebar.

Serene Silhouettes (12 of 14)

Today’s project is inspired by three different challenges:  Retro Sketches #108, Splitcoast Stampers CAS266, and The Card Concept #7.

Challenge Images

I began my card with a Whisper White card base.  Then I cut panels of Marina Mist and Soft Sky.  I used my Big Shot to emboss the Soft Sky panels with the Beautifully Baroque and Fancy Fan embossing folders.  I layered the Soft Sky panels on the Marina Mist ones and adhered them to the card base using Multipurpose Liquid Glue.

Serene Silhouettes (3 of 14)

Next, it was time to turn my attention to my focal piece for the card.  I began by rubbing a panel of Whisper White card stock with my Embossing Buddy to ensure that I got a clean image without any extra embossing powder stuck on the card.  Then I inked up my stamp with Versamark Ink and coated the image with White Stampin’ Emboss Powder.  I used my Heat Emboss Tool to set the image.

Serene Silhouettes (1 of 14)

At this stage of the game, things were looking rather plain, but that was all about to change.  The next steps are where the magic happens.  I used a sponge dauber to add ink to the background of my image.  I began by adding Soft Sky ink to the entire background using a circular motion. Then I started from the bottom of the panel and added Marina Mist ink, blending it with the Soft Sky as I went.  I followed the same procedure with my Night of Navy Classic Stampin’ Pad next.  I kept layering and blending until I achieved the desired ombre effect.

Serene Silhouettes (2 of 14)

I finished my art piece by adding a butterfly from the Papillon Potpourri stamp set (wood mount and clear mount).  I stamped the image in Marina Mist ink on Soft Sky card stock and punched it out using the Bitty Butterfly Punch. I embellished the butterfly with a Basic Pearl Accent and attached it to the panel using a Mini Glue Dot.  Next, I punched the bottom of the panel using my Scallop Trim Border Punch and attached it to the front of the card with Stampin’ Dimensionals.

Serene Silhouettes (4 of 14)

For my greeting , I chose the “Birthday Wishes” sentiment from the  Four You stamp set (wood mount and clear mount).  I stamped it in Night of Navy ink on a scrap of Smoky Slate card stock.  Then I used my Hexagon Punch to create the ends of my banner.  Next, I used a sponge dauber to ink around the edges of the panel with Marina Mist ink.  I mounted my sentiment onto the front of the card using Stampin’ Dimensionals.  Finally, I added three pearls to the top right corner of the card.

Serene Silhouettes (9 of 14)

For the finishing touches on the inside of my card I stamped the floral image from the Serene Silhouettes stamp set in the corner using my Night of Navy Classic Stampin’ Pad.

Serene Silhouettes (13 of 14)

As a final detail, I stamped the images from the card on an envelope too.  I love the crisp look of the blue tones on the white card.  It just looks clean and elegant.  I would love to hear what you think about this project too.  Don’t forget to leave me a comment, for your chance to win a free stamp set!  Also, if you liked my post today, please pin it to Pinterest for me.  If you scroll to the bottom of the post, you will find a “pin it” button just below my supply list for the project.

If you would like to purchase the Serene Silhouettes stamp set you can shop in my online store now by clicking here.  If you need any stamping supplies, I hope you will consider contacting me to be your demonstrator.  I would love to create with you!

You can find a complete list of supplies used for this project at the very bottom of this post.

____________________________________________________________

WEEKLY DEALS from Stampin’ Up! April 1-7

Click here to see the Weekly Deals from Stampin’ Up! in my online store.  The Weekly Deals are only while supplies last and only available at these great prices through April 7.

Screen Shot 2014-04-01 at 9.41.23 PM

________________________________________________________________________________________

If you need any stamping supplies, I’d be very happy to be your Demonstrator.  Just click on Order Stampin’ Up! Online Now in the main menu or in the sidebar to go directly to my online store or drop me an email if you have any questions.

Happy Stamping!

Heather

  • Visit my online store here.
  • Shop the Clearance Rack here.

____________________________________________________________

Stampin’ Up! items used to create this project:

Stamp Sets: Four You (130538); Serene Silhouettes (127324); Papillon Potpourri (123759)

Dies, Punches, & Embossing Folders: Beautifully Baroque Textured Impressions Embossing Folder (130917); Fancy Fan TIEF (127751); Bitty Butterfly Punch (129406); Hexagon Punch (130919); Scallop Trim Border Punch (118402)

Card Stock & DSP:  Whisper White (100730) – 4-1/4″ x 11″ card base; 2″ x 3-3/4″ panel; Marina Mist (119682) – 1-1/4″ x 4-1/2″ (2 panels); Soft Sky (131203) – 1-1/8″ x 4-3/8″ (2 panels), one butterfly punch; Smoky Slate (131202) – Banner for sentiment.

Markers & Ink:  Soft Sky Classic Stampin’ Pad (131181); Marina Mist Classic Stampin’ Pad (126962); Night of Navy Classic Stampin’ Pad (126970); Versamark Ink (102283)

Embellishments: White Stampin’ Emboss Powder (109132); Basic Pearls Jewel Accents (119247)

Tools:  sponge daubers (102892); Big Shot (113439); Heat Emboss Tool (129053); Embossing Buddy (103083)

Adhesive: Stampin’ Dimensionals (104430); Glue Dots (103683); Multipurpose liquid glue (110755)

Collective Creativity with Stampin’ Up!

For today’s post, I’ve got something a little different for you.  I recently participated in a group project with some other Stampin’ Up! Demonstrators, and I wanted to share the end result with you.  I just love how this framed art piece turned out.  It really is amazing that it came together so well, since each piece was created in isolation… collective creativity at its finest!

Spring Grid Project (3 of 20)

Isn’t it pretty!  I can’t wait to see it hanging on the wall of my new craft room!  I’m remodeling a guest bedroom, so I will finally have a dedicated space for all my creative endeavors.  Don’t worry, I’m taking pictures as the process evolves, and I will show you everything once it is finished!

This is a great project to create with friends.  I hope you will try it out and leave me a comment.  Speaking of comments, that brings me to my drawing for April!  Sale-a-bration is over, but it isn’t too late to get your hands on some of the great products featured during the promotion.  Leave me a comment, and I will enter you into my drawing.  During the month of April, I will be doing a drawing every Sunday.  One lucky person will receive one of the items from Sale-a-bration as a special show of appreciation to you, my readers.  Also, if you like my work, why not get my post delivered right to your inbox.  Click on “follow” in the sidebar to subscribe to my blog via email!

Spring Grid Project (8 of 20)

Now, let’s get to the details about this project.  First, the group decided on a color scheme and each person was assigned a background color either Bermuda Bay or Daffodil Delight.  Then every person created nine copies of a 2″ x 2″ art piece using Stampin’ Up! products.  We chose a spring theme and limited our color choices to the brights collection.  We shared with each other which stamp sets we would be using, so that we didn’t end up with nine squares all featuring the same ones.  Once our squares were finished, we kept one, and mailed the other eight to the other participants.  It was so fun getting these little gems in the mail and seeing it all come together piece by piece.

Here are more detailed views of each of the grid sections:

Spring Grid Project (20 of 20)

Created by Sue Prather

Spring Grid Project (16 of 20)

Created by Nancy Pellows

Spring Grid Project (15 of 20)

Created by Loyda Montanez

Spring Grid Project (14 of 20)

Created by Amy Austin Kinler in collaboration with Heather Van Looy

Spring Grid Project (13 of 20)

Created by Dawn Sorenson in collaboration with Heather Van Looy

Spring Grid Project (12 of 20)

Created by Sandi MacIver

Spring Grid Project (11 of 20)

Created by Kristi Gray

Spring Grid Project (10 of 20)

Created by Sheryl Whitmer

Spring Grid Project (9 of 20)

Created by Heather Van Looy

If you would like to create one of these projects, here are few logistical items to consider:

  • Set a due date for mailing the pieces and allow everyone enough work time to meet the due date.Each art piece should measure 1-7/8″ x 1-7/8″ and be mounted on a 2″ x 2″ piece of whisper white card stock.
  • The background pieces (Bermuda Bay/Daffodil Delight) measure 2-1/4″ x 2-1/4″.  They are added by the recipient once all the pieces have been received.  This allows each person more flexibility in deciding how to put the final product together.
  • Since these are framed in a shadow box, it is okay to have quite a bit of dimensionality to them.  In fact, the more three-dimensional the art is, the better!
  • When you receive all of the squares, cut a 7-1/8″ square of whisper white card stock to help mount all the squares evenly.  I started with the corner pieces and worked my way in.  I lined up the outside edges flush with the edge of the 7-1/8″ square.
  • Mount the 7-1/8″ square onto an 8″ x 8″ square of whisper white.
  • Mount that onto a 10″ x 10″ piece of Designer Series Paper of your choice.
  • Place in a 10″ x 10″ shadow box frame.
  • NOTE:  I assembled my project according the directions above, and then when I went to buy my frame, they only had 12″ x 12″.  I added my finished piece to a 12″ x 12″ square of Daffodil Delight DSP, and I actually like how it tied all the squares together.

Spring Grid Project (17 of 20)

If you like this project, please do me a favor and pin it to Pinterest for me.  I always appreciate your help in getting the word out about my blog.  You will find a “pin it” button at the very bottom of this post below the list of stamp sets that were used to create this project.  And don’t forget to leave me a comment for your chance to win a free stamp set from Sale-a-bration!

If you would like to purchase any of the wonderful products featured in this project, I would love to help you out.  You can shop in my online store now by clicking here.  Also, if you would like to create one of these projects with your friends at a workshop it would be a great chance to earn the Simply Sketched stamp set through our hostess program.  I hope you will consider contacting me to be your demonstrator.  I would love to help you and group of friends put a similar project together as a fun social occasion!

You can find a complete list of stamp sets and punches used for this project at the very bottom of this post.

___________________________________________

WEEKLY DEALS from Stampin’ Up! April 1-7

Click here to see the Weekly Deals from Stampin’ Up! in my online store.  The Weekly Deals are only while supplies last and only available at these great prices through April 7.

Screen Shot 2014-04-01 at 9.41.23 PM

Other Stampin’ Up! Links & Promotions

  • Visit my online store here.
  • Shop the Clearance Rack here.

If you need any stamping supplies, I’d be very happy to be your Demonstrator.  Just click on Order Stampin’ Up! Online Now in the main menu or in the sidebar to go directly to my online store or drop me an email if you have any questions.

Happy Stamping!

Heather

____________________________________________________________

Stampin’ Up! items used to create this project:

Stamp Sets: Simply Sketched (Hostess Reward – 129672); Fabulous Florets (123027); Serene Silhouettes (127324); Papillon Potpourri (123759); Wetlands (126697); Secret Garden (129144); Hardwood (133035); For the Birds (126407)

Dies, Punches, & Embossing Folders: Itty Bitty Shapes Punch Pack (118309); Bitty Butterfly punch (129406); Little Leaves Sizzlits (114511); 1-3/4″ Scallop Circle Punch (119854); Beautiful Wings Embosslits (118138)


New Updates from Stampin’ Up! – April 1, 2014

Before I get to today’s updates from Stampin’ Up!, I would like to congratulate Jari Francis for being the lucky winner of my March drawing!  Thanks to everyone who left me comments.  It means so much to me to hear what you think.  Jari, will be receiving a beautiful handcrafted card in the mail very soon!

Sale-a-bration is over, but it isn’t too late to get your hands on some of the great products featured during the promotion.  Leave me a comment, and I will enter you into my drawing.  During the month of April, I will be doing a drawing every Sunday.  One lucky person will receive one of the items from Sale-a-bration as a special show of appreciation to you, my readers.

Now, onto this week’s updates… I love seeing what great deals Stampin’ Up! has for us each Tuesday!  Today there are several great products featured in the weekly deals, and you must check out those new digital downloads too!  Personally, I’ve got my eye on that lace trim tape.  It is so very pretty!

If you need any stamping supplies, I’d be very happy to be your Demonstrator.  Just click on Order Stampin’ Up! Online Now in the main menu or in the sidebar to go directly to my online store or drop me an email if you have any questions.

Happy Stamping!

Heather

Weekly Deals from Stampin’ Up! April 1-7

Here are the new Weekly Deals from Stampin’ Up!:


WEEKLY DEALS


We hope you enjoy this week’s Weekly Deals!

Blue 3/8 Inch Denim Jean Ribbon Item # 125053
Regular Price: $6.95 US/$9.50 CAN
Discounted Price: $5.21 US/$7.13 CAN
Delicate Details Lace Tape Item # 130966
Regular Price: $9.95 US/$11.95 CAN
Discounted Price: $7.46 US/$8.96 CAN
Polka Stampin’ Around Builder Wheel Item # 130109
Regular Price: $4.50 US/$5.95 CAN
Discounted Price: $3.38 US/$4.46 CAN
Perfect Pennants Bigz Die Item # 123126
Regular Price: $32.95 US/$40.95 CAN
Discounted Price: $24.71 US/$30.71 CAN
Fancy Flower Punch Item # 118073
Regular Price: $16.95 US/$22.95 CAN
Discounted Price: $12.71 US/$17.21 CAN
Fun Flowers Bigz L Die Item # 121812
Regular Price: $32.95 US/$40.95 CAN
Discounted Price: $24.71 US/$30.71 CAN
7/16″ Natural Trim Ribbon Item # 129287
Regular Price: $6.95 US/$8.95 CAN
Discounted Price: $5.21 US/$6.71 CAN
Mom, I Love You Ensemble – Digital Download Item # 129872
Regular Price: $9.95 /$10.95 CAN
Discounted Price: $5.97 US/$6.57 CAN

Click here to see the Weekly Deals from Stampin’ Up! in my online store.  The Weekly Deals are only while supplies last and only available at these great prices through April 7.

NEW DOWNLOADS 04-01-2014

Click here to see the new digital downloads for the week of April 1:

Stampin’ Up! is committed to bringing you fresh, exciting digital content each and every week. Check out the latest downloads below. Click on the download title to see it in the store, or click on the images to get an even closer view. You can also click here to view a PDF with additional details about this week’s downloads.


Fine Print Greetings Card Templates
(item 137911)
(NAEUSP)

Eggstra Spectacular Stamp Brush Set
(item 137912)
(NAEUSP)


Other Stampin’ Up! Links & Promotions

  • Visit my online store here.
  • Shop the Clearance Rack here.

Blooming with Kindness Birthday Wishes Card – Stampin’ Up!

Today’s card features the Blooming with Kindness stamp set (wood mount and clear mount) and Watercolor Wonder Designer Series Paper from Stampin’ Up!  The design was inspired by Sandi MacIver (Stamping with Sandi) who introduced me to the idea of stamping on patterned paper.  I also owe Sandi a huge shout out and show of appreciation for mentioning me on her blog on Thursday.  Many of you reading this today found me via Sandi’s post, and I am very grateful for the introduction!  I am so thrilled to have you with me today!

Now, onto today’s project… I just love this stamp set.  From the moment I saw that gorgeous flower, I knew I had to have it.  I get tons of compliments on every card I make with this one.  If you like what I’ve created today, I would love it if you would leave me a comment.  Tomorrow is the end of the month, so this is your last chance to get in on my monthly drawing for a a handcrafted card in the mail!  Also, if you enjoy reading my posts, why not have them delivered to your inbox automatically.  Just click on the “follow” button in the sidebar.  I can’t even tell you how thrilled I am every time I get a new follower!  I just love sharing ideas with you guys and hearing all about the great project ideas you have too.

Blooming with Kindness - watercolor wonder (13 of 13)

I began my card by selecting a piece of Watercolor Wonder DSP with cute yellow and orange polkadots.  The design of this paper was simple enough that I felt it would make a beautiful background for my stamped images.  I chose to stamp my images in Crushed Curry and Tangerine Tango ink to coordinate with the design of the Watercolor Wonder DSP.  That is one great thing about Stampin’ Up designer series papers, they always list which colors were used in the design right on the label.  It takes all the guesswork out of creating your color scheme.

Blooming with Kindness - watercolor wonder (2 of 13)

First, I stamped the flower from the Blooming with Kindness stamp set in Crushed Curry on the right side of my panel, making sure it went off the page a bit.  Then I cleaned my stamp and inked it up with Tangerine Tango.  I stamped it once on a scrap of paper, before stamping it in the bottom left corner of my DSP panel.  I wanted to add extra depth to my design by altering the intensity of the colors.  For my third bloom, which would be the main focal point of the card, I knew it needed to have some added dimension.  I decided to double stamp it to create a bit of a shadow effect.  First, I inked up my stamp with Crushed Curry and stamped off on a scratch paper before stamping a lighter image on the DSP panel.  Then I used my Stamp-a-ma-jig to stamp the image again using Tangerine Tango ink.  For the second stamp, I offset the image just slightly to create the illusion of depth.

Blooming with Kindness - watercolor wonder (6 of 13)

For my greeting , I chose the “Birthday Wishes” sentiment from the  Simply Sketched stamp set, available as one of the great hostess rewards from Stampin’ Up!.  I stamped it in Cajun Craze ink on my stamped panel using my Stamp-a-ma-jig.  Then, I used a sponge dauber to ink around the edges of the panel in the same color.  I mounted my art piece on a panel of Tangerine Tango using SNAIL adhesive, then adhered that to a panel of beautiful floral designer series paper from the Watercolor Wonder set.  Finally, I added all of my layered panels to a Tangerine Tango card base.

Blooming with Kindness - watercolor wonder (7 of 13)

For the finishing touches on the inside of my card I stamped the floral image from the Blooming with Kindness stamp set along the bottom of a panel of Whisper White card stock using the same ink colors as I did on the front of the card.  Then I inked around the edges of the panel using Tangerine Tango ink and a sponge dauber.  I layered this panel onto a panel of the floral Watercolor Wonder DSP and adhered it to the card base.

Blooming with Kindness - watercolor wonder (9 of 13)

I love the bright cheery colors of this card, and the elegance of the floral stamp.  I think it is stunning (if I do say so myself)! LOL.  I will definitely keep my eye out for other designer series paper designs that I think would make a nice background image.

I would love to hear what you think about this project too.  Don’t forget to leave me a comment, for your chance to win a handcrafted card!  Also, if you liked my post today, please pin it to Pinterest for me.  I am new to blogging and I would love your help in boosting my blog following.  If you scroll to the bottom of the post, you will find a “pin it” button just below my supply list for the project.

If you would like to purchase the Blooming with Kindness stamp set now is the perfect time.  Monday, March 31st is the final day of the Sale-a-Bration promotion.  Don’t miss out on your chance to get some really great products for FREE with your $50 purchase.  Shop in my online store now by clicking here.  You can learn more about the Sale-a-bration promotional items in this brochure.  Also, if you would like the chance to earn the Simply Sketched stamp set through our hostess program, I hope you will consider contacting me to be your demonstrator.

You can find a complete list of supplies used for this project at the very bottom of this post.

____________________________________________________________

Weekly Deals from Stampin’ Up! March 25-31

Here are the new Weekly Deals from Stampin’ Up!:

Screen Shot 2014-03-25 at 6.22.01 AM


Click here to see the Weekly Deals from Stampin’ Up! in my online store.  The Weekly Deals are only while supplies last and only available at these great prices through March 31.

________________________________________________________________________________________

If you need any stamping supplies, I’d be very happy to be your Demonstrator.  Just click on Order Stampin’ Up! Online Now in the main menu or in the sidebar to go directly to my online store or drop me an email if you have any questions.

Happy Stamping!

Heather

  • It’s Sale-a-bration time!!  You’ll get a free item from Stampin’ Up! for every $50 that you purchase between now and March 31!  Click on my Stampin’ Up! Promotions page for more information!
  • Visit my online store here.
  • Shop the Clearance Rack here.

____________________________________________________________

Stampin’ Up! items used to create this project:

Stamp Sets: Blooming with Kindness (126422); Simply Sketched (Hostess Reward – 129672)

Dies, Punches, & Embossing Folders: N/A

Card Stock & DSP:  Tangerine Tango (111349)- 4-1/4″ x 11″ card base, 3-1/2″ x 4-3/4″panel; Watercolor Wonder DSP (132994) – Floral: 5″ x 5-1/4″ panel (x2 – front of card and inside card); Polka Dot: 3-3/8″ x 4-5/8″ panel; Whisper White (100730) – 3-3/4″ x 5″ panel (inside of card).

Markers & Ink:  Crushed Curry Classic Stampin’ Pad (131173); Cajun Craze Classic Stampin’ Pad (126965); Tangerine Tango Classic Stampin’ Pad (126946)

Embellishments: N/A

Tools:  Stamp-a-ma-jig (101049); sponge daubers (102892)

Adhesive: SNAIL (104332)

Birthday Basics Makes Gifting Easy! – Stampin’ Up!

Today I wanted to show you how a little Stampin’ Up! magic with the Birthday Basics DSP  and the Scalloped Tag Topper Punch can turn gift giving into a breeze.

If you like my post today, please leave me a comment.  I love hearing from you and sharing ideas.  Plus, as an added benefit,  you will be entered into my monthly drawing for a chance to win a free card.  Also, If you aren’t already a subscriber, please consider following me via email.   Just click on the “follow” button in the sidebar.

Cupcake Punch (11 of 11)

My son will be three in a couple of weeks.  The year I was pregnant with him, we had 7 other babies born at school.  In addition to that, there are 10 kids who live on our street.  I tell you all this just to demonstrate that we get invited to a lot of birthday parties!  Between the gifts, the cards, and the gift wrap it gets pretty expensive.  Now, you know I’ve got the cards covered, but it wasn’t until recently that I realized I could make some super cute gifts with plain brown craft paper and a couple of minutes with some punches.  I’ve seen tons of really cute stamped packages out there, but I don’t always have time to color a bunch of stamps and make a paper bow, etc.  So, today’s share is my 5 minute solution to kids birthday wrap!

Cupcake Punch (1 of 11)

I started by cutting a 2″ x 3-1/2″ strip of the candles paper from the Birthday Basics designer series paper pack.  Then I cut a circle of Coastal Cabana card stock using my Circles Framelits Dies (I would have used the 1-3/4″ circle punch if I had it… that is going on an order soon!).  I added the circle to my birthday candle tag using Stampin’ Dimensionals.  Next, I quickly punched a cupcake using the Cupcake Builder Punch and three different papers from the Birthday Basics DSP pack.  Those were glued together using Multipurpose Liquid Glue and added to the label with Stampin’ Dimensionals.

Cupcake Punch (2 of 11)

Finally, I stamped the “Happy Birthday” sentiment from the Teeny Tiny Wishes stamp set (wood mount and clear mount) on Whisper White card stock using my Bermuda Bay Classic Stampin’ Pad.  I punched it out using the Word Window Punch.  Then I used the Modern Label Punch to create a base for my greeting in Bermuda Bay card stock.  I layered everything together using Stampin’ Dimensionals and threaded some white ribbon through to finish it all off with a cute little bow.

Cupcake Punch (10 of 11)

This gift tag was quick and easy to make.  In fact, I think I might go ahead and make several more to have on hand next time we are invited to a birthday party!  If you liked this project, please don’t forget to leave me a comment so you will be entered into my drawing.  Also, please pin it to Pinterest for me.  I am new to blogging and I would love your help in developing a blog following.  If you scroll to the bottom of the post, you will find a “pin it” button just below my supply list for the project.

If you would like to purchase the Birthday Basics DSP, Cupcake Punch, or any of the other great products featured in this project, shop in my online store by clicking here.  Remember you can earn a FREE item with every $50 purchase through March 31st.  The final days of Sale-a-bration are here.  Don’t miss your chance to get these great products before they are gone!

You can find a complete list of supplies used for this project at the very bottom of this post.

____________________________________________________________

Weekly Deals from Stampin’ Up! March 25-31

Here are the new Weekly Deals from Stampin’ Up!:

Screen Shot 2014-03-25 at 6.22.01 AM

Click here to see the Weekly Deals from Stampin’ Up! in my online store.  The Weekly Deals are only while supplies last and only available at these great prices through March 31.

____________________________________________________________

If you need any stamping supplies, I’d be very happy to be your Demonstrator.  Just click on Order Stampin’ Up! Online Now in the main menu or in the sidebar to go directly to my online store or drop me an email if you have any questions.

Happy Stamping!

Heather

  • It’s Sale-a-bration time!!  You’ll get a free item from Stampin’ Up! for every $50 that you purchase between now and March 31!  Click on my Stampin’ Up! Promotions page for more information!
  • Visit my online store here.
  • Shop the Clearance Rack here.

____________________________________________________________

Stampin’ Up! items used to create this project:

Stamp Sets: Teeny Tiny Wishes (127802)

Dies, Punches, & Embossing Folders: Cupcake Punch (121807); Scalloped Tag Topper Punch (133324); Circles Framelits Dies (130911); Word Window Punch (119857); Modern Label Punch (119849)

Card Stock & DSP:  Bermuda Bay (131197) – modern label punch; Whisper White (100730) – word window punch; Coastal Cabana (131297) – Circles framelit die cut; Birthday Basics DSP – Birthday candles: 2″ x 3-1/2″ tag, polka dots: cupcake wrapper, coastal cabana floral – cupcake icing, raspberry ripple – cherry.

Markers & Ink:  Bermuda Bay Classic Stampin’ Pad (131171)

Embellishments: Ribbon (the one I used is not a Stampin’ Up! item) –  Use 5/8″ Organza Ribbon (114319) from Stampin’ Up!

Tools:  N/A

Adhesive: Stampin’ Dimensionals (104430); Multipurpose Liquid Glue (110755)