Simply Sketched, You Make Me Happy! – Stampin’ Up!

Today’s card features the Simply Sketched (wood mount and clear mount), Papillon Potpouri (wood mount and clear mount) and Perfect Pennants (wood mount and clear mount) stamp sets from Stampin’ Up!  The Simply Sketched stamp set is one of the lovely hostess items you can earn through the Stampin’ Rewards program.  I am in love with the flower in this set! This is the second card I’ve created with it this week.  I think you can see by the different colors I used how versatile that little flower can be.  (There’s a cute little bird in that set too.  I haven’t used that one yet, but I expect you will be seeing it here soon.)

If you like what I’ve created today, I would love it if you would leave me a comment.  On March 31st I will do a drawing and one lucky person who left me a comment will receive a handcrafted card in the mail!  Also, if you enjoy reading my posts, why not have them delivered to your inbox automatically.  Just click on the “follow” button in the sidebar.  I get super excited every time that I see someone else is following my blog.  It just makes my day to know you are following along with me as I create these posts!

Simply Sketched Perfect Pennants (5 of 6)

Today’s card was inspired by:

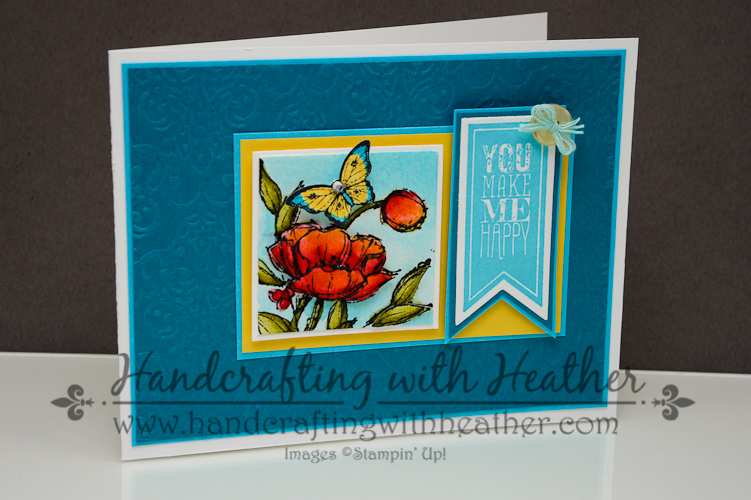
I began my card with a  Whisper White card base.  Then I added a panel of Tempting Turquoise card stock using SNAIL adhesive.  Next, I dry embossed a panel of Island Indigo card stock using the Lacy Brocade embossing folder and added that to the front of my card.  For my focal point, I layered panels of Tempting Turquoise and Daffodil Delight as the base for my three dimensional elements.

Simply Sketched Perfect Pennants (3 of 6)

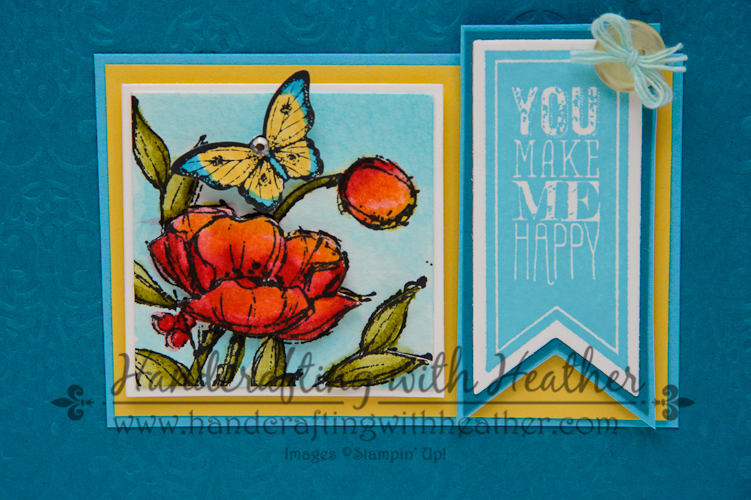
Next, I used Staz-on Black ink and my Stamp-a-ma-jig to stamp the flower and leaf elements from the Simply Sketched stamp set onto a square of  watercolor paper. I also stamped an additional flower and leaf on another scrap of watercolor paper to add some dimension later.  I colored my stamped images using the Brights Collection Stampin’ Write Markers (Tempting Turquoise, Real Red, Pumpkin Pie, & Daffodil Delight) and a Blender Pen to give it a watercolor effect.  I cut out the extra flower and leaves using paper snips.  Then, I  attached the leaves to the foreground of my square with mini glue dots and used Stampin’ Dimensionals to add my flower on top of the one on the square of watercolor paper for some extra depth.  Then I stamped the butterfly from the Papillon Potpourri stamp set onto some Whisper White card stock using Staz-on Black and colored it with my markers.  Then I cut it out using the Bitty Butterflies Punch.  I added a Basic Rhinestones Jewel Accent to the butterfly and added it to my square using Stampin Dimensionals.  I adhered my watercolored panel to a square of Whisper White and added the finished piece to the front of the card using Stampin’ Dimensionals.

Simply Sketched Perfect Pennants (1 of 6)

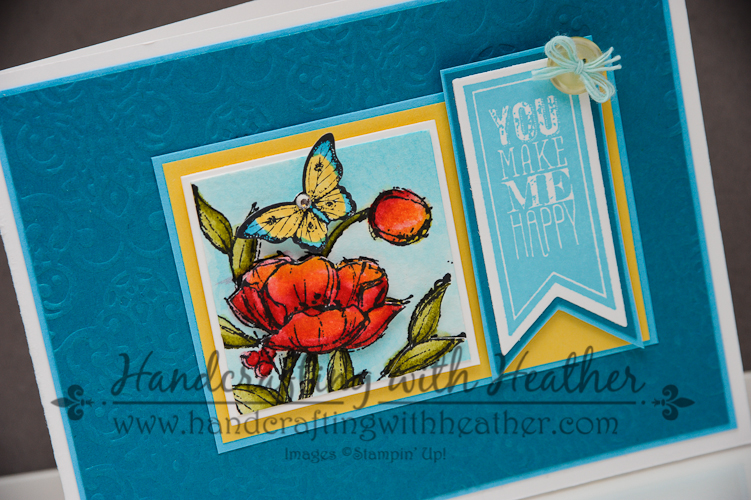
Then I stamped the “You Make Me Happy” greeting from the Perfect Pennants stamp set on Whisper White card stock using my Tempting Turquoise Classic Stampin’ Pad.  I cut that out using the Banners Framelits Dies (2nd from the center).  I also cut a banners in Tempting Turquoise and Island Indigo (3rd from the center). (Remember, the Perfect Pennants stamp set and the Banners Framelits can be purchased as a bundle for 15% off, wood mount and clear mount.)  I layered my greeting onto the Island Indigo banner and trimmed it down. Then I repeated the process with the Tempting Turquoise banner.  Finally, I finished my design off with a button from the Designer Subtles Collection and some bakers twine from the Sweet Sorbet Accessory Pack (Sale-a-bration item).

Simply Sketched Perfect Pennants (4 of 6)

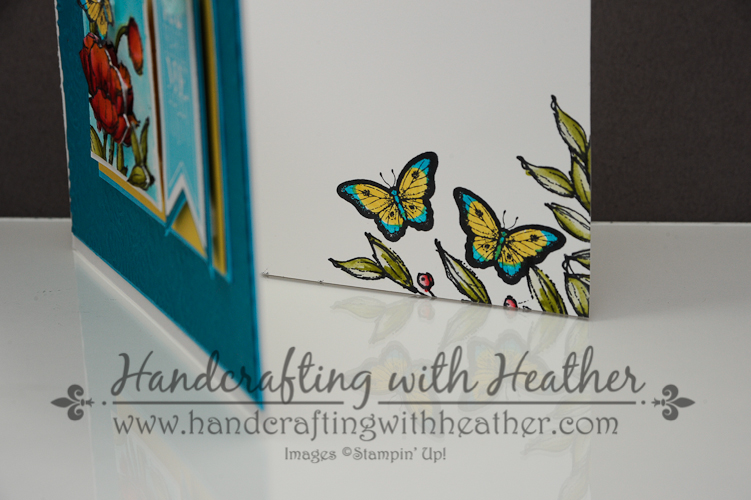
For my finishing touch, I stamped the leaves from Simply Sketched and the butterfly from Papillon Potpouri on the inside of my card and colored them to match the front of the card.

I love how my watercolored square turned out.  The colors just pop off the page, and the dimension added by the 3-D elements make it all really jump out at you.  If you liked my post today, please pin it to Pinterest for me.  I am new to blogging and I would love your help in developing a blog following.  If you scroll to the bottom of the post, you will find a “pin it” button just below my supply list for the project… and, don’t forget to leave me a comment for your chance to win a handcrafted card!

If you would like to purchase the earn the Simply Sketched stamp set as a hostess reward, I hope you will consider contacting me.  Of course, you can always shop in my online store for any of the great products featured in this project by clicking here.  Remember you can earn the Sweet Sorbet Accessory Pack for FREE (Sale-a-bration items) with a $50 purchase.

You can find a complete list of supplies used for this project at the very bottom of this post.

____________________________________________________________

Weekly Deals from Stampin’ Up! March 11 – 17

Here are the new Weekly Deals from Stampin’ Up!:Click here to see the Weekly Deals from Stampin’ Up! in my online store.  The Weekly Deals are only while supplies last and only available at these great prices through February 17.

Screen Shot 2014-03-12 at 8.34.27 PM

Click here to see the Weekly Deals from Stampin’ Up! in my online store.  The Weekly Deals are only while supplies last and only available at these great prices through March 17.

________________________________________________________________________________________

If you need any stamping supplies, I’d be very happy to be your Demonstrator.  Just click on Order Stampin’ Up! Online Now in the main menu or in the sidebar to go directly to my online store or drop me an email if you have any questions.

Happy Stamping!

Heather

  • It’s Sale-a-bration time!!  You’ll get a free item from Stampin’ Up! for every $50 that you purchase between now and March 31!  Click on my Stampin’ Up! Promotions page for more information!
  • Visit my online store here.
  • Shop the Clearance Rack here.

____________________________________________________________

Stampin’ Up! items used to create this project:

Stamp Sets: Simply Sketched (Hostess Reward – 129672); Perfect Pennants (133230); Papillon Potpourri (123759)

Dies, Punches, & Embossing Folders: Banners Collection Framelits (132173); Lacy Brocade Textured Impressions Embossing Folder (127819); Bitty Butterfly Punch (129406)

Card Stock & DSP:  Whisper White (100730) – 4-1/4″ x 11″ card base, 2″ x 2″ panel, one banner; Tempting Turquoise (102067) – 4″ x 5-1/4″ panel, 2-3/8″ x 3-5/8″ panel, one banner; Island Indigo (122923) – 3-7/8″ x 5-1/8″ panel, one banner; Daffodil Delight (119683) – 2-1/4″ x 3-1/2″ panel

Markers & Ink:  Tempting Turquoise Classic Stampin’ Pad (126952); Brights Collection Stampin’ Write Markers (131259), Staz-on Black (101406)

Embellishments: Basic Rhinestones Jewel Accents (119246); Buttons – Designer Subtles Collection (130030); Bakers Twine from the Sweet Sorbet Accessory Pack (Sale-a-bration item)

Tools:  Big Shot (113439); Stamp-a-ma-jig (101049)

Adhesive: SNAIL (104332); Stampin’ Dimensionals (104430); Mini Glue Dots (103683)

Simply Sketched Just for You! – Stampin’ Up!

Today’s card features the Simply Sketched stamp set from Stampin’ Up! (wood mount and clear mount).  This beautiful stamp set is one of our lovely hostess items available through the Stampin’ Rewards program.  I just love the way it turned out with the watercoloring!  I also love that this card was the perfect combination for four different challenges this week!  I find it invigorating to try to combine more than one challenge into one card, but four is a new record for me!  So, lots of props to the design teams who provided me with the necessary inspiration for today’s card:   Dynamic Duos #93, Mojo Monday sketch #336,  Splitcoast Stampers CAS #263, and SUO Challenges #92.  I have to say, I really enjoy participating in challenges.  I find that it makes me think creatively to figure out how I can meet the constraints presented by the design teams.  I highly recommend it to get those creative juices flowing!

Please leave me a comment to let me know what you think of my card today.  I really appreciate hearing your feedback.  It is so uplifting to know that someone admires your work.  Also, as an added benefit, on March 31st I will do a drawing and one lucky person who left me a comment will receive a handcrafted card in the mail!  Also, if you enjoy reading my posts, why not have them delivered to your inbox automatically.  Just click on the “follow” button in the sidebar.  I get super excited every time that I see someone else is following my blog.  It just makes my day to know you are following along with me as I create these posts!

Simply Sketched (6 of 12)

I began my card with a  Whisper White card base.  Then I added a panel of Sahara Sand paper from the Sweet Sorbet DSP pack (Sale-a-bration item) using SNAIL adhesive.  Next, I dry embossed a panel of Blushing Bride card stock using the decorative dots embossing folder (Sale-a-bration item).  I layered that panel onto a panel of Crumb Cake card stock and added them to the front of my card. I used the 4th largest Circles Collection Framelits Die (counting from the outside in toward the center) to cut a circle of Crumb Cake card stock to mat my floral focal point.  I used the next smallest circle die to trace a circle in pencil on Whisper White card stock, then I used my stamp-a-ma-jig to place the flower and leaf stamps where I wanted them in the circle using  Staz-on Black Ink.  I stamped another flower and leaf on a scrap of Whisper White to cut out for my three dimensional element.

Simply Sketched (5 of 12)

For my watercoloring, I pressed my Sahara Sand  and Blushing Bride Classic Stampin’ Pads onto a ceramic plate and used some water and a paintbrush to color in my stamped images.  Then I cut out my circle using paper snips because I wanted to have the leaves overlap the circumference of the circle.  I also cut out the extra leaf and flower stamps.  I attached the leaves with mini glue dots, and used Stampin’ Dimensionals to add my flower to the front of the card for some extra depth.

Simply Sketched (3 of 12)

Finally, I finished my card front with some pearls and the “Just for You” sentiment from the Teeny Tiny Wishes stamp set (wood mount and clear mount) in Staz-on Black.  I punched the greeting out using the word window punch and attached it with Stampin’ Dimensionals.  Because I wanted my sentiment to be small, I lined up the edge of the punch near the beginning of my greeting.  Then I attached it to a post-it note to serve as a handle and punched it again from the other side.  I just love how versatile Stampin’ Up! punches are.  With a little ingenuity you can really do so many different things with them.

Simply Sketched (10 of 12)

Of course, I couldn’t leave the inside of my card naked, so I stamped the images from the front on the inside and quickly colored them using the same watercoloring technique as before.  I think it makes such a difference when you add a little detail the the inside of the card.  It just seems to tie everything together and take your design to the next level.

I am very pleased with how this card turned out.  It was actually my first attempt at watercoloring on a card, and I think it turned out fabulously!  I hope that you agree.  If you liked my post today, please pin it to Pinterest for me.  I am new to blogging and I would love your help in developing a blog following.  If you scroll to the bottom of the post, you will find a “pin it” button just below my supply list for the project… and, don’t forget to leave me a comment for your chance to win a handcrafted card!

If you would like to earn the Simply Sketched stamp set as a hostess reward, I hope you will consider contacting me.  Of course, you can always shop in my online store by clicking here.  Remember you can earn the Sweet Sorbet Designer Series Paper or the Decorative Dots embossing folder for FREE (Sale-a-bration items) with a $50 purchase.

You can find a complete list of supplies used for this project at the very bottom of this post.

____________________________________________________________

Weekly Deals from Stampin’ Up! March 11 – 17

Here are the new Weekly Deals from Stampin’ Up!:Click here to see the Weekly Deals from Stampin’ Up! in my online store.  The Weekly Deals are only while supplies last and only available at these great prices through February 17.

Screen Shot 2014-03-12 at 8.34.27 PM

Click here to see the Weekly Deals from Stampin’ Up! in my online store.  The Weekly Deals are only while supplies last and only available at these great prices through March 17.

________________________________________________________________________________________

If you need any stamping supplies, I’d be very happy to be your Demonstrator.  Just click on Order Stampin’ Up! Online Now in the main menu or in the sidebar to go directly to my online store or drop me an email if you have any questions.

Happy Stamping!

Heather

  • It’s Sale-a-bration time!!  You’ll get a free item from Stampin’ Up! for every $50 that you purchase between now and March 31!  Click on my Stampin’ Up! Promotions page for more information!
  • Visit my online store here.
  • Shop the Clearance Rack here.

____________________________________________________________

Stampin’ Up! items used to create this project:

Stamp Sets: Simply Sketched (Hostess Reward – 129672); Teeny Tiny Wishes (127802)

Dies, Punches, & Embossing Folders: Circles Collection Framelits (130911); Decorative Dots Textured Impressions Embossing Folder (Sale-a-bration item); Word Window Punch (119857)

Card Stock & DSP:  Whisper White (100730) – 4-1/4″ x 11″ card base, one word window punch, one circle; Sahara Sand DSP from the Sweet Sorbet series (Sale-a-bration) – 4″ x 5-1/4″ panel; Crumb Cake (120953) – 4″ x 4-1/4″ panel, one circle (Circles framelits); Blushing Bride (131198) – 4″ x 4″ panel.

Markers & Ink:  Blushing Bride Classic Stampin’ Pad (131172); Sahara Sand Classic Stampin’ Pad (126976); Staz-on Jet Black (101406).

Embellishments: Basic Pearls Jewel Accents (119247)

Tools:  Big Shot (113439); Stamp-a-ma-jig (101049)

Adhesive: SNAIL (104332); Stampin’ Dimensionals (104430); Mini Glue Dots (103683)

Oh, Secret Garden, You Make me Smile! – Stampin’ Up!

Today’s card features the Secret Garden stamp set (wood mount and clear mount) from Stampin’ Up!  The inspiration for this card came from the Mojo Monday sketch challenge #335 and the Splitcoast Stampers Color Challenge #468. (The challenge calls for Raspberry Ripple, but I didn’t have that so I substituted Rose Red.)  At first I was a little stuck with my design, but I am really pleased with the end result.  I would love to hear what you think too!  On March 31st I will do a drawing and one lucky person who leaves me a comment will win a handcrafted card in the mail!  Also, if you enjoy reading my posts, why not have them delivered to your inbox automatically.  Just click on the “follow” button in the sidebar.

secret garden (3 of 13)

I didn’t have any designer series paper in the challenge colors, so I decided to create my own!  I randomly stamped a piece of Very Vanilla card stock with the Secret Garden stamp set in Rose Red, Island Indigo, and Old Olive.  I didn’t want my stamped images to be too bold and overwhelming, so I stamped the Island Indigo and Old Olive stamps on a scrap sheet of paper before stamping them on my card stock.  This gave the colors a bit of a softer effect.  I wanted to tie in the black from my card base, so I chose a stamp from the Petite Petals stamp set (wood mount and clear mount) and used my Staz On Black ink to add it to my design.  I was trying to highlight the colors of the challenge without having too many big blocks of solid color or a pattern that was so bold it became distracting.  I think my floral stamped paper did just the trick! 

secret garden (9 of 13)

Once my stamping was done, I cut the panels for my card.  I placed a panel of Island Indigo side by side with a panel of my stamped design and adhered them to a Basic Black card base using SNAIL Adhesive.  Then I cut a panel of Basic Black and embossed it using the Lacy Brocade embossing folder and my Big Shot.  I cut two small squares of card stock; one in Island Indigo and and the other from my stamped paper.  I used SNAIL to attach the Island Indigo and Black pieces to the card front.  Then I used Stampin’ Dimensionals to attach my stamped square.

secret garden (13 of 13)

Next, I added a banner cut from Rose Red card stock.  I cut a 1/2″ strip of card stock and then used the Banner Punch (Sale-a-bration item) to shape the end of the banner.  Then I stamped a flower from the Secret Garden stamp set using my Island Indigo Classic Stampin’ Pad.  I used the Secret Garden Framelits to cut out my flower and some leaves from Old Olive card stock.  I used mini glue dots to adhere the leaves and then used Stampin’ Dimensionals to add my flower.  I chose the “You make me smile” greeting from the A Round Array stamp set (wood mount and clear mount), which I stamped in Rose Red ink on Very Vanilla card stock and cut out using the 7/8″ Scalloped Circle Punch.  The sentiment was also adhered using Stampin’ Dimensionals.  Finally, I added some Basic Pearl Jewel Accents to the center of my flower and the bottom left corner of my card for a finishing touch.

secret garden (8 of 13)
Of course, you may have noticed that I always like to finish the inside of my card with a coordinating accent.  I used the Secret Garden and Petite Petals stamp sets to mirror the design from the front of my card on a panel of Very Vanilla and adhered it to the inside of the card using SNAIL.  

I hope you have enjoyed today’s creation.  It was a great creative challenge for me and I really enjoyed putting it together.  If you liked my post today, I would appreciate it if you could help me out by pinning it to Pinterest.  I am still working on building up my blog following and I need all the help I can get to spread the word!  If you scroll to the bottom of the post, you will find a “pin it” button just below my supply list for the project… and, don’t forget to leave me a comment for your chance to win a handcrafted card in the mail!

If you would like to order the Secret Garden stamp set or any of the other beautiful products featured in this card, please click here to shop in my online store.  I would love to help you in your creative journey by becoming your personal Stampin’ Up! Demonstrator.  Remember it’s Sale-a-bration with Stampin’ Up! Choose from a wide variety of FREE items with any $50 purchase until March 31, 2014.

You can find a complete list of supplies, including card stock cuts at the very bottom of this post.

____________________________________________________________

Weekly Deals from Stampin’ Up!  March 4 – 10

Here are the new Weekly Deals from Stampin’ Up!:

Weekly Deals

Click here to see the Weekly Deals from Stampin’ Up! in my online store.  The Weekly Deals are only while supplies last and only available at these great prices through March 10.

____________________________________________________________

If you need any stamping supplies, I’d be very happy to be your Demonstrator.  Just click on Order Stampin’ Up! Online Now in the main menu or in the sidebar to go directly to my online store or drop me an email if you have any questions.

Happy Stamping!

Heather

  • It’s Sale-a-bration time!!  You’ll get a free item from Stampin’ Up! for every $50 that you purchase between now and March 31!  Click on my Stampin’ Up! Promotions page for more information!
  • Visit my online store here.
  • Shop the Clearance Rack here.

____________________________________________________________

Stampin’ Up! items used to create this project:

Stamp Sets: A Round Array (129090); Secret Garden (129144); Petite Petals (133155)

Dies, Punches, & Embossing Folders: Secret Garden Framelits Dies (129372); Lacy Brocade Textured Impressions Embossing Folder (127819); 7/8″ Scallop Circle Punch (129404); Banner Punch (Sale-a-bration item)

Embellishments: Basic Pearls Jewel Accents (119247)

Card Stock:  Basic Black (121045) – card base 4-1/4″ x 11″, 3-1/4″ x 3-1/2″ panel; Island Indigo (122923) – 1-3/4″ x 5-1/4″ panel, 2-1/4″ x 2-1/4″ square; Very Vanilla (101650) – 2-1/2″ x 5-1/4″ panel (stamped), 2″ x 2″ square (stamped), 4″ x 5-1/4″ panel (inside), one flower die cut, one 7/8″ scalloped circle punch (sentiment); Old Olive (100702) – one leaf die cut (Secret Garden Framelits); Rose Red (102544) – one banner.

Markers & Ink:  Rose Red Classic Stampin’ Pad (126954); Island Indigo Classic Stampin’ Pad (126986); Old Olive Classic Stampin’ Pad (126953); Stazon Black (101406)

Tools:  Big Shot (113439)

Adhesive: SNAIL (104332); Stampin’ Dimensionals (104430); Mini Glue Dots (103683)


Make a “Mosaic Madness” Wish with Stampin’ Up!

I have been having lots of fun with challenges this week.  I wanted to see how many challenges I could cover with a single card.  It really gets the creative juices flowing!  Today’s card features the Perfect Pennants (wood mount and clear mountand Mosaic Madness (wood mount and clear mount) stamp sets from Stampin’ Up!  I love that the Modern Mosaic stamp set also has a coordinating punch and embossing folder… oh the possibilities! LOL!

If you enjoy this card, please leave me a comment.  I would love to hear what you think.  On March 31st, I will do a drawing and one lucky person who left me a comment will receive a beautiful handcrafted card in the mail!  Also, if you enjoy reading my posts, why not have them delivered to your inbox automatically.  Just click on the “follow” button in the sidebar.

Mosaic Madness4

This card combines three challenges in one:  SCS Sketch Challenge #477,  Color Challenge #467, and SUO #91

Screen Shot 2014-03-01 at 10.14.17 PM

I began my card with a Bermuda Bay card base, then I dry embossed a Soft Sky panel using the Modern Mosaic Textured Impressions Embossing Folder.  I adhered this panel to the card base using SNAIL adhesive.  Next, I cut a banner in Midnight Muse card stock using the largest of the Banner Framelits Dies.  I trimmed 1/2 inch off of the banner from each side to make it the appropriate width for my card design.  Then, I added panels of Bermuda Bay and Very Vanilla using SNAIL.  (Before adhering the panels, I inked the outside edge of the Very Vanilla panel using a sponge dauber and my Bermuda Bay Classic Stampin’ Pad.)

Mosaic Madness2

After creating the basic design, it was time to add the details. I used Bermuda Bay ink for all of the stamping in this project.  I stamped the “Make a Wish” greeting from the Perfect Pennants stamp set (available as a bundle with the Banner Framelits Dies for a 15% discount off the regular price; wood mount and clear mount).

Mosaic Madness8

Next, I stamped some of the stamps from the Mosaic Madness stamp set and cut them out using the Mosaic Punch.  (The Mosaic Madness stamp set and the Mosaic Punch are also available as a bundle for 15% off the normal price; wood mount and clear mount.)  For a little bit of “bling” I added some Basic Rhinestone Jewel Accents to my punched pieces.  Finally, I stamped some banners using the Perfect Pennants and Banner Blast (Sale-a-bration item) stamp sets.  I punched out the small banners using the Banner Punch (Sale-a-bration item), and I attached all of the detail pieces to the front of the card using  Stampin’ Dimensionals.  

Mosaic Madness6

As a finishing touch, I added a Very Vanilla panel to the inside of my card and stamped it with the banner stamps I used on the front.

I am pleased with how this card turned out.  I like that it could be used for a man’s birthday card too.  I tend to make my cards very “girly” so this one is pretty neutral for me!  If you enjoyed my post, please pin it to Pinterest for me.  I am working on building up my blog following and could use your help in getting the word out!  If you scroll to the bottom of the post, you will find a “pin it” button just below my supply list for the project… and, don’t forget to leave me a comment for your chance to win a handcrafted card in the mail!

If you would like to order the Mosaic Madness stamp set, Perfect Pennants stamp set or any of the other beautiful products featured in this card, please click here to shop in my online store.  Remember it’s Sale-a-bration with Stampin’ Up! Choose from a wide variety of FREE items (including the Banner Punch and Banner Blast stamp set) with any $50 purchase until March 31, 2014.

You can find a complete list of supplies, including card stock cuts, and the very bottom of this post.

____________________________________________________________

Weekly Deals from Stampin’ Up! March 4-10

Here are the new Weekly Deals from Stampin’ Up!:

WEEKLY DEALS

We hope you enjoy this week’s Weekly Deals!

Coastal Cabana 3/8″ Ruffle Stretch Trim Item # 130024
Regular Price: 8.95 US/12.5 CAN
Discounted Price: 6.7125 US/9.375 CAN
Strawberry Slush 3/8″ Ruffle Stretch Trim Item # 130023
Regular Price: 8.95 US/12.5 CAN
Discounted Price: 6.7125 US/9.375 CAN
Adorning Accents Textured Impressions Embossing Folders Item # 125601
Regular Price: 8.95 US/10.95 CAN
Discounted Price: 6.7125 US/8.2125 CAN
Large Rhinestone Basic Jewels Item # 129324
Regular Price: 4.95 US/6.5 CAN
Discounted Price: 3.7125 US/4.875 CAN
Midnight Muse 3/8″ Stitched Satin Ribbon Item # 126847
Regular Price: 8.95 US/12.25 CAN
Discounted Price: 6.7125 US/9.1875 CAN
Betsy’S Blooms Stampin’ Around Standard Wheel Item # 126943
Regular Price: 6.5 US/7.95 CAN
Discounted Price: 4.875 US/5.9625 CAN
2012-2014 In Color Designer Series Paper Stack Item # 130137
Regular Price: 21.95 US/26.95 CAN
Discounted Price: 16.4625 US/20.2125 CAN
Everything Easter Ensemble – Digital Download Item # 129363
Regular Price: 14.95 US/16.5 CAN
Discounted Price: 8.97 US/9.9 CAN

Click here to see the Weekly Deals from Stampin’ Up! in my online store.  The Weekly Deals are only while supplies last and only available at these great prices through March 10.

____________________________________________________________

If you need any stamping supplies, I’d be very happy to be your Demonstrator.  Just click on Order Stampin’ Up! Online Now in the main menu or in the sidebar to go directly to my online store or drop me an email if you have any questions.

Happy Stamping!

Heather

  • It’s Sale-a-bration time!!  You’ll get a free item from Stampin’ Up! for every $50 that you purchase between now and March 31!  Click on my Stampin’ Up! Promotions page for more information!
  • Visit my online store here.
  • Shop the Clearance Rack here.

____________________________________________________________

Stampin’ Up! items used to create this project:

Stamp Sets: Mosaic Madness (130249); Perfect Pennants (133230); Banner Blast (Sale-a-bration item)

Dies, Punches, & Embossing Folders: Banner Framelits Dies (132173); Modern Mosaic Textured Impressions Embossing Folder (129984); Mosaic Punch (131267); Banner Punch (Sale-a-bration item)

Embellishments: Basic Rhinestones Jewel Accents (119246)

Card Stock:  Bermuda Bay (131197) – 4-1/4″ x 11″ card base, 2-1/2″ x 2-1/2″ panel (front of card), one banner; Soft Sky (131203) – 3-3/4″ x 5″ panel, two banners (banner punch); Midnight Muse (126843) – one large banner (Banner Framelits Dies); Very Vanilla (101650) – 2-1/4″ x 2-1/4″ panel (front of card), 3-3/4″ x 5″ panel (inside of card), two Mosaic Punches.  

Markers & Ink:  Bermuda Bay Classic Stampin’ Pad (131171)

Tools:  Big Shot (113439); Sponge Dauber (102892)

Adhesive: SNAIL (104332); Stampin’ Dimensionals (104430)


Blooming with Kindness and Elegance – Stampin’ Up!

Today’s card is my first step into the world of card challenges.  I created this card using the Blooming with Kindness stamp set from Stampin’ Up! (wood mount and clear mount), which I absolutely adore!  I think the bloom from that stamp set is simply gorgeous.  I can’t wait to send this one to someone special.  If you enjoy this card, please leave me a comment.  I would love to hear what you think.  On March 31st, I will do a drawing and one lucky person who left me a comment will receive a beautiful handcrafted card in the mail!  Also, if you enjoy reading my posts, why not have them delivered to your inbox automatically.  Just click on the “follow” button in the sidebar.

Blooming with Kindness4

This card combines three challenges in one:  Freshly Made Sketches #124, Clean and Simple #261, and Color Challenge #467

Screen Shot 2014-03-01 at 9.12.44 PM

I began my card with a Soft Sky card base, and layered it with panels of Midnight Muse and Very Vanilla card stock using SNAIL adhesive.   Then I used my Stamp-a-ma-jig to place the flower from the Blooming with Kindness stamp set. I stamped the image twice; first with my Soft Sky Classic Stampin’ Pad and then with Bermuda Bay.  I offset the two stamps just slightly to give the image some added depth.

Blooming with Kindness8

Next, I stamped the “Just for You” greeting from the Teeny Tiny Wishes stamp set (wood mount and clear mount) in Bermuda Bay ink and punched it out using the Word Window Punch.  I layered that onto a piece of Soft Sky card stock, cut out with the Modern Label Punch, and added two small Basic Pearl Jewel Accents on either side of the sentiment. I used Stampin’ Dimensionals to adhere my sentiment to a Large Oval in Midnight muse, and layered that onto an Extra Large Scalloped Oval in Bermuda Bay.  I adhered the whole combination to the front of the card using Stampin’ Dimensionals.

Blooming with Kindness3

Finally, I finished the inside of my card by stamping one of the border stamps from the Mosaic Madness stamp set (wood mount and clear mount) along the bottom edge of a Very Vanilla card stock panel.

Blooming with Kindness6

I love how this card came together.  The simple design and elegance of the flower make it special in my mind.  If you enjoyed my post, please pin it to Pinterest for me.  I am working on building up my blog following and could use your help in getting the word out!  If you scroll to the bottom of the post, you will find a “pin it” button just below my supply list for the project… and, don’t forget to leave me a comment for your chance to win a handcrafted card in the mail!

If you would like to order the Blooming with Kindness stamp set or any of the other beautiful products featured in this card, please click here to shop in my online store.  Remember it’s Sale-a-bration with Stampin’ Up! Choose from a wide variety of FREE items with any $50 purchase until March 31, 2014.

You can find a complete list of supplies, including card stock cuts, and the very bottom of this post.

____________________________________________________________

Weekly Deals from Stampin’ Up! February 25 – March 3

Here are the new Weekly Deals from Stampin’ Up!:

Click here to see the Weekly Deals from Stampin’ Up! in my online store.  The Weekly Deals are only while supplies last and only available at these great prices through March 3.

____________________________________________________________

If you need any stamping supplies, I’d be very happy to be your Demonstrator.  Just click on Order Stampin’ Up! Online Now in the main menu or in the sidebar to go directly to my online store or drop me an email if you have any questions.

Happy Stamping!

Heather

  • It’s Sale-a-bration time!!  You’ll get a free item from Stampin’ Up! for every $50 that you purchase between now and March 31!  Click on my Stampin’ Up! Promotions page for more information!
  • Visit my online store here.
  • Shop the Clearance Rack here.

____________________________________________________________

Stampin’ Up! items used to create this project:

Stamp Sets: Blooming with Kindness (126422); Teeny Tiny Wishes (127802); Mosaic Madness (130249)

Dies, Punches, & Embossing Folders: Word Window Punch (119857); Modern Label Punch (119849); Extra Large Scalloped Oval Punch (119856); Large Oval Punch (119855)

Embellishments: Basic Pearls Jewel Accents (119247)

Card Stock:  Soft Sky (131203) card base – 5-1/2″ x 8-1/2″, one modern label punch; Midnight Muse (126843) – 4-3/4″ x 3-1/2″ panel, large oval punch; Very Vanilla (101650) – 4-3/8″ x 3-1/8″ panel (front of card), 5″ x 3-3/4″ panel (inside), one word window punch; Bermuda Bay (131197) – Extra Large Scalloped Oval Punch

Markers & Ink:  Bermuda Bay Classic Stampin’ Pad (131171); Soft Sky Classic Stampin’ Pad (131181)

Tools:  Stamp-a-ma-jig (101049)

Adhesive: SNAIL (104332); Stampin’ Dimensionals (104430)


A “Beautifully Baroque” and “Mixed Bunch” Birthday! – Stampin’ Up!

The card I have created for you today features the Beautifully Baroque embossing folder and the Mixed Bunch stamp set (wood mount and clear mount).  It is not only beautiful, but also very quick!  The best of both worlds for this busy mom and teacher!  If you enjoy this card, please leave me a comment.  I would love to hear what you think.  On March 31st, I will do a drawing and one lucky person who left me a comment will receive a beautiful handcrafted card in the mail!  Also, if you enjoy reading my posts, why not have them delivered to your inbox automatically.  Just click on the “follow” button in the sidebar.

Beautifully Baroque Mixed Bunch7

This card is loosely based on the Freshly Made Sketches #124.

I began my card by cutting a panel of Whisper White stock, which I dry embossed using the Beautifully Baroque embossing folder and my Big Shot.  Then I cut my panel into thirds and adhered them to a Whisper White card base using  SNAIL adhesiveleaving about 1/8″ of space between the three panels.

Beautifully Baroque Mixed Bunch9

Next, I cut a thin strip of card stock and adhered a length of Strawberry Slush Stretch Ruffle Trim to it using SNAIL.  I layered that at the bottom of my embossed panels, then I stamped my flower from the Mixed Bunch stamp set on whisper white card stock using my Strawberry Slush Classic Stampin’ Pad and cut it out using the Blossom Punch.  For the center of my flower, I stamped a small medallion from the stamp set with the same ink on Strawberry Slush card stock.  The medallion was punched using the 7/8″ scalloped circle punch and layered on top of the flower using Stampin’ Dimensionals and finished with a Basic Pearl Jewel Accent.  I used my Banner Punch (Sale-a-bration item available FREE with a $50 purchase until March 31st) to cut out two small banners and used Stampin’ Dimensionals to adhere them to the card behind the flower.

Beautifully Baroque Mixed Bunch6

I finished my card by stamping the “Happy Birthday Wishes” greeting from the Simply Sketched stamp set (Hostess Reward Item) in the bottom corner of the card.  I used my Stamp-a-ma-jig to make sure I got the placement just right.  I just love that tool!  

As you can see, this card was very simple to make, but elegant none-the-less.  If you enjoyed my post, please pin it to Pinterest for me.  I am working on building up my blog following and could use your help in getting the word out!  If you scroll to the bottom of the post, you will find a “pin it” button just below my supply list for the project… and, don’t forget to leave me a comment for your chance to win a handcrafted card in the mail!

If you would like to order the Beautifully Baroque embossing folder or the Mixed Bunch  stamp set or any of the other beautiful products featured in this card, please click here to shop in my online store.  Remember you can earn the Banner Punch
 for FREE (Sale-a-bration item) with a $50 purchase.

You can find a complete list of supplies, including card stock cuts, and the very bottom of this post.

____________________________________________________________

Weekly Deals from Stampin’ Up! February 25 – March 3

Here are the new Weekly Deals from Stampin’ Up!:

Click here to see the Weekly Deals from Stampin’ Up! in my online store.  The Weekly Deals are only while supplies last and only available at these great prices through March 3.

____________________________________________________________

If you need any stamping supplies, I’d be very happy to be your Demonstrator.  Just click on Order Stampin’ Up! Online Now in the main menu or in the sidebar to go directly to my online store or drop me an email if you have any questions.

Happy Stamping!

Heather

  • It’s Sale-a-bration time!!  You’ll get a free item from Stampin’ Up! for every $50 that you purchase between now and March 31!  Click on my Stampin’ Up! Promotions page for more information!
  • Visit my online store here.
  • Shop the Clearance Rack here.

____________________________________________________________

Stampin’ Up! items used to create this project:

Stamp Sets: Mixed Bunch (125537); Simply Sketched (Hostess Item – 129672)

Dies, Punches, & Embossing Folders: Beautifully Baroque Embossing Folder (130917); Blossom Punch (125603); 7/8″ Scalloped Circle Punch (129404); Banner Punch (Sale-a-bration item)

Embellishments: Basic Pearls Jewel Accents (119247); Strawberry Slush Ruffle Stretch Trim (130023)

Card Stock:  Whisper White (100730) card base – 5-1/2″ x 8-1/2″, 3-3/4″ x 4″ panel (cut into thirds), 1/4″ x 4″ strip (to adhere ribbon), one flower (blossom punch); Strawberry Slush (131295) – small round medallion (7/8″ scalloped circle punch), two banners (banner punch)

Markers & Ink:  Strawberry Slush Classic Stampin’ Pad (131178)

Tools:  Big Shot (113439); Stamp-a-ma-jig (101049)

Adhesive: SNAIL (104332); Stampin’ Dimensionals (104430)


Sweet Sorbet and Chalk Talk Card – Stampin’ Up!

Today I have created a lovely card for you featuring the Chalk Talk stamp set (wood mount and clear mount) and Sweet Sorbet Designer Series Paper (Sale-a-bration item available FREE with a $50 purchase through March 31st!).  I wanted to create a beautiful card that would be quick and easy to put together.  If you enjoy this card, please leave me a comment.  I would love to hear what you think.  On March 31st, I will do a drawing and one lucky person who left me a comment will receive this beautiful card in the mail!  Also, if you enjoy reading my posts, why not have them delivered to your inbox automatically.  Just click on the “follow” button in the sidebar.

Chalk Talk & Sweet Sorbet15

I started my creation by cutting panels of Basic Black card stock, Sweet Sorbet Designer Series Paper, and Whisper White card stock.  I adhered the black and Sweet Sorbet panels together with SNAIL adhesive.  Then I used my Stamp-a-ma-jig to stamp the Chalk Talk stamp on the Whisper White panel using my Pool Party Classic Stampin’ Pad.  I added a strip of Coastal Cabana Stretch Ruffle Trim and adhered the white panel to the top of the Sweet Sorbet panel.   Then I adhered my layered panels to a Soft Sky card base.

Chalk Talk & Sweet Sorbet13

Next, I used my Basic Black Stampin’ Write Marker to color in a portion of the Chalk Talk stamp I used on the front of my card.  I used my Stamp-a-ma-jig to place it where I wanted it above and below my layered panels, recoloring the stamp before stamping it again.

Chalk Talk & Sweet Sorbet19

Finally, I used the Decorative Label Punch to create a background for my greeting with Pool Party card stock.  I stamped the “I’m So Grateful There’s You” sentiment from the Chalk Talk stamp set on Whisper White card stock using my Basic Black Classic Stampin’ Pad.  I layered those on the front of the card using Stampin’ Dimensionals, then I added a Basic Rhinestones Jewel Accent to each of the scrollwork details at the top and bottom of the card.

Chalk Talk & Sweet Sorbet7

I finished the inside of my card by layering a panel of Whisper White card stock on top of a Basic Black one.  I colored the Chalk Talk  stamp again with my Basic Black Stampin’ Write Marker and used my Stamp-a-ma-jig to center it at the bottom of the card.

This card was fun to create, and I hope that you have enjoyed reading about it.  If you did, please pin it to Pinterest for me.  I am new to blogging and I would love your help in developing a blog following.  If you scroll to the bottom of the post, you will find a “pin it” button just below my supply list for the project… and, don’t forget to leave me a comment for your chance to win today’s card!

If you would like to order the Chalk Talk stamp set or any of the other beautiful products featured in this card, please click here to shop in my online store.  Remember you can earn the Sweet Sorbet Designer Series Paper for FREE (Sale-a-bration item) with a $50 purchase.

You can find a complete list of supplies, including card stock cuts, and the very bottom of this post.

____________________________________________________________

Weekly Deals from Stampin’ Up! February 25 – March 3

Here are the new Weekly Deals from Stampin’ Up!:

Backyard Basics Framelits Dies Item # 129380 Regular Price: $24.95 Discounted Price: $18.71
Gold Metallic Encore Pad Item # 132141 Regular Price: $9.95 Discounted Price: $7.46
Basics Glimmer Brads Item # 121003 Regular Price: $4.95 Discounted Price: $3.71
Paper Doily Sizzlits Die Item # 125592 Regular Price: $21.95 Discounted Price: $16.46
Primrose Petals 3/8″ Stitched Satin Ribbon Item # 126844 Regular Price: $8.95 Discounted Price: $6.71
Summer Starfruit 3/8″ Stitched Satin Ribbon Item # 126846 Regular Price: $8.95 Discounted Price: $6.71
Season By Season Kit – Digital Download Item # 130060 Regular Price: $9.95 Discounted Price: $5.97

Click here to see the Weekly Deals from Stampin’ Up! in my online store.  The Weekly Deals are only while supplies last and only available at these great prices through February 17.


____________________________________________________________

If you need any stamping supplies, I’d be very happy to be your Demonstrator.  Just click on Order Stampin’ Up! Online Now in the main menu or in the sidebar to go directly to my online store or drop me an email if you have any questions.

Happy Stamping!

Heather

  • It’s Sale-a-bration time!!  You’ll get a free item from Stampin’ Up! for every $50 that you purchase between now and March 31!  Click on my Stampin’ Up! Promotions page for more information!
  • Visit my online store here.
  • Shop the Clearance Rack here.

____________________________________________________________

Stampin’ Up! items used to create this project:

Stamp Sets: Chalk Talk (130634)

Dies, Punches, & Embossing Folders: Decorative Label Punch (120907)

Embellishments: Basic Rhinestone Jewel Accents (119246); Coastal Cabana Ruffle Stretch Trim (130024)

Card Stock:  Soft Sky (131203) card base – 5-1/2″ x 8-1/2″; Basic Black (121045) – 3-3/4″ x 3-3/4″ panel, 3-3/4″ x 5″ panel (inside of card); Whisper White (100730) – 3″ x 3″ panel, 3-1/2″ x 4-3/4″ panel (inside of card), one sentiment (oval); Sweet Sorbet Designer Series Paper (Sale-a-bration item) – 3-1/2″ x 3-1/2″ panel; Pool Party (122924) – one decorative label punch

Markers & Ink:  Basic Black Classic Stampin’ Pad (126980); Pool Party Classic Stampin’ Pad (126982); Basic Black Stampin’ Write Marker (100082)

Tools:  Stamp-a-ma-jig (101049)

Adhesive: SNAIL (104332); Stampin’ Dimensionals (104430)

Life is Wonderful with Perfect Pennants and Mixed Bunch from Stampin’ Up!

My card today was created using the Perfect Pennants, Mixed Bunch, and Flower Shop stamp sets from Stampin’ Up!  It also features the Modern Mosaic and Decorative Dots (Sale-a-bration item) embossing folders.  The Decorative Dots embossing folder is one of my favorite items available FREE with a $50 purchase through March 31st!  There are just so many things you can create with that cute design.  So, if you love this card and want to get some of the supplies, now is a great time.  For your convenience, I have hyperlinked the names of products to my online store… just click and you’ll be on your way to creating this beautiful card too!

Perfect Pennants Mixed Bunch3

I started my creation by cutting panels of Whisper WhiteCoastal Cabana and So Saffron card stock.  Next, I dry embossed the Coastal Cabana and So Saffron panels using the Modern Mosaic and Decorative Dots embossing folders using my Big Shot Die-Cut Machine.  Then, I added some Coastal Cabana Stretch Ruffle Trim to the top of the yellow panel with SNAIL adhesive.  I used the Adorning Accents Edgelits to cut a scalloped strip of Whisper White card stock, and I used a small hole punch to create a hole at each scallop to give my trim an eyelet lace effect.  Finally, I  adhered it to the bottom of the Coastal Cabana panel and layered all of my panels on a  Basic Gray card base.

Perfect Pennants Mixed Bunch12

Once the foundation for my card was finished, it was time to embellish it with a lovely flower and my card greeting.  I chose the “Life doesn’t have to be perfect to be wonderful” sentiment from the Perfect Pennants stamp set (wood mount and clear mount) for my greeting.  I love this one because it can be used for many different occasions.  I stamped it on Whisper White card stock using the Basic Gray Classic Stampin’ Padthen I cut it out using the 3rd smallest Banner Framelits Die.   (Remember, the Perfect Pennants stamp set and Banner Framelits Dies can be purchased together as a bundle for 15% off the regular price. Available in wood mount or clear mount bundles.)

Perfect Pennants Mixed Bunch17

After stamping the greeting, I used a sponge dauber to apply ink to the edges of my banner for a little added contrast.  I attached a brad from the Vintage Trinkets accents and elements  set to the top of the banner and stuck it to the front of my card using Stampin’ Dimensionals.  I stamped two round medallions using my  Coastal Cabana Classic Stampin’ Pad and inked around the edges after I cut them out.  Then I attached one of them to the bottom of the banner using Stampin’ Dimensionals.  I set the other one aside to use on the inside of my card later.

Perfect Pennants Mixed Bunch5

For my flower, I used my So Saffron Classic Stampin’ Pad to stamp a large flower using the Mixed Bunch stamp set (wood mount and clear mount) and a small flower using the Flower Shop stamp set (wood mount and clear mount).  Then I punched out the flowers using the Blossom Punch and the Pansy Punch.  (The Flower Shop stamp set and Pansy Punch are available as a bundle for 15% discount off the regular price.  Available in  wood mount and clear mount).

The leaves of the flower were stamped using the leaf stamp from the  Secret Garden stamp set (wood mount and clear mount) and my Pear Pizzazz Classic Stampin’ Pad.  I inked up my leaf stamp and then stamped it twice without re-inking between stamps.  This gave my design some added dimension and contrast.  Then I used the Secret Garden Framelits Dies to cut out the leaf images.

Perfect Pennants Mixed Bunch12

Finally, I attached my leaves with Glue Dots and layered my flowers using Stampin’ Dimensionals.  The center of the flower was finished by adding a large pearl from the Basic Pearls Jewel Accents.

Perfect Pennants Mixed Bunch13

I finished the inside of my card by adding a panel of Whisper White card stock with a strip of So Saffron card stock along the bottom.  I brushed Coastal Cabana ink along the bottom edge of the trim using a sponge dauber to give it some extra contrast.  Then I attached the second medallion I created earlier to the center of the yellow strip using Stampin’ Dimensionals.

I hope you have enjoyed my share today.  I certainly enjoyed creating it.  I just love the color combination.  I know that someone special will enjoy receiving it at just the right moment.

If you would like to order the Perfect Pennants, Mixed Bunch, or Flower Shop stamp sets and earn the Decorative Dots embossing folder for FREE (Sale-a-bration item), please click here to shop in my online store.

You can find a complete list of supplies, including card stock cuts, and the very bottom of this post.

____________________________________________________________

Weekly Deals from Stampin’ Up! February 18-24

Here are the Weekly Deals from Stampin’ Up!:

Click here to see the Weekly Deals from Stampin’ Up! in my online store.  The Weekly Deals are only while supplies last and only available at these great prices through February 17.

____________________________________________________________

Clearance Rack Updated!

Screen Shot 2014-02-18 at 6.30.12 AM

Stampin’ Up! has updated the Clearance Rack in the online store!  I saw some punches, dies, card stock, DSP and embellishments at great deals.  And Clearance Rack items count toward your merchandise total for Sale-a-bration items!!  So click here to head over and start shopping now!  Clearance Rack deals are only available while supplies last.

____________________________________________________________

If you need any stamping supplies, I’d be very happy to be your Demonstrator.  Just click on Order Stampin’ Up! Online Now in the main menu or in the sidebar to go directly to my online store or drop me an email if you have any questions.

Happy Stamping!

Heather

  • It’s Sale-a-bration time!!  You’ll get a free item from Stampin’ Up! for every $50 that you purchase between now and March 31!  Click on my Stampin’ Up! Promotions page for more information!
  • Visit my online store here.
  • Shop the Clearance Rack here.

____________________________________________________________

Stampin’ Up! items used to create this project:

Stamp Sets: Perfect Pennants (133230); Mixed Bunch (125537); Flower Shop (130942); Secret Garden (129144)

Dies, Punches, & Embossing Folders: Banner Framelits Dies (132173); Secret Garden Framelits Dies (129372); Modern Mosaic Embossing Folder (129984); Adorning Accents Edgelits (125595); Blossom Punch (125603); Pansy Punch (130698); Decorative Dots Embossing Folder  (Sale-A-Bration item available FREE with $50 purchase until March 31, 2014)

Embellishments: Basic Pearl Jewel Accents (119247); Coastal Cabana Ruffle Stretch Trim (130024); Vintage Trinkets Accents & Elements – Brad (118764)

Card Stock:  Basic Gray (121044) – 4-14″ x 11″ card base; Whisper White (100730) – two 3-3/4″ x 5″ panels (front and inside of card),  one greeting (Banners Collection Framelits), strip for Adorning Accents Edgelits trim, two flowers, two leaves, two small medallions; Coastal Cabana (130024) – 3-1/2″ x 3-1/2″ panel; So Saffron (105118) – 3-1/2″ x 1-1/2″ panel, and 1/4″ x 3-3/4″ strip for inside of card.

Markers & Ink:  Basic Gray Classic Stampin’ Pad (126981); So Saffron Classic Stampin’ Pad (126957); Coastal Cabana Classic Stampin’ Pad (131175); Pear Pizzazz Classic Stampin’ Pad (131180)

Tools:  Big Shot Die-Cutting Machine (113439); Sponge Daubers (102892)

Adhesive: SNAIL (104332); Stampin’ Dimensionals (104430); Glue Dots (103683)

A “See Ya Later” Birthday Sale-A-Bration – Stampin’ Up!

Today’s share was created using the See Ya Later stamp set and Decorative Dots (Sale-a-bration items) embossing folder from Stampin’ Up! Both of these items are available FREE with a $50 purchase through March 31st!  I just love this card!  I can’t wait to send it to someone special.

See Ya Later Birthday SAB7

I wish I could take full credit for this cute design, but I actually got the idea from a similar card I saw on Pinterest, created by Selene Kempton.  I changed it up a little bit to make it my own, but I want to be sure to give credit where credit is due.

See Ya Later Birthday SAB9

I started by cutting panels of Coastal Cabana and Pink Pirouette card stock.  Next, I dry embossed the pink panel using the Decorative Dots embossing folder and my Big Shot Die-Cut Machine.

See Ya Later Birthday SAB11

I used the three largest Banner Framelits Dies to cut banners from the Birthday Basics Designer Series Paper.  I wanted my banners to be different lengths, but they were too wide for my project, so I trimmed each of them to be 1-1/4 inches wide. Then I adhered them to the Pink Pirouette panel using SNAIL adhesive.

See Ya Later Birthday SAB12

I wrapped my pink panel with Coastal Cabana Stretch Ruffle Trim and tied it in a knot. Then I adhered the two panels together and placed them on a Whisper White card base using SNAIL.

See Ya Later Birthday SAB8

I used stampin’ write markers (So Saffron, Wild Wasabi, Strawberry Slush, & Coastal Cabana) to color the birthday sentiment from the See Ya Later stamp set.  Then I used the Labels Collection Framelits to cut it out.

Next I used a sponge dauber to color the edges of the sentiment using my Strawberry Slush Classic Stampin’ Pad and adhered the final product to the card front using Stampin’ Dimensionals.

See Ya Later Birthday SAB3

Finally, I completed the front of the card by adding three small Basic Rhinestones Jewel Accents in the bottom right hand corner.

See Ya Later Birthday SAB4

I finished the inside of my card by adding a strip of Coastal Cabana card stock along the bottom.  Then I used the banner punch (Sale-a-bration item) to create three small banners using the same Birthday Basics Designer Series Paper which was used on the front of the card.

I hope you have enjoyed my share today.  I certainly enjoyed creating it.  If you would like to place an order and earn the See Ya Later stamp set, Decorative Dots embossing folder, or the banner punch for FREE (Sale-a-bration items), please click here to shop in my online store.

You can find a complete list of supplies, including card stock cuts, and the very bottom of this post.

____________________________________________________________

Weekly Deals from Stampin’ Up! February 18-24

Here are the Weekly Deals from Stampin’ Up!:

Click here to see the Weekly Deals from Stampin’ Up! in my online store.  The Weekly Deals are only while supplies last and only available at these great prices through February 17.

____________________________________________________________

Clearance Rack Updated!

Screen Shot 2014-02-18 at 6.30.12 AM

Stampin’ Up! has updated the Clearance Rack in the online store!  I saw some punches, dies, card stock, DSP and embellishments at great deals.  And Clearance Rack items count toward your merchandise total for Sale-a-bration items!!  So click here to head over and start shopping now!  Clearance Rack deals are only available while supplies last.

____________________________________________________________

If you need any stamping supplies, I’d be very happy to be your Demonstrator.  Just click on Order Stampin’ Up! Online Now in the main menu or in the sidebar to go directly to my online store or drop me an email if you have any questions.

Happy Stamping!

Heather

  • It’s Sale-a-bration time!!  You’ll get a free item from Stampin’ Up! for every $50 that you purchase between now and March 31!  Click on my Stampin’ Up! Promotions page for more information!
  • Visit my online store here.
  • Shop the Clearance Rack here.

____________________________________________________________

Stampin’ Up! items used to create this project:

Stamp Sets: See Ya Later (Sale-A-Bration item available FREE with $50 purchase until March 31, 2014)

Dies, Punches, & Embossing Folders: Banner Framelits Dies (132173); Labels Collection Framelits (125598); Decorative Dots Embossing Folder & Banner Punch (Sale-A-Bration Free items with $50 purchase)

Embellishments: Basic Rhinestone Jewel Accents (119246)

Card Stock:  Whisper White (100730) – 4-14″ x 11″ card base, one sentiment label (Labels Collection Framelits); Coastal Cabana (130024) – 4″ x 5-1/4″ panel, and 1/4″ x 4-1/4″ strip for inside of card; Pink Pirouette (111351) – 3-3/4″ x 5″ panel.

Designer Series Paper: Birthday Basics (130145) – 3 large banners (Banners Framelits Dies) and 3 small banners (Banner Punch)

Markers & Ink:  Strawberry Slush Classic Stampin’ Pad (131178); So Saffron & Wild Wasabi Stampin Write Markers – Subtles Collection (131263); Coastal Cabana and Strawberry Slush Stampin’ Write Markers – In Color 2013-2015 Collection (131260)

Tools:  Big Shot Die-Cutting Machine (113439); Sponge Daubers (102892)

Adhesive: SNAIL (104332); Stampin’ Dimensionals (104430)