Blended Bloom Meets Work of Art – Stampin’ Up!

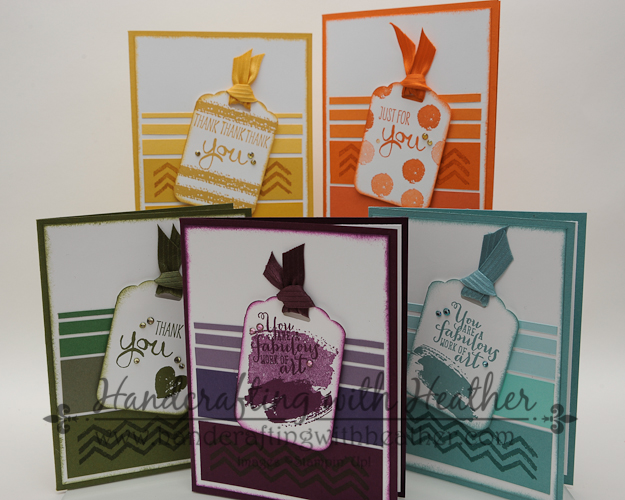
When I first saw the Work of Art stamp set at the Stampin’ Up! 2014 Annual Catalog Premiere, I’ll be honest, I wasn’t sure about it.  But, I love a free gift, so I was excited to try it out when we received it at the end of the night.  Boy, was my first impression wrong!  I have really enjoyed working with that set!  And, the Blended Bloom stamp is quickly becoming a favorite!  I think it is going to give my Blooming with Kindness stamp set a run for its money when it comes to “ink time.”  If you are a regular reader of my blog, you know I love that Blooming with Kindness flower! LOL.

Blended Bloom & Work of Art (2 of 9)

It has been so much fun playing with all my new items from the 2014 annual catalog pre-order.  If you haven’t seen the new catalog yet, now is a great time to get your hands on one so you can get your wish list ready for the official launch on June 2nd.  I will be mailing out complimentary copies to all my customers who place an order of $25 or more during the month of May.

Blended Bloom & Work of Art (5 of 9)
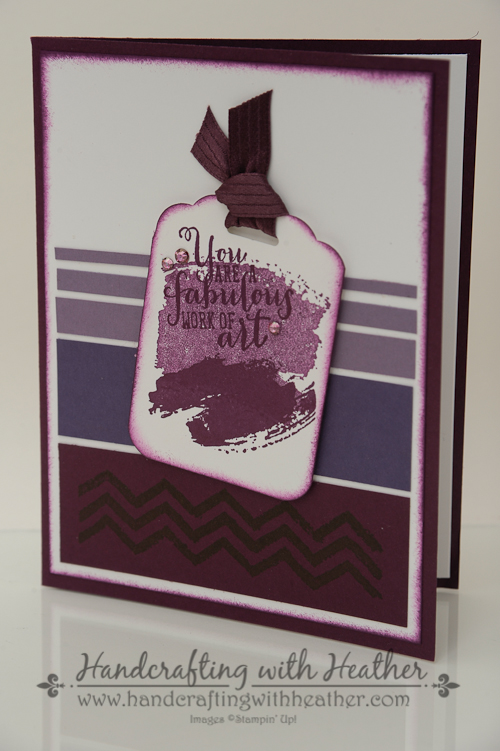
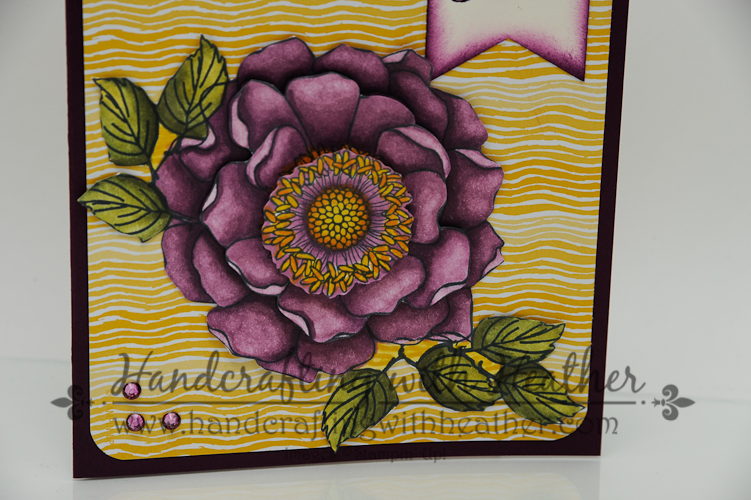
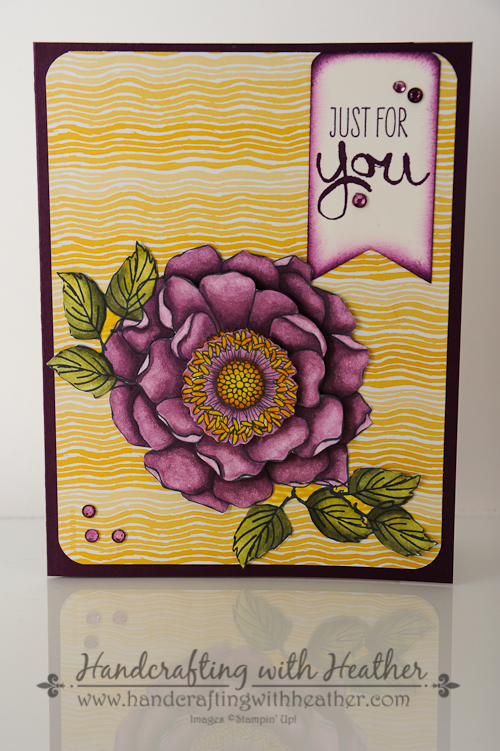
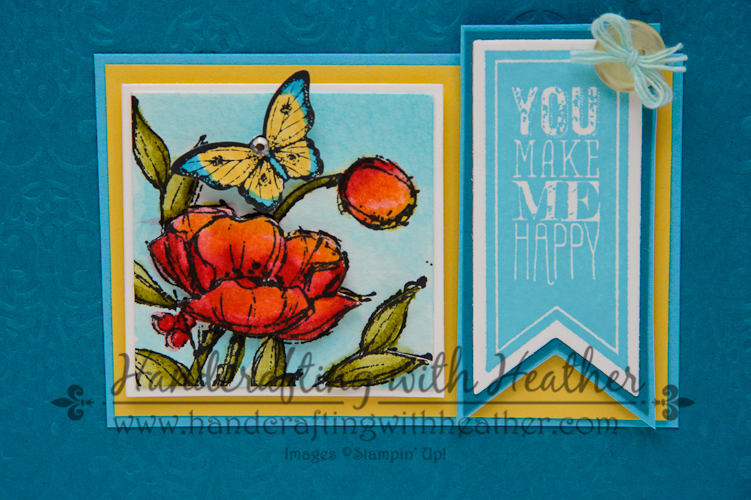
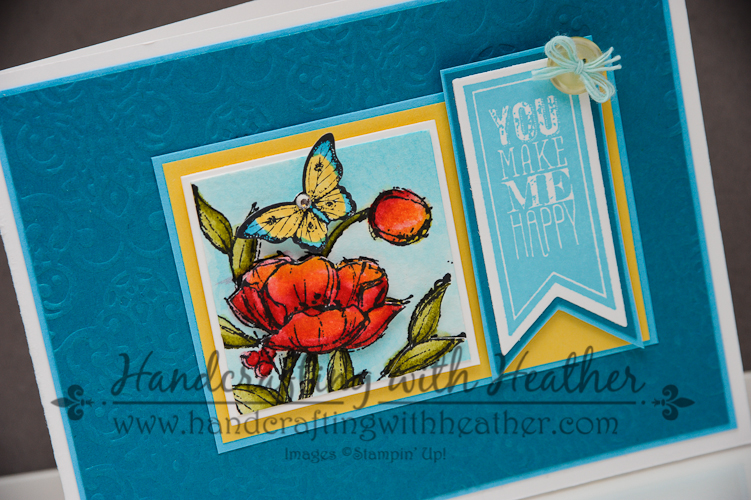
I chose a Blackberry Bliss card base for my project today.  It is one of the new In Colors, and I am totally in love with this dark, regal shade of purple.  Next, I stamped the Blended Bloom stamp in the corner of a panel of Whisper Whisper white card stock using Memento Tuxedo Black Ink.  While I was at it, I also stamped a second flower on another sheet of card stock.  Blended Bloom & Work of Art (3 of 9)

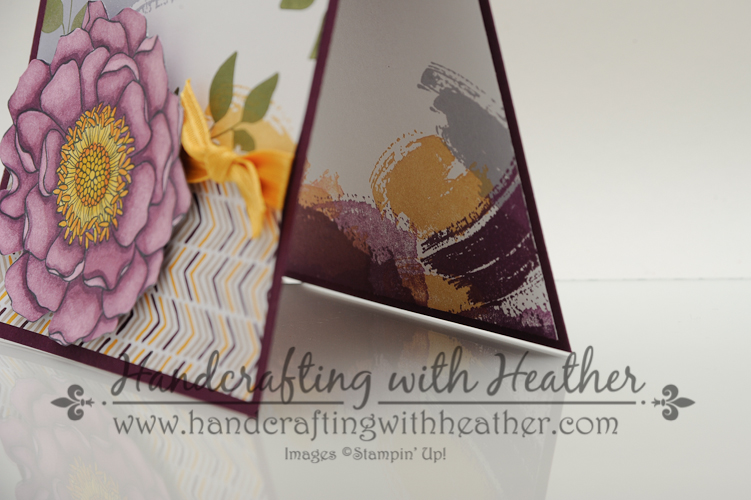
Next,  I stamped the leaf image from the Summer Silhouettes stamp set along the edges of my Whisper White panel using Mossy Meadow ink (another new In Color).  For some of the images, I stamped off then stamped on the card, to give greater range of color in my card design.  Then, I stamped the paint splotches (yes, that is a technical term) in Wisteria Wonder and Hello Honey.  For the Hello Honey “paint” I stamped off once before stamping on my card to give the color a little softer effect.

Blended Bloom & Work of Art (9 of 9)

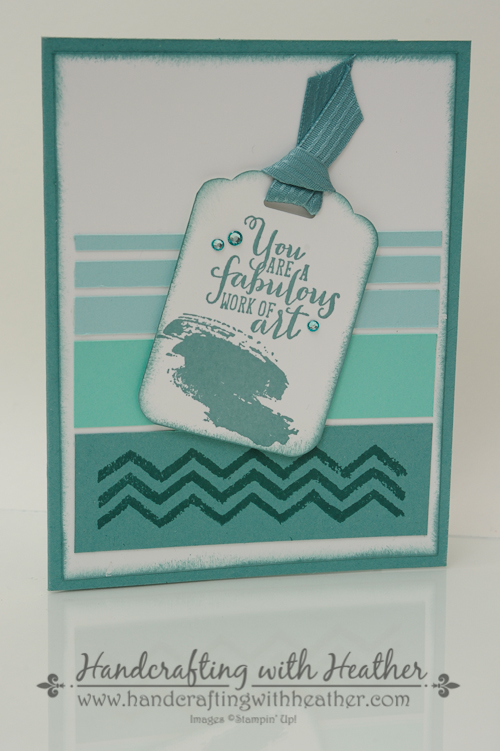
I just love the “You are a Fabulous Work of Art” sentiment from the Work of Art stamp set. The font is whimsical, and I adore the affirming message.  I used Blackberry Bliss ink and my stamp-a-ma-jig to make sure I got the placement just perfect.  Then it was time for some coloring!

Blended Bloom & Work of Art (6 of 9)

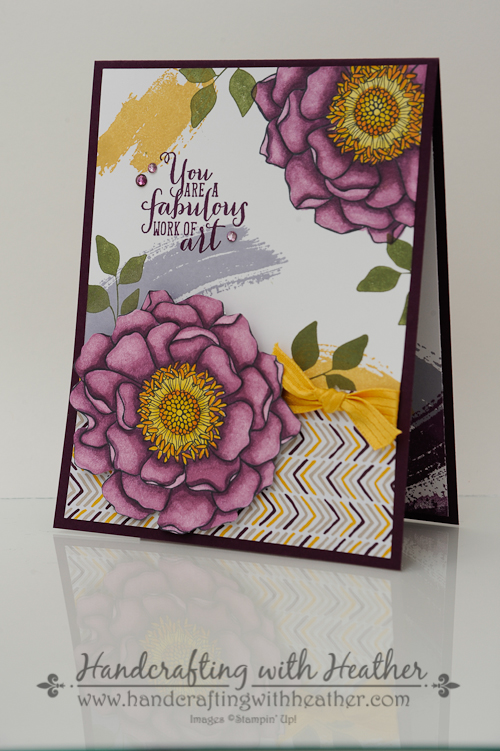
I used my new Stampin’ Blendabilities markers (release date TBD) in Rich Razzleberry, Daffodil Delight, and Pumpkin Pie to color in my flower images.  I used the “dark to light” method (click here to see my video tutorial) to achieve the beautifully blended contrast and shading.  Once my flowers were both colored, I cut out the second flower I had stamped and set it aside until my card front was finished.

Blended Bloom & Work of Art (5 of 9)

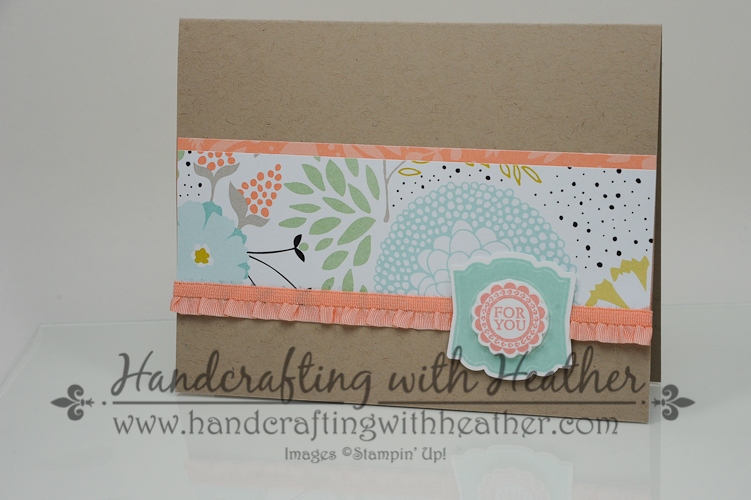
I added a panel of Designer Series Paper from the Moonlight Paper Stack to the bottom of my stamped panel using SNAIL.  I ran SNAIL adhesive across the place where my two panels joined on the front of the card, leaving a 1″ gap where I wanted to put my knot.   Then I added a length of Hello Honey 3/8″ Stiched Satin Ribbon to my combined panel and anchored it on the back with SNAIL.  I slid a shorter piece of the ribbon under that one (where I had left a space in my adhesive) and tied it in a knot.  I have found that this method saves on materials, because  you don’t have to wrap the ribbon all the way around the panel.

Blended Bloom & Work of Art (9 of 9)

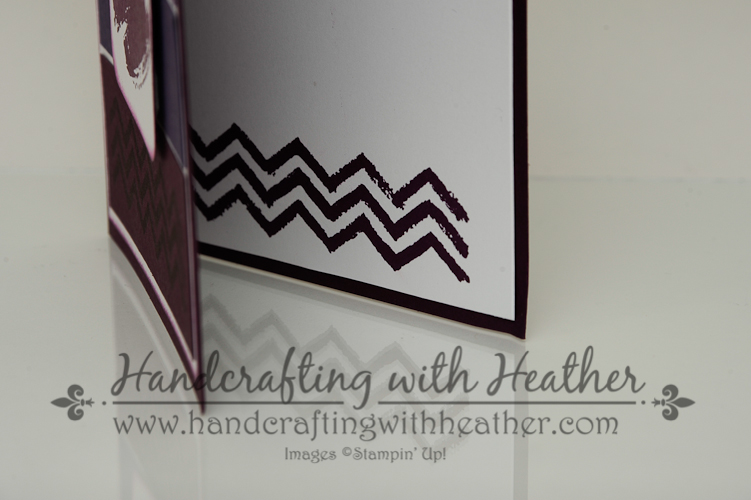
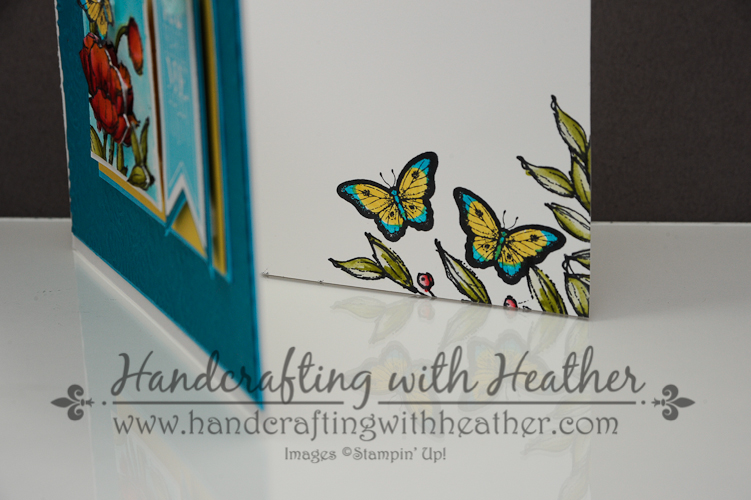
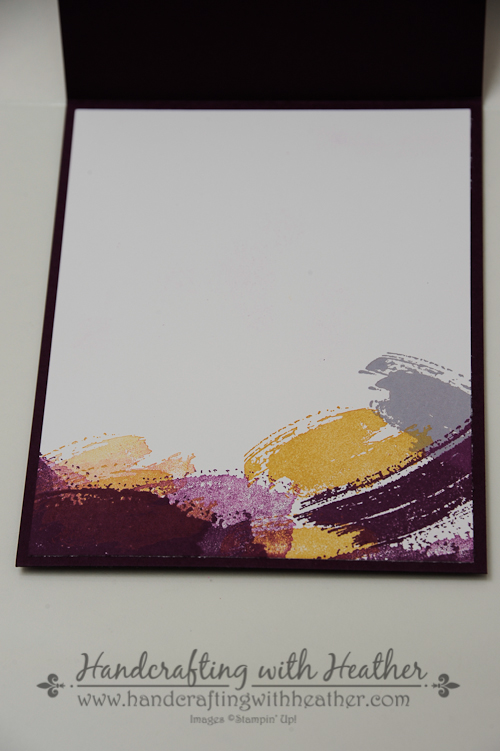
Finally, I added my flower to the bottom of the card using Stampin’ Dimensionals, and added some rhinestones that I colored using the Stampin’ Blendabilties.  For the inside of my card, I created an abstract design using the paint splotches from Work of Art.

Blended Bloom & Work of Art (8 of 9)

Blended Bloom & Work of Art (7 of 9)

I am really happy with how this card turned out.  I hope you like it too.  As always, if you are a fan, please pin this project to Pinterest and leave me a comment.  You will find a “pin it” button at the very bottom of this post below the supply list and cards stock cuts.  Also, if you like my work, why not subscribe to my blog via email.  All you have to do is click on “follow” in the sidebar.

I hope you will consider selecting me as your demonstrator for your purchases of these great new products and all your other stamping supplies.  If you need any stamping supplies you can shop now in my online store!  Also, remember that I’ve got a stack of brand new catalogs hot off the presses waiting for you.  If you place an order of $25 or more during the month of May, I will send you your very own copy free of charge!  Feel free to drop me an email if you have any questions.  I’m here to help!

Happy Stamping!

Heather

  • Visit my online store here.
  • Shop the Clearance Rack here.

WEEKLY DEALS for May 13-19

weekly deals 5-13

Click here to see the Weekly Deals from Stampin’ Up! in my online store.  The Weekly Deals are only while supplies last and only available at these great prices through May 19.


Stampin’ Up! items used to create today’s project:

If you would like to order any of the products featured in today’s project, click the images below to order from my online store. (Keep in mind that some sneak peek items will not be available for purchase until June 2, 2014.)

Card Base: Blackberry Bliss – 4-1/4″ x 11″

Panels: Whisper White – 4″ x 3-1/2″ panel (front), 4″ x 5-1/4″ panel (inside); Moonlight DSP – 4″ x 1-3/4″ panel

Sneak Peek at the New 2014-2016 In Colors from Stampin’ Up!

I am having such a great time playing with all of my pre-order items.  Today, I want to introduce you to the new 2014-2016 In Colors: Tangelo Twist, Hello Honey, Mossy Meadow, Lost Lagoon, and Blackberry Bliss.  Aren’t they just yummy!  At first when I saw them I noticed how similar some of them are to existing colors from Stampin’ Up!, but as I work with them more, I realize that each has its own unique characteristics.  Although some of the differences are subtle, they are important and lead to a more complete palette of color choices.  So, without further ado, here are your new In Colors!

Work of Art In Colors (1 of 17)

For each card in this set, I paired the In Color with two other existing colors for my ombre background.  I stamped the In Color with the chevron design from the Work of Art stamp set (available in June) so it would be easy to identify which one is the new color.  I also used the In Colors for the card base and tag design.  To finish things off, I added the beautiful new 3/8″ stitched satin ribbon to the top of the tag.  I love this ribbon!  It is so pretty, with a little bit of texture for a special added detail.

Work of Art In Colors (6 of 17)

Background Colors (bottom to top):  Tangerine Tango, Tangelo Twist (In Color), Pumpkin Pie

Work of Art In Colors (8 of 17)

Crushed Curry, Hello Honey, Daffodil Delight

Work of Art In Colors (10 of 17)

Mossy Meadow, Always Artichoke, Garden Green

Work of Art In Colors (13 of 17)

Lost Lagoon, Coastal Cabana, Pool Party

Work of Art In Colors (15 of 17)

Blackberry Bliss, Elegant Eggplant, Perfect Plum

Work of Art In Colors (8 of 17)

Work of Art In Colors (11 of 17)

To add a little bling to my cards, I finished off each tag with some rhinestones that I colored with the new Stampin’ Blendabilities Markers.  Then I stamped the chevron design on the inside of the card to tie everything together.

Work of Art In Colors (16 of 17)

I know that when you are able to get your hands on these great new In Colors you will fall in love with them too.  I adore the deep, rich purple of Blackberry Bliss and the calming effects of Lost Lagoon.  Mossy Meadow adds a nice new shade to the green color family offered by Stampin’ Up!  It has a little more lushness than Always Artichoke, but isn’t as vibrant as Garden Green.  Tangelo Twist provides a bit of a rusty undertone to the orange color family, while hello honey has some greenish undertones that remind me of dijon mustard.

Work of Art In Colors (1 of 17)

I hope you have enjoyed getting to know each of these new In Colors today.  I hope you will consider selecting me as your demonstrator for your purchases of these great new shades when they become available in June.  In the meantime, if you need any stamping supplies you can shop now in my online store!  I’ve received the new annual catalogs from Stampin’ Up! and I will be mailing out complimentary copies to all my customers who place an order of $25 or more during the month of May!  Feel free to drop me an email if you have any questions.  I’m here to help!

If you like today’s project, please pin it to Pinterest and leave me a comment.  You will find a “pin it” button at the very bottom of this post below the supply list and cards stock cuts.  Also, if you like my work, why not subscribe to my blog via email.  All you have to do is click on “follow” in the sidebar.

Happy Stamping!

Heather

  • Visit my online store here.
  • Shop the Clearance Rack here.

WEEKLY DEALS for May 13-19

weekly deals 5-13

Click here to see the Weekly Deals from Stampin’ Up! in my online store.  The Weekly Deals are only while supplies last and only available at these great prices through May 19.


Stampin’ Up! items used to create today’s project:

If you would like to order any of the products featured in today’s project, click the images below to order from my online store.

Card Base: Tangelo Twist, Hello Honey, Mossy Meadow, Lost Lagoon, Blackberry Bliss – 5-1/2″ x 8-1/2″

Panels: Whisper White – 4″ x 5-1/4″ two panels (front and inside)

Colored strips for background: Darkest Color – 1-1/4″ x 3-3/4″ strip; Medium Color – 1″ x 3-3/4″ strip; Lightest Color – three strips 3-3/4″ wide and approximately 1/8″, 1/4″, and 3/8″ tall. (I did not measure for these, I just made one skinny strip, and then made the next two slightly larger each time.)

Sentiment & Die Cuts:  Whisper White – 2″ x 3″ Scalloped Tag


Sneak Peek at the New Blendabilities from Stampin’ Up!

NEW!  Blendabilities from Stampin’ Up!

Now is a great time to be a Stampin’ Up! Demonstrator!  I just got my pre-order in the mail, so today’s project is a sneak peek at the brand new Stampin’ Blendabilities Markers.  These markers are a new line of product that will be introduced with the 2014 annual catalog on June 2nd. Unfortunately, there has been a delay for their initial release, so they will not be available for purchase right away, but I’m so excited about them that I wanted to show you what these beautiful markers can do anyway!  I will keep you updated about exactly when they will be available.  This project is full of sneak peeks for you.  I used the Blended Bloom stamp because  it cried out to me… “Heather, color me, please!”  Isn’t it lovely?  You are also getting a sneak peek at some of the brand new 2014-2015 In Colors and the Work of Art stamp set from Stampin! Up!

Blended Bloom (1 of 10)

I’m sure you are excited to try Blendabilities out too, but in the meantime, I wanted to take a few moments to share with you some of the features and benefits of these fantastic new markers.

What Sets Them Apart:

  • The Stampin’ Up! rectangular barrel keeps your markers from rolling away!
  • Flat storage helps to maintain the life of each marker.
  • Each marker comes with a tip on each end: brush and fine.
  • Marker tips are made of nylon, which is superior to polyester which can fray.
  • Color coded caps.
  • Stampin’ Up! markers coordinate wonderfully with our cardstock, and can be used with transparent sheets.
  • Blendabilities are alcohol based, which makes them colorfast and allows them to blend with each other beautifully.
  • You can color on anything… rhinestones, buttons, window sheets, etc.

These exclusive alcohol-based marker sets, come in a 3-pack of light, medium and dark shades (of the same color ), and provide your projects a more saturated look with blended colors. Stampin’ Up! recommends using Whisper White Cardstock with your Stampin’ Up! Blendabilities, but any one of our cardstocks would work just as well.

Blended Bloom (3 of 10)I began with one of the brand new In Colors for my card base, Blackberry Bliss.  It is a gorgeous rich dark shade of purple.  Then I layered on a panel of Designer Series Paper from the Moonlight DSP Stack, which I punched using the Envelope Punch Board to round the corners.  This one is also a new In Color called Hello Honey.  In an upcoming post, I will show you all of the new In colors with some comparisons to other current Stampin’ Up! colors…. so stay tuned.

Blended Bloom (4 of 10)

Next, I got out my yummy new Stampin’ Blendabilities markers, which I absolutely adore.  They are my new favorite item for sure!  The colors blend together so nicely, giving a watercolor effect but with much more saturated colors.  Love, love, love!  For my art piece today I stamped the Blended Bloom flower onto Whisper White card stock three times.  Then I stamped the leaf image from Fabulous Florets several times around one of the floral images.  (Remember, Fabulous Florets is on the retiring list, so if you haven’t got it in your collection, you should try to grab it before it is gone.)

Blended Bloom (5 of 10)

I stamped the image three times because I wanted to cut out several layers to give my card some dimension.  I began by coloring in the darkest areas of my flower first and then blending in lighter and lighter colors as I moved outward on each petal.  I colored in only the part of the flower that was necessary for each layer, then I “fussy cut” them out using my paper snips.  I put the layers together using Stampin’ Dimensionals and added the flower to the front of my card using Multipurpose Liquid Glue.

Blended Bloom (10 of 10)

Because the Blendabilities work a little differently than regular markers, I plan to create a video for you in the coming weeks that will show some techniques for using them.  Again, stay tuned for more great things from Handcrafting with Heather! 🙂

Blended Bloom (7 of 10)

For my sentiment, I chose the Work of Art stamp set featured in the new annual catalog.  I stamped it in Blackberry Bliss ink on a strip of Very Vanilla card stock and used my hexagon punch to create the banner effect at the bottom.  I used a sponge dauber to ink around the edges of the banner using the same color.

Blended Bloom (6 of 10)

Finally, I used my Stampin’ Blendabilities to color in some rhinestones to match the color scheme of my card.  Yes, that’s right, you can color on just about anything using Blendabilities!

Blended Bloom (9 of 10)

To finish off the inside of my card, I stamped a brush stroke border from Work of Art in Blackberry Bliss and then layered on a strip of the Hello Honey Designer Series Paper from the front of the card.

Blended Bloom (8 of 10)

I hope you have enjoyed my project today.  I certainly had fun playing with all my new products!  If you like this card, please pin it to Pinterest and leave me a comment.  You will find a “pin it” button at the very bottom of this post below the supply list and cards stock cuts.  Also, if you like my work, why not subscribe to my blog via email.  All you have to do is click on “follow” in the sidebar.

If you find inspiration from this blog, one way you can show your support is by selecting me as your personal Stampin’ Up! Demonstrator.  One great thing about being a demonstrator is getting to preview some of the new products before they are available to the general public!  But don’t worry, you will be able to purchase the Blended Bloom and Work of Art stamp sets from Stampin’ Up! in just a few short weeks.  In the meantime, if you need any stamping supplies you can shop now in my online store!  I’ve received the new annual catalogs from Stampin’ Up! and I will be mailing out complimentary copies to all my customers who place an order of $25 or more during the month of May!  Feel free to drop me an email if you have any questions.  I’m here to help!

Happy Stamping!

Heather

  • Visit my online store here.
  • Shop the Clearance Rack here.

WEEKLY DEALS for May 6-12

weekly deals 5-6

Click here to see the Weekly Deals from Stampin’ Up! in my online store.  The Weekly Deals are only while supplies last and only available at these great prices through May 12.


Stampin’ Up! items used to create today’s project:

If you would like to order any of the products featured in today’s project, click the images below to order from my online store.


Card Stock Cuts

Card Base: Blackberry Bliss – 5-1/2″ x 8-1/2″

Panels: Hello Honey DSP – 4″ x 5-1/4″ panel; Very Vanilla – 4″ x 5-1/4″ panel (inside of card)

Sentiment & Die Cuts:  Very Vanilla – (banner for sentiment) – approximately 1-1/4″ x 2-1/2″


Thinking of You with Serene Silhouettes – Stampin’ Up!

Today’s card is an elegant floral card featuring the Serene Silhouettes and Four You stamp sets from Stampin’ Up!  The name of this stamp set has us focus on the beautiful silhouette of the designs, but today I wanted to show you how this stamp set can be used with color to create lovely flowers that are so quick and easy!

Serene Silhouettes & Four You (5 of 7)

I love the versatility of this stamp set!  I would appreciate hearing what you think about it too.  What is your favorite way to use the Serene Silhouettes stamp set?  I love reading all of your comments and connecting with you as we create together.  Also, if you are a fan of my work, why not have my posts delivered to your inbox automatically.  Just click on the “follow” button in the sidebar.

Serene Silhouettes & Four You (2 of 7)

I started my card today with a Crumb Cake card base.  Then I inked around the edges of a panel of Polka Dot Pink Pirouette DSP from the subtles paper stack using Crumb Cake ink. I adhered the panel to the front of my card using Multipurpose Liquid Glue.

Serene Silhouettes & Four You (3 of 7)

Next, I colored the floral stamp from Serene Silhouettes using my Stampin’ Write Markers.  I colored all of the grass with Crumb Cake, and I colored the blooms with Blushing Bride.  Then I used the “Thumping” technique to add some extra interest to my image before stamping it.  I used Soft Suede on the grass and Strawberry Slush on the flowers to provide some extra depth and shading to my art piece.  This video tutorial will show you just how easy it is to create beautiful images using the Thumping technique.

Once my focal point was finished, I matted it with Crumb Cake card stock and adhered it to the front of the card using Stampin’ Dimensionals.  For my sentiment, I chose the “Thinking of You” greeting from the Four You stamp set.  I stamped it on a scrap of Very Vanilla card stock using Crumb Cake Ink and then used my hexagon punch to create a banner.  I inked around the edges of the sentiment using my sponge dauber and Crumb Cake ink.  Next, I adhered the greeting to the stamped floral panel using Stampin’ Dimensionals.  Finally, for a finishing touch, I added three medium pearls to the top right corner of my art piece.

Serene Silhouettes & Four You (1 of 7)

To finish off the inside of my card, I stamped the floral image from Serene Silhouettes on a panel of Very Vanilla card stock; using the same technique as I did on the front.

Serene Silhouettes & Four You (7 of 7)

I am very happy with how this card turned out.  I can’t wait to try the thumping technique with other stamp sets!  This card would be a great design for many occasions.  Simply by changing the greeting, you could use this card for nearly anything.  I hope you have enjoyed my creation today.  If you have, save it for later by pinning it to Pinterest.  If you scroll to the bottom of this post, you will find a complete list of supplies used to make today’s project, including the dimensions for the card stock cuts. Below the supply list, you will find a “pin it” button.  I would appreciate your help in spreading the word about my work.

If you find inspiration from this blog, one way you can show your support is by selecting me as your personal Stampin’ Up! Demonstrator.  If you are interested in purchasing the Serene Silhouettes or Four You stamp sets from Stampin’ Up! you can shop now in my online store!

If you need any stamping supplies or have any questions, I would love to help you out.  Just click on Order Stampin’ Up! Online Now in the main menu or in the sidebar to go directly to my online store.  Feel free to drop me an email if you have any questions.  I’m here to help!

Happy Stamping!

Heather

  • Visit my online store here.
  • Shop the Clearance Rack here.

WEEKLY DEALS for April 29 – May 5

 Weekly Deals

Click here to see the Weekly Deals from Stampin’ Up! in my online store.  The Weekly Deals are only while supplies last and only available at these great prices through May 5.


Stampin’ Up! items used to create today’s project:

If you would like to order any of the products featured in today’s project, click the images below to order from my online store.

Card Stock Cuts

Card Base:  Crumb Cake – 5-1/2″ x 8-1/2″

Panels:  Pink Pirouette DSP (Subtles Paper Stack) – 4″ x 5-1/4″ panel; Crumb Cake – 3-1/4″ x 4-1/2″ panel; Very Vanilla – 3-1/8″ x 4-3/8″ panel, 4″ x 5-1/4″ panel (inside of card)

Sentiment/Die Cuts: Very Vanilla – banner for greeting


Mosaic Madness… Hello Card – Stampin’ Up!

Sometimes when life gets busy you just need a super quick card!  Today’s project fits that bill just perfectly with two versions of an everyday card to say “Hello” featuring the Mosaic Madness and Four  You stamp sets from Stampin’ Up!

Mosaic Madness (1 of 11)

If you enjoy reading my posts I would love to hear from you.  It is so uplifting to connect with all of you and hear your thoughts and creative suggestions.  If you are a fan, why not have my posts delivered to your inbox automatically.  Just click on the “follow” button in the sidebar.

Mosaic Madness (7 of 11)

I started my card today with a Whisper White card base, which I dry embossed using the Modern Mosaic Textured Impresssions Embossing Folder.  Next, I added a strip of Gumball Green designer series paper from the Birthday Basics Pack.  That set has so many cute patterns in it!  If you don’t have it in your collection, you should grab some before it is gone.  The Birthday Basics set is one that is available only while supplies last through June 4th.

Mosaic Madness (2 of 11)

Next, I stamped one of the designs from the Mosaic Madness stamp set onto Whisper White card stock using my Pistachio Pudding Classic Stampin’ Pad.  I punched out the stamped images using the Mosaic Punch.  (The Mosaic Madness stamp set and Mosaic Punch are available as a bundle for a 15% discount through June 4th.)  Then I adhered the punched pieces to the front of my card using Stampin’ Dimensionals.

Mosaic Madness (8 of 11)

For my sentiment, I chose the “Hello” greeting from the Four You stamp set.  I stamped it on Whisper White card stock using Versamark Ink and then heat embossed it with Black Stampin’ Emboss Powder and my Heat Tool.  I punched out my sentiment using the Decorative Label Punch.  Then I created a partial mat for my greeting by punching the same shape in Gumball Green DSP.  I cut the green punch in half lengthwise, and then cut out the pointed part on the sides (click here to see a visual).

Mosaic Madness (3 of 11)

To finish off the inside of my card, I stamped one of the border stamps from Mosaic Madness in Pistachio Pudding ink along the top and bottom of the inside of my card.

Mosaic Madness (4 of 11)

Mosaic Madness (6 of 11)

I love how quick and easy these cards are to create!  I hope you will try it out when you are in need of a fast solution.  A great way to store all your ideas for creative inspiration is to pin them to Pinterest.  If you scroll to the bottom of this post, you will find a complete list of supplies used to make today’s project, including the dimensions for the card stock cuts.  Below the supply list, you will find a “pin it” button.  I would appreciate your help in spreading the word about my work.

If you find inspiration from this blog, one way you can show your support is by selecting me as your personal Stampin’ Up! Demonstrator.  If you are interested in purchasing the Mosaic Madness or Four You stamp sets from Stampin’ Up! you can shop now in my online store!

If you need any stamping supplies or have any questions, I would love to help you out.  Just click on Order Stampin’ Up! Online Now in the main menu or in the sidebar to go directly to my online store.  Feel free to drop me an email if you have any questions.  I’m here to help!

Happy Stamping!

Heather

  • Visit my online store here.
  • Shop the Clearance Rack here.

WEEKLY DEALS for April 29 – May 5

 Weekly Deals

Click here to see the Weekly Deals from Stampin’ Up! in my online store.  The Weekly Deals are only while supplies last and only available at these great prices through May 5.


Stampin’ Up! items used to create today’s project:

If you would like to order any of the products featured in today’s project, click the images below to order from my online store.


Card Stock Cuts

Card Base:  Whisper White – 4-1/4″ x 11″

Panels:  Birthday Basics DSP (Gumball Green) – 1″ x 5-1/2″ strip OR 1″ x 4-1/4″ strip depending on which layout you choose.

Sentiment/Die Cuts: Very Vanilla – four mosaic punches, one decorative label punch; Birthday Basics DSP (Gumball Green) – one decorative label punch.


Sweet Sorbet Stamp-a-Stack – Stampin’ Up!

On Sunday, I shared an elegant Stamp-a-Stack featuring the Serene Silhouettes stamp set from Stampin’ Up! Today’s project is another set of cards; this one featuring the Sweet Sorbet Designer Series Paper from Sale-a-Bration.  When you sign up for my Stamp-a-Stack class on May 3rd from 7:00 – 9:00 p.m. you will get the opportunity to make both of these lovely card sets.  If you live in the Atlanta area and would be interested in attending my class, please contact me to sign up. The cost of the class is $15 and includes all consumable materials and use of my stamping supplies.  What’s even better is that I do all the prep work, so you can just come and enjoy the fun!  You can’t beat that!  I would love to connect with some of you face to face for an opportunity to truly create together!

Sweet Sorbet DSP (17 of 17)

If you like this project as much as I do, I would love to hear from you.  Please leave me a comment and I will enter you into my drawing.  During the month of April, I will be doing a drawing each Sunday.  One lucky winner will receive one of the featured products from Sale-a-bration.  So, if you missed out on the free items during the sale, now is your chance to win one!  Also, if you enjoy reading my posts, why not have them delivered to your inbox automatically.  Just click on the “follow” button in the sidebar.

Sweet Sorbet Birthday Card with Tag Topper Closure (Card #1)


Sweet Sorbet DSP (11 of 17)

Sweet Sorbet DSP (14 of 17)

Stampin’ Up! items used to create card #1:

Stamp Sets: Label Love (130622); Petal Parade (133602)

Dies, Punches, & Embossing Folders: Artisan Label Punch (1309210); Scalloped Tag Topper Punch (133324)

Card Stock & DSP:  Crumb Cake (120953) – 5-1/2″ x 8-1/2″ card base; Crisp Canteloupe DSP (from Sweet Sorbet Pack – Sale-a-Bration) – 2-1/4″ x 5-1/4″ panel; Floral Sweet Sorbet DSP (Sale-a-Bration) – 2″ x 5″ panel; Whisper White (100730) – 4″ x 5-1/4″ panel (inside of card), one artisan label punch; Pool Party (122924) – one artisan label punch

Markers & Ink:  Pool Party Classic Stampin’ Pad (126982); Crisp Canteloupe Classic Stampin’ Pad (131176); Pistachio Pudding Classic Stampin’ Pad (131177)

Embellishments: Pool Party twine (Sale-a-bration)

Tools:  N/A

Adhesive: Stampin’ Dimensionals (104430); SNAIL Adhesive (104332)

Sweet Sorbet Thank You Card (Card #2)

Sweet Sorbet DSP (10 of 17)

Sweet Sorbet DSP (8 of 17)

Stampin’ Up! items used to create card #2:

Stamp Sets: Label Love (130622); Petal Parade (133602); A Round Array (129090)

Dies, Punches, & Embossing Folders: Artisan Label Punch (1309210); 7/8″ Scalloped Circle Punch (129404)

Card Stock & DSP:  Crumb Cake (120953) – 4-1/4″ x 11″ card base; Crisp Canteloupe DSP (from Sweet Sorbet Pack – Sale-a-Bration) – 4-1/4″ x 3″ panel; Floral Sweet Sorbet DSP (Sale-a-Bration) – 4-1/4″ x 2-3/4″ panel; Whisper White (100730) – 4″ x 5-1/4″ panel (inside of card), one artisan label punch, one scalloped circle punch

Markers & Ink:  Pool Party Classic Stampin’ Pad (126982); Crisp Canteloupe Classic Stampin’ Pad (131176); Pistachio Pudding Classic Stampin’ Pad (131177)

Embellishments: Crisp Canteloupe Stretch Ruffle Trim (130021)

Tools:  N/A

Adhesive: Stampin’ Dimensionals (104430); SNAIL Adhesive (104332)

Sweet Sorbet For You (Card #3)

Sweet Sorbet DSP (5 of 17)

Stampin’ Up! items used to create card #3:

Stamp Sets: Label Love (130622); Petal Parade (133602); A Round Array (129090)

Dies, Punches, & Embossing Folders: Artisan Label Punch (1309210); 7/8″ Scalloped Circle Punch (129404)

Card Stock & DSP:  Crumb Cake (120953) – 5-1/2″ x 8-1/2″ card base; Crisp Canteloupe DSP (from Sweet Sorbet Pack – Sale-a-Bration) – 5-1/2″ x 2″ panel; Floral Sweet Sorbet DSP (Sale-a-Bration) – 5-1/2″ x 1-3/4″ panel; Whisper White (100730) – 4″ x 5-1/4″ panel (inside of card), one artisan label punch, one scalloped circle punch

Markers & Ink:  Pool Party Classic Stampin’ Pad (126982); Crisp Canteloupe Classic Stampin’ Pad (131176); Pistachio Pudding Classic Stampin’ Pad (131177)

Embellishments: Crisp Canteloupe Stretch Ruffle Trim (130021)

Tools:  N/A

Adhesive: Stampin’ Dimensionals (104430); SNAIL Adhesive (104332)

Sweet Sorbet & Label Love Just for You (Card #4)

Sweet Sorbet DSP (4 of 17)

Stampin’ Up! items used to create card #4:

Stamp Sets: Label Love (130622); Petal Parade (133602)

Dies, Punches, & Embossing Folders: Artisan Label Punch (1309210)

Card Stock & DSP:  Crumb Cake (120953) – 5-1/2″ x 8-1/2″ card base; Crisp Canteloupe DSP (from Sweet Sorbet Pack – Sale-a-Bration) – 5-1/4″ x 4″ panel; Floral Sweet Sorbet DSP (Sale-a-Bration) – 5″ x 3-3/4″ panel; Whisper White (100730) – 4″ x 5-1/4″ panel (inside of card), one artisan label punch

Markers & Ink:  Pool Party Classic Stampin’ Pad (126982); Crisp Canteloupe Classic Stampin’ Pad (131176); Pistachio Pudding Classic Stampin’ Pad (131177)

Embellishments: Crisp Canteloupe Stretch Ruffle Trim (130021)

Tools:  N/A

Adhesive: Stampin’ Dimensionals (104430); SNAIL Adhesive (104332)

If you enjoyed my post today, please pin it to Pinterest for me.  You will find a “pin it” button at the very bottom of the post.  Also, don’t forget to leave me a comment for your chance to win a free stamp set from Sale-a-bration!  And, most importantly, sign up for my Stamp-a-Stack class on May 3rd where we will make both of these beautiful card sets!  Space is limited, so be sure to reserve your spot today!

serene silhouettes (28 of 28)

Sweet Sorbet DSP (17 of 17)

____________________________________________________________

WEEKLY DEALS for April 8 – 14

 Screen Shot 2014-04-08 at 6.44.39 AM

Click here to see the Weekly Deals from Stampin’ Up! in my online store.  The Weekly Deals are only while supplies last and only available at these great prices through April 14.

______________________________________________________________________________________

If you need any stamping supplies, I’d be very happy to be your Demonstrator.  Just click on Order Stampin’ Up! Online Now in the main menu or in the sidebar to go directly to my online store or drop me an email if you have any questions.

Happy Stamping!

Heather

  • Visit my online store here.
  • Shop the Clearance Rack here.


Serene Silhouettes Stamp-a-Stack – Stampin’ Up!

On Friday, I shared an elegant card featuring the Serene Silhouettes stamp set (wood mount and clear mount) from Stampin’ Up!  I liked the card so much, that I decided to create a stamp-a-stack collection around it.  If you live in the Atlanta area and would be interested in making this gorgeous card set , please contact me to sign up for my Stamp-a-Stack class on Saturday, May 3rd from 7:00-9:00 p.m.  We will create this set and another one (I’ll post about that one soon).  The cost of the class is $15 and includes all consumable materials, use of my stamping supplies, and I will do all the prep work… you can’t beat that!  I would love to connect with some of you face to face for an opportunity to truly create together!

serene silhouettes (28 of 28)

If you like this project as much as I do, I would love to hear from you.  Please leave me a comment and I will enter you into my drawing.  During the month of April, I will be doing a drawing each Sunday.  One lucky winner will receive one of the featured products from Sale-a-bration.  So, if you missed out on the free items during the sale, now is your chance to win one!  Also, if you enjoy reading my posts, why not have them delivered to your inbox automatically.  Just click on the “follow” button in the sidebar.

All of the cards in this set were inspired by the Splitcoast Stampers CAS266 card challenge, which was to create a clean and simple card using three of the following colors:

I maintained the same design elements for all four cards of this set.  For details about the techniques used in this project, please click here.  Below, you will find card recipes for the specific supplies and dimensions for each card.

Serene Silhouettes Birthday Wishes (Card #1)

Serene Silhouettes (12 of 14)

Card #1 was inspired by three different challenges:  Retro Sketches #108, Splitcoast Stampers CAS266, and The Card Concept #7.

Challenge Images

Stampin’ Up! items used to create card #1:

Stamp Sets: Four You (130538); Serene Silhouettes (127324); Papillon Potpourri (123759)

Dies, Punches, & Embossing Folders: Beautifully Baroque Textured Impressions Embossing Folder (130917); Fancy Fan TIEF (127751); Bitty Butterfly Punch (129406); Hexagon Punch (130919); Scallop Trim Border Punch (118402)

Card Stock & DSP:  Whisper White (100730) – 4-1/4″ x 11″ card base; 2″ x 3-3/4″ panel; Marina Mist (119682) – 1-1/4″ x 4-1/2″ (2 panels); Soft Sky (131203) – 1-1/8″ x 4-3/8″ (2 panels), one butterfly punch; Smoky Slate (131202) – Banner for sentiment.

Markers & Ink:  Soft Sky Classic Stampin’ Pad (131181); Marina Mist Classic Stampin’ Pad (126962); Night of Navy Classic Stampin’ Pad (126970); Versamark Ink (102283)

Embellishments: White Stampin’ Emboss Powder (109132); Basic Pearls Jewel Accents (119247)

Tools:  sponge daubers (102892); Big Shot (113439); Heat Emboss Tool (129053); Embossing Buddy (103083)

Adhesive: Stampin’ Dimensionals (104430); Glue Dots (103683); Multipurpose liquid glue (110755)

Morning Meadow… “Hello” (Card #2)

serene silhouettes (16 of 28)

serene silhouettes (14 of 28)

I used Freshly Made Sketches Challenge #130 for my inspiration for card #2 of my stamp-a-stack set.  This set was created using the Morning Meadow stamp set (wood mount and clear mount) which is available as one the hostess rewards from Stampin’ Up!

Stampin’ Up! items used to create card #2:

Stamp Sets: Morning Meadow (129678); Perfect Pennants (133230)

Dies, Punches, & Embossing Folders: Fancy Fan Textured Impressions Embossing Folder (127751); Pansy Punch (130698)

Card Stock & DSP:  Whisper White (100730) – 5-1/2″ x 8-1/2″ card base; 3-1/8″ x 2-13/16″ panel (mat for stamped image), 3″ x 2-3/4″ panel (for stamped image), one pansy punch; Marina Mist (119682) – 5-1/4″ x 4″ panel; Soft Sky (131203) – 3-7/8″ x 5-1/8″ panel; Marina Mist Designer Series Paper (130135) – 3-1/2″ x 3″; Smoky Slate (131202) – Banner for sentiment.

Markers & Ink:  Soft Sky Classic Stampin’ Pad (131181); Marina Mist Classic Stampin’ Pad (126962); Night of Navy Classic Stampin’ Pad (126970); Versamark Ink (102283)

Embellishments: White Stampin’ Emboss Powder (109132); Basic Pearls Jewel Accents (119247)

Tools:  sponge daubers (102892); Big Shot (113439); Heat Emboss Tool (129053); Embossing Buddy (103083)

Adhesive: Stampin’ Dimensionals (104430); Glue Dots (103683); Multipurpose liquid glue (110755)

Serene Silhouettes Just for You (Card #3)

serene silhouettes (9 of 28)

serene silhouettes (5 of 28)

Mojo Monday sketch challenge 339, provided the inspiration for card #3.  I like the variety provided by the tall and skinny design.  This card was created using the Serene Silhouettes stamp set (wood mount and clear mount), and A Round Array for the sentiment (wood mount and clear mount).

Stampin’ Up! items used to create card #3:

Stamp Sets: Serene Silhouettes (127324); A Round Array (129090)

Dies, Punches, & Embossing Folders: Beautifully Baroque Textured Impressions Embossing Folder (130917); Fancy Fan TIEF (127751); Ovals Collection Framelits Dies (129381); 7/8″ Scallop Circle Punch (129404); 1″ circle punch (119868)

Card Stock & DSP:  Whisper White (100730) – 3-1/2″ x 11″ card base; Oval framelits die cut (for stamped image), one 7-8″ scalloped circle punch; Marina Mist (119682) – 1-1/4″ x 4″ (2 panels), 3-1/4″ x 2-1/4″ panel; Soft Sky (131203) – 1-1/8″ x 3-7/8″ (2 panels); Soft Sky Designer Series Paper (130135) – 3-1/8″ x 2-1/8″; Smoky Slate (131202) – 1″ circle punch.

Markers & Ink:  Soft Sky Classic Stampin’ Pad (131181); Marina Mist Classic Stampin’ Pad (126962); Night of Navy Classic Stampin’ Pad (126970); Versamark Ink (102283)

Embellishments: White Stampin’ Emboss Powder (109132); Basic Pearls Jewel Accents (119247)

Tools:  sponge daubers (102892); Big Shot (113439); Heat Emboss Tool (129053); Embossing Buddy (103083)

Adhesive: Stampin’ Dimensionals (104430); Multipurpose liquid glue (110755)

Serene Silhouettes Thank You (Card #4)

serene silhouettes (17 of 28)

serene silhouettes (24 of 28)

The Paper Craft Crew, sketch challenge #87, provided the inspiration for card #4.  I like the variety provided by the tall and skinny design.  This card was created using the Serene Silhouettes stamp set (wood mount and clear mount), Petite Petals (wood mount and clear mount) and Teeny Tiny Wishes for the sentiment (wood mount and clear mount).

Stampin’ Up! items used to create card #4:

Stamp Sets: Serene Silhouettes (127324); Teeny Tiny Wishes (127802); Petite Petals (133155)

Dies, Punches, & Embossing Folders: Beautifully Baroque Textured Impressions Embossing Folder (130917); Fancy Fan TIEF (127751); Ovals Collection Framelits Dies (129381); Hexagon Punch (130919); Banner Punch (133519); Modern Label Punch (119849); Word Window Punch (119857); Petite Petals Punch (133322)

Card Stock & DSP:  Whisper White (100730) – 5-1/2 x 8-1/2″ card base; 1-1/8″ x 4-1/2″ (banner), one word window punch, 4 petite petals punches, Oval framelits die cut (for stamped image); Marina Mist (119682) – 4″ x 5-1/4″ panel; Soft Sky (131203) – 3-7/8″ x 5-1/8″ panel; Marina Mist Designer Series Paper (130135) – 1-1/2″ x 4-3/4″ (banner); Smoky Slate (131202) – one modern label punch.

Markers & Ink:  Soft Sky Classic Stampin’ Pad (131181); Marina Mist Classic Stampin’ Pad (126962); Night of Navy Classic Stampin’ Pad (126970); Versamark Ink (102283)

Embellishments: White Stampin’ Emboss Powder (109132); Basic Pearls Jewel Accents (119247)

Tools:  sponge daubers (102892); Big Shot (113439); Heat Emboss Tool (129053); Embossing Buddy (103083)

Adhesive: Stampin’ Dimensionals (104430); Multipurpose liquid glue (110755)

If you enjoyed my post today, please pin it to Pinterest for me.  You will find a “pin it” button at the very bottom of the post.  Also, don’t forget to leave me a comment for your chance to win a free stamp set from Sale-a-bration!

____________________________________________________________

WEEKLY DEALS from Stampin’ Up! April 1-7

Click here to see the Weekly Deals from Stampin’ Up! in my online store.  The Weekly Deals are only while supplies last and only available at these great prices through April 7.

Screen Shot 2014-04-01 at 9.41.23 PM

________________________________________________________________________________________

If you need any stamping supplies, I’d be very happy to be your Demonstrator.  Just click on Order Stampin’ Up! Online Now in the main menu or in the sidebar to go directly to my online store or drop me an email if you have any questions.

Happy Stamping!

Heather

  • Visit my online store here.
  • Shop the Clearance Rack here.


From My Heart Friendship Card – Stampin’ Up!

Before I get to today’s card, I have to say “thank you” to my Stampin’ Up! upline, Amy Koenders (Stamp with Amy K).  Amy introduced many of you to my blog Friday, and I am so grateful for her support.  Amy, you are fabulous and your cards are too!

Now, onto today’s card, which was created using the From my Heart stamp set from Stampin’ Up! (wood mount and clear mount).  I just love the teapot image in this set.  It is so cute and different from my normal floral/nature themed cards.  It seemed the perfect choice to go with SCS color challenge 470 this week.

Friday was such an exciting blogging day for me.  I loved seeing so much blog traffic and so many new subscribers!  You have no idea how excited I get seeing the reach of my posts.  That’s where the nerdy math teacher in me comes through! LOL.  Anyway, if you like my post today, I would appreciate hearing from you.  At the end of the month, I will do a drawing and one lucky person who left me a comment will receive a free card in the mail!  If you aren’t already a subscriber, please consider following me via email.   Just click on the “follow” button in the sidebar.

From My Heart (1 of 7)

Today’s card was inspired by The Mojo Monday 337 sketch challenge & Splitcoast Stampers Color Challenge #470:

I began my card with a  Baked Brown Sugar card base.  Then I added panels of Night of Navy (my substitution for the color challenge), Cherry Cobbler DSP, Whisper White, and Night of Navy DSP (Regals DSP Stack) using SNAIL adhesive.

From My Heart (3 of 7)

Next, I colored my friendship stamp from the From my Heart stamp set using my Stampin’ Write Markers in Night of Navy, Cherry Cobbler, Wild Wasabi, & Baked Brown Sugar (In Color Markers, Subtles Collection Markers, and Regals Collection Markers).  I stamped the image on Whisper White and used my Baked Brown Sugar ink pad and a sponge dauber to ink around the edges of the panel.  Then I colored the teapot and tray again and stamped them on a scrap of Whisper White,  I cut that out using paper snips and added it to my greeting with Stampin’ Dimensionals for some added depth. I followed the same procedure, stamping the friendship banner in Night of Navy on Baked Brown Sugar card stock.  The finished greeting was layered onto a square of Cherry Cobbler card stock, which I inked with my Night of Navy Classic Stampin’ Pad.

From My Heart (2 of 7)

Finally, I stamped two flowers from the Petite Petals stamp set (wood mount and clear mount) using Night of Navy ink.  I colored my flowers using my Cherry Cobbler Classic Stampin’ Pad and my Blender Pens I punched out the flowers using the Petite Petals Punch and added Basic Rhinestones Jewel Accents to the center.  Then I added them to the front of the card using Stampin’ Dimensionals.  (Remember, the Petite Petals stamp set and punch are available as a bundle for a 15% discount, wood mount and clear mount.)

From My Heart (7 of 7)

For the finishing touches on the inside of my card I layered strips of Cherry Cobbler DSP and Night of Navy card stock and added them to the bottom of the card.

This card is not my normal kind of color scheme, but I really like the finished product.  That’s the great thing about challenges, they put you outside your comfort zone.  If you liked this card, please don’t forget to leave me a comment so you will be entered into my drawing.  Also, if you liked my post today, please pin it to Pinterest for me.  I am new to blogging and I would love your help in developing a blog following.  If you scroll to the bottom of the post, you will find a “pin it” button just below my supply list for the project.

If you would like to purchase the From my Heart  stamp set, or any of the other great products featured in this project, shop in my online store by clicking here.  Remember you can earn a FREE item with every $50 purchase through March 31st.  The final days of Sale-a-bration are fast approaching.  Don’t miss your chance to get these great products before they are gone!

You can find a complete list of supplies used for this project at the very bottom of this post.

____________________________________________________________

Weekly Deals from Stampin’ Up! March 18-24

Here are the new Weekly Deals from Stampin’ Up!:

Screen Shot 2014-03-19 at 9.55.26 PM

Click here to see the Weekly Deals from Stampin’ Up! in my online store.  The Weekly Deals are only while supplies last and only available at these great prices through March 24.

________________________________________________________________________________________

If you need any stamping supplies, I’d be very happy to be your Demonstrator.  Just click on Order Stampin’ Up! Online Now in the main menu or in the sidebar to go directly to my online store or drop me an email if you have any questions.

Happy Stamping!

Heather

  • It’s Sale-a-bration time!!  You’ll get a free item from Stampin’ Up! for every $50 that you purchase between now and March 31!  Click on my Stampin’ Up! Promotions page for more information!
  • Visit my online store here.
  • Shop the Clearance Rack here.

____________________________________________________________

Stampin’ Up! items used to create this project:

Stamp Sets: Simply Sketched (Hostess Reward – 129672)

Dies, Punches, & Embossing Folders: N/A

Card Stock & DSP:  Baked Brown Sugar (131296) – 5-1/2″ x 8-1/2″ card base, one stamped banner; Night of Navy (100867) – 5-1/2″ x 1-1/8″ strip, 4-” x 1-1/8″ strip (inside card); Cherry Cobbler DSP (130139) – 5-1/2″ x 1″ strip, 4″ x 1″ strip for inside of card; Whisper White (100730) – 2-7/8″ x 4-5/8″ panel, 2-1/2″ x 2-1/2″ square,  5-1/4″ x 4″ panel (inside of card); Night of Navy DSP (130139) – 2-3/4″ x 4-1/2″ panel.

Markers & Ink:  Baked Brown Sugar Classic Stampin’ Pad (131174); Night of Navy Classic Stampin’ Pad (126970); Cherry Cobbler Classic Stampin’ Pad (126966); Blender Pens (102845); In Color 2013-2015 Stampin’ Write Markers (131260); Regals Collection Stampin’ Write Markers (131262); Subtles Collection Stampin’ Write Markers (131263)

Embellishments: Basic Rhinestone Jewel Accents (119246)

Tools:  sponge daubers (102892)

Adhesive: SNAIL (104332); Stampin’ Dimensionals (104430)

Simply Sketched, You Make Me Happy! – Stampin’ Up!

Today’s card features the Simply Sketched (wood mount and clear mount), Papillon Potpouri (wood mount and clear mount) and Perfect Pennants (wood mount and clear mount) stamp sets from Stampin’ Up!  The Simply Sketched stamp set is one of the lovely hostess items you can earn through the Stampin’ Rewards program.  I am in love with the flower in this set! This is the second card I’ve created with it this week.  I think you can see by the different colors I used how versatile that little flower can be.  (There’s a cute little bird in that set too.  I haven’t used that one yet, but I expect you will be seeing it here soon.)

If you like what I’ve created today, I would love it if you would leave me a comment.  On March 31st I will do a drawing and one lucky person who left me a comment will receive a handcrafted card in the mail!  Also, if you enjoy reading my posts, why not have them delivered to your inbox automatically.  Just click on the “follow” button in the sidebar.  I get super excited every time that I see someone else is following my blog.  It just makes my day to know you are following along with me as I create these posts!

Simply Sketched Perfect Pennants (5 of 6)

Today’s card was inspired by:

I began my card with a  Whisper White card base.  Then I added a panel of Tempting Turquoise card stock using SNAIL adhesive.  Next, I dry embossed a panel of Island Indigo card stock using the Lacy Brocade embossing folder and added that to the front of my card.  For my focal point, I layered panels of Tempting Turquoise and Daffodil Delight as the base for my three dimensional elements.

Simply Sketched Perfect Pennants (3 of 6)

Next, I used Staz-on Black ink and my Stamp-a-ma-jig to stamp the flower and leaf elements from the Simply Sketched stamp set onto a square of  watercolor paper. I also stamped an additional flower and leaf on another scrap of watercolor paper to add some dimension later.  I colored my stamped images using the Brights Collection Stampin’ Write Markers (Tempting Turquoise, Real Red, Pumpkin Pie, & Daffodil Delight) and a Blender Pen to give it a watercolor effect.  I cut out the extra flower and leaves using paper snips.  Then, I  attached the leaves to the foreground of my square with mini glue dots and used Stampin’ Dimensionals to add my flower on top of the one on the square of watercolor paper for some extra depth.  Then I stamped the butterfly from the Papillon Potpourri stamp set onto some Whisper White card stock using Staz-on Black and colored it with my markers.  Then I cut it out using the Bitty Butterflies Punch.  I added a Basic Rhinestones Jewel Accent to the butterfly and added it to my square using Stampin Dimensionals.  I adhered my watercolored panel to a square of Whisper White and added the finished piece to the front of the card using Stampin’ Dimensionals.

Simply Sketched Perfect Pennants (1 of 6)

Then I stamped the “You Make Me Happy” greeting from the Perfect Pennants stamp set on Whisper White card stock using my Tempting Turquoise Classic Stampin’ Pad.  I cut that out using the Banners Framelits Dies (2nd from the center).  I also cut a banners in Tempting Turquoise and Island Indigo (3rd from the center). (Remember, the Perfect Pennants stamp set and the Banners Framelits can be purchased as a bundle for 15% off, wood mount and clear mount.)  I layered my greeting onto the Island Indigo banner and trimmed it down. Then I repeated the process with the Tempting Turquoise banner.  Finally, I finished my design off with a button from the Designer Subtles Collection and some bakers twine from the Sweet Sorbet Accessory Pack (Sale-a-bration item).

Simply Sketched Perfect Pennants (4 of 6)

For my finishing touch, I stamped the leaves from Simply Sketched and the butterfly from Papillon Potpouri on the inside of my card and colored them to match the front of the card.

I love how my watercolored square turned out.  The colors just pop off the page, and the dimension added by the 3-D elements make it all really jump out at you.  If you liked my post today, please pin it to Pinterest for me.  I am new to blogging and I would love your help in developing a blog following.  If you scroll to the bottom of the post, you will find a “pin it” button just below my supply list for the project… and, don’t forget to leave me a comment for your chance to win a handcrafted card!

If you would like to purchase the earn the Simply Sketched stamp set as a hostess reward, I hope you will consider contacting me.  Of course, you can always shop in my online store for any of the great products featured in this project by clicking here.  Remember you can earn the Sweet Sorbet Accessory Pack for FREE (Sale-a-bration items) with a $50 purchase.

You can find a complete list of supplies used for this project at the very bottom of this post.

____________________________________________________________

Weekly Deals from Stampin’ Up! March 11 – 17

Here are the new Weekly Deals from Stampin’ Up!:Click here to see the Weekly Deals from Stampin’ Up! in my online store.  The Weekly Deals are only while supplies last and only available at these great prices through February 17.

Screen Shot 2014-03-12 at 8.34.27 PM

Click here to see the Weekly Deals from Stampin’ Up! in my online store.  The Weekly Deals are only while supplies last and only available at these great prices through March 17.

________________________________________________________________________________________

If you need any stamping supplies, I’d be very happy to be your Demonstrator.  Just click on Order Stampin’ Up! Online Now in the main menu or in the sidebar to go directly to my online store or drop me an email if you have any questions.

Happy Stamping!

Heather

  • It’s Sale-a-bration time!!  You’ll get a free item from Stampin’ Up! for every $50 that you purchase between now and March 31!  Click on my Stampin’ Up! Promotions page for more information!
  • Visit my online store here.
  • Shop the Clearance Rack here.

____________________________________________________________

Stampin’ Up! items used to create this project:

Stamp Sets: Simply Sketched (Hostess Reward – 129672); Perfect Pennants (133230); Papillon Potpourri (123759)

Dies, Punches, & Embossing Folders: Banners Collection Framelits (132173); Lacy Brocade Textured Impressions Embossing Folder (127819); Bitty Butterfly Punch (129406)

Card Stock & DSP:  Whisper White (100730) – 4-1/4″ x 11″ card base, 2″ x 2″ panel, one banner; Tempting Turquoise (102067) – 4″ x 5-1/4″ panel, 2-3/8″ x 3-5/8″ panel, one banner; Island Indigo (122923) – 3-7/8″ x 5-1/8″ panel, one banner; Daffodil Delight (119683) – 2-1/4″ x 3-1/2″ panel

Markers & Ink:  Tempting Turquoise Classic Stampin’ Pad (126952); Brights Collection Stampin’ Write Markers (131259), Staz-on Black (101406)

Embellishments: Basic Rhinestones Jewel Accents (119246); Buttons – Designer Subtles Collection (130030); Bakers Twine from the Sweet Sorbet Accessory Pack (Sale-a-bration item)

Tools:  Big Shot (113439); Stamp-a-ma-jig (101049)

Adhesive: SNAIL (104332); Stampin’ Dimensionals (104430); Mini Glue Dots (103683)

Simply Sketched Just for You! – Stampin’ Up!

Today’s card features the Simply Sketched stamp set from Stampin’ Up! (wood mount and clear mount).  This beautiful stamp set is one of our lovely hostess items available through the Stampin’ Rewards program.  I just love the way it turned out with the watercoloring!  I also love that this card was the perfect combination for four different challenges this week!  I find it invigorating to try to combine more than one challenge into one card, but four is a new record for me!  So, lots of props to the design teams who provided me with the necessary inspiration for today’s card:   Dynamic Duos #93, Mojo Monday sketch #336,  Splitcoast Stampers CAS #263, and SUO Challenges #92.  I have to say, I really enjoy participating in challenges.  I find that it makes me think creatively to figure out how I can meet the constraints presented by the design teams.  I highly recommend it to get those creative juices flowing!

Please leave me a comment to let me know what you think of my card today.  I really appreciate hearing your feedback.  It is so uplifting to know that someone admires your work.  Also, as an added benefit, on March 31st I will do a drawing and one lucky person who left me a comment will receive a handcrafted card in the mail!  Also, if you enjoy reading my posts, why not have them delivered to your inbox automatically.  Just click on the “follow” button in the sidebar.  I get super excited every time that I see someone else is following my blog.  It just makes my day to know you are following along with me as I create these posts!

Simply Sketched (6 of 12)

I began my card with a  Whisper White card base.  Then I added a panel of Sahara Sand paper from the Sweet Sorbet DSP pack (Sale-a-bration item) using SNAIL adhesive.  Next, I dry embossed a panel of Blushing Bride card stock using the decorative dots embossing folder (Sale-a-bration item).  I layered that panel onto a panel of Crumb Cake card stock and added them to the front of my card. I used the 4th largest Circles Collection Framelits Die (counting from the outside in toward the center) to cut a circle of Crumb Cake card stock to mat my floral focal point.  I used the next smallest circle die to trace a circle in pencil on Whisper White card stock, then I used my stamp-a-ma-jig to place the flower and leaf stamps where I wanted them in the circle using  Staz-on Black Ink.  I stamped another flower and leaf on a scrap of Whisper White to cut out for my three dimensional element.

Simply Sketched (5 of 12)

For my watercoloring, I pressed my Sahara Sand  and Blushing Bride Classic Stampin’ Pads onto a ceramic plate and used some water and a paintbrush to color in my stamped images.  Then I cut out my circle using paper snips because I wanted to have the leaves overlap the circumference of the circle.  I also cut out the extra leaf and flower stamps.  I attached the leaves with mini glue dots, and used Stampin’ Dimensionals to add my flower to the front of the card for some extra depth.

Simply Sketched (3 of 12)

Finally, I finished my card front with some pearls and the “Just for You” sentiment from the Teeny Tiny Wishes stamp set (wood mount and clear mount) in Staz-on Black.  I punched the greeting out using the word window punch and attached it with Stampin’ Dimensionals.  Because I wanted my sentiment to be small, I lined up the edge of the punch near the beginning of my greeting.  Then I attached it to a post-it note to serve as a handle and punched it again from the other side.  I just love how versatile Stampin’ Up! punches are.  With a little ingenuity you can really do so many different things with them.

Simply Sketched (10 of 12)

Of course, I couldn’t leave the inside of my card naked, so I stamped the images from the front on the inside and quickly colored them using the same watercoloring technique as before.  I think it makes such a difference when you add a little detail the the inside of the card.  It just seems to tie everything together and take your design to the next level.

I am very pleased with how this card turned out.  It was actually my first attempt at watercoloring on a card, and I think it turned out fabulously!  I hope that you agree.  If you liked my post today, please pin it to Pinterest for me.  I am new to blogging and I would love your help in developing a blog following.  If you scroll to the bottom of the post, you will find a “pin it” button just below my supply list for the project… and, don’t forget to leave me a comment for your chance to win a handcrafted card!

If you would like to earn the Simply Sketched stamp set as a hostess reward, I hope you will consider contacting me.  Of course, you can always shop in my online store by clicking here.  Remember you can earn the Sweet Sorbet Designer Series Paper or the Decorative Dots embossing folder for FREE (Sale-a-bration items) with a $50 purchase.

You can find a complete list of supplies used for this project at the very bottom of this post.

____________________________________________________________

Weekly Deals from Stampin’ Up! March 11 – 17

Here are the new Weekly Deals from Stampin’ Up!:Click here to see the Weekly Deals from Stampin’ Up! in my online store.  The Weekly Deals are only while supplies last and only available at these great prices through February 17.

Screen Shot 2014-03-12 at 8.34.27 PM

Click here to see the Weekly Deals from Stampin’ Up! in my online store.  The Weekly Deals are only while supplies last and only available at these great prices through March 17.

________________________________________________________________________________________

If you need any stamping supplies, I’d be very happy to be your Demonstrator.  Just click on Order Stampin’ Up! Online Now in the main menu or in the sidebar to go directly to my online store or drop me an email if you have any questions.

Happy Stamping!

Heather

  • It’s Sale-a-bration time!!  You’ll get a free item from Stampin’ Up! for every $50 that you purchase between now and March 31!  Click on my Stampin’ Up! Promotions page for more information!
  • Visit my online store here.
  • Shop the Clearance Rack here.

____________________________________________________________

Stampin’ Up! items used to create this project:

Stamp Sets: Simply Sketched (Hostess Reward – 129672); Teeny Tiny Wishes (127802)

Dies, Punches, & Embossing Folders: Circles Collection Framelits (130911); Decorative Dots Textured Impressions Embossing Folder (Sale-a-bration item); Word Window Punch (119857)

Card Stock & DSP:  Whisper White (100730) – 4-1/4″ x 11″ card base, one word window punch, one circle; Sahara Sand DSP from the Sweet Sorbet series (Sale-a-bration) – 4″ x 5-1/4″ panel; Crumb Cake (120953) – 4″ x 4-1/4″ panel, one circle (Circles framelits); Blushing Bride (131198) – 4″ x 4″ panel.

Markers & Ink:  Blushing Bride Classic Stampin’ Pad (131172); Sahara Sand Classic Stampin’ Pad (126976); Staz-on Jet Black (101406).

Embellishments: Basic Pearls Jewel Accents (119247)

Tools:  Big Shot (113439); Stamp-a-ma-jig (101049)

Adhesive: SNAIL (104332); Stampin’ Dimensionals (104430); Mini Glue Dots (103683)